
On to the tutorial. This weekend, Nick and I are going to a Clue themed party for his office, and the invite said to pick a character, and include some accessory in that characters color in your outfit. I chose Miss Scarlett, because red is easy, right? WRONG. I could not find a red dress that A) I liked, B) fit me, and C) was in my budget. It had to be all 3, and yet, sadly, nothing. I wound up with a really cute black dress that A) I loved, B) fit me, and C) was in my budget. Yay!
That left me needing red accessories, though. I decided I'd make something for my hair. I had no idea what, but when I sat down to make it, it just came together and I fell in love with it! Here's a few pictures of the item, which I think totally rocks.


Isn't it lovely? I think it'll be a hit at the party- at least I hope so! I love it, and wish I could wear it every day.
So, when I was making it, I just sort of tossed it together, no rhyme or reason, just the desire to make something pretty. However, I did re-make it today, and decided to offer it up as a tutorial to my sadly neglected blog. So, here we go!
You'll Need:
- 2 Rose Heads- both times, I used 2 different colored roses, all of them found at dollar stores on bushes. You want roses that look open already, not the ones that are all closed up.
- Tulle in a coordinating or contrasting color- I used glitter tulle on my red/black one, and love the little added sparkle.
- 1 headband- I recommend skinny. I picked up a 3 pack of satin headbands at Dollar Tree.
- Gem center- this isn't really completely necessary, but the center of the rose will look bare without it. Again, these were from Dollar Tree in a packet I picked up last fall.
- Felt- DT has this as well. I recommend a color that will blend in- it won't be visible, but as a 'just in case' kind of moment.
- Feathers- this is the only thing I had to get at the craft store FOR this project. I didn't have any on hand in red. I recommend soft, silky feathers. They are fantastic to work with, and are still usually inexpensive.
- Glue Gun
- Scissors
Now, let's get started!
- Take the roses apart, and toss the plastic stuff aside. You won't need it or use it in this project. Once they are apart, figure out the largest piece from both roses- this will be your base.
- Take your tulle, and cut out squares roughly the size of 2-3 of your flower petal sections. You are going to fold this into 4's, find the middle, then cut a petal shape out of it. When you unfold it, it should be a 4 'petal' base. Cut as many as you would like- these will be interspersed with your flower petals.
- Once you have your tulle petals and regular petals laid out, it's time to start gluing. Using hot glue, glue a circle around the center hole of your base flower. Take your next largest flower, and line the center holes up, but lay it so that the petals are interspersed from one another. Press it down, and smooth the material with your finger so it holds nice and tight.
- Continue adding layers, adding in tulle layers as you go, until you have added in all the layers. Glue the center gem to the middle of the flower, covering up the hole.
- Next, cut a circle or square smaller than the flower out of felt. This is going to be the base pad for the feathers.
- Take your feathers out, and before gluing, start arranging them in the design you would like. I suggest longer feathers on the bottom layer, myself. Once you are happy with the way they are arranged, you will want to start gluing them down. To do this, glue a strip across the felt pad, and gently press the feathers into place. Once there is no glue showing, you can add another strip of glue and repeat. If you are adding quite a few feathers, you may want to add a second pad of felt on top of the feathers already laid down. Glue and feathers can get messy!
- When you are happy with your feathers, add a top 'pad' of felt, gluing it in place. This will help sandwich the feathers.
- Add glue to the top side of the pad, getting close to the edges. Once it's covered decently, but not too thickly, center your flower on it, and press nice and tight to make sure it's in place. Unless you want to add more tulle, small gems, or beads, your flower is done.
- Put your headband on, and using a mirror, move the flower around until you find a place on your head where you want it to be. Make sure to hold that place on the headband when you remove it, so you know where you will be adding the flower to. The first one I did, I placed higher up than what I would have liked. The second time, I went much lower and love where it sits.
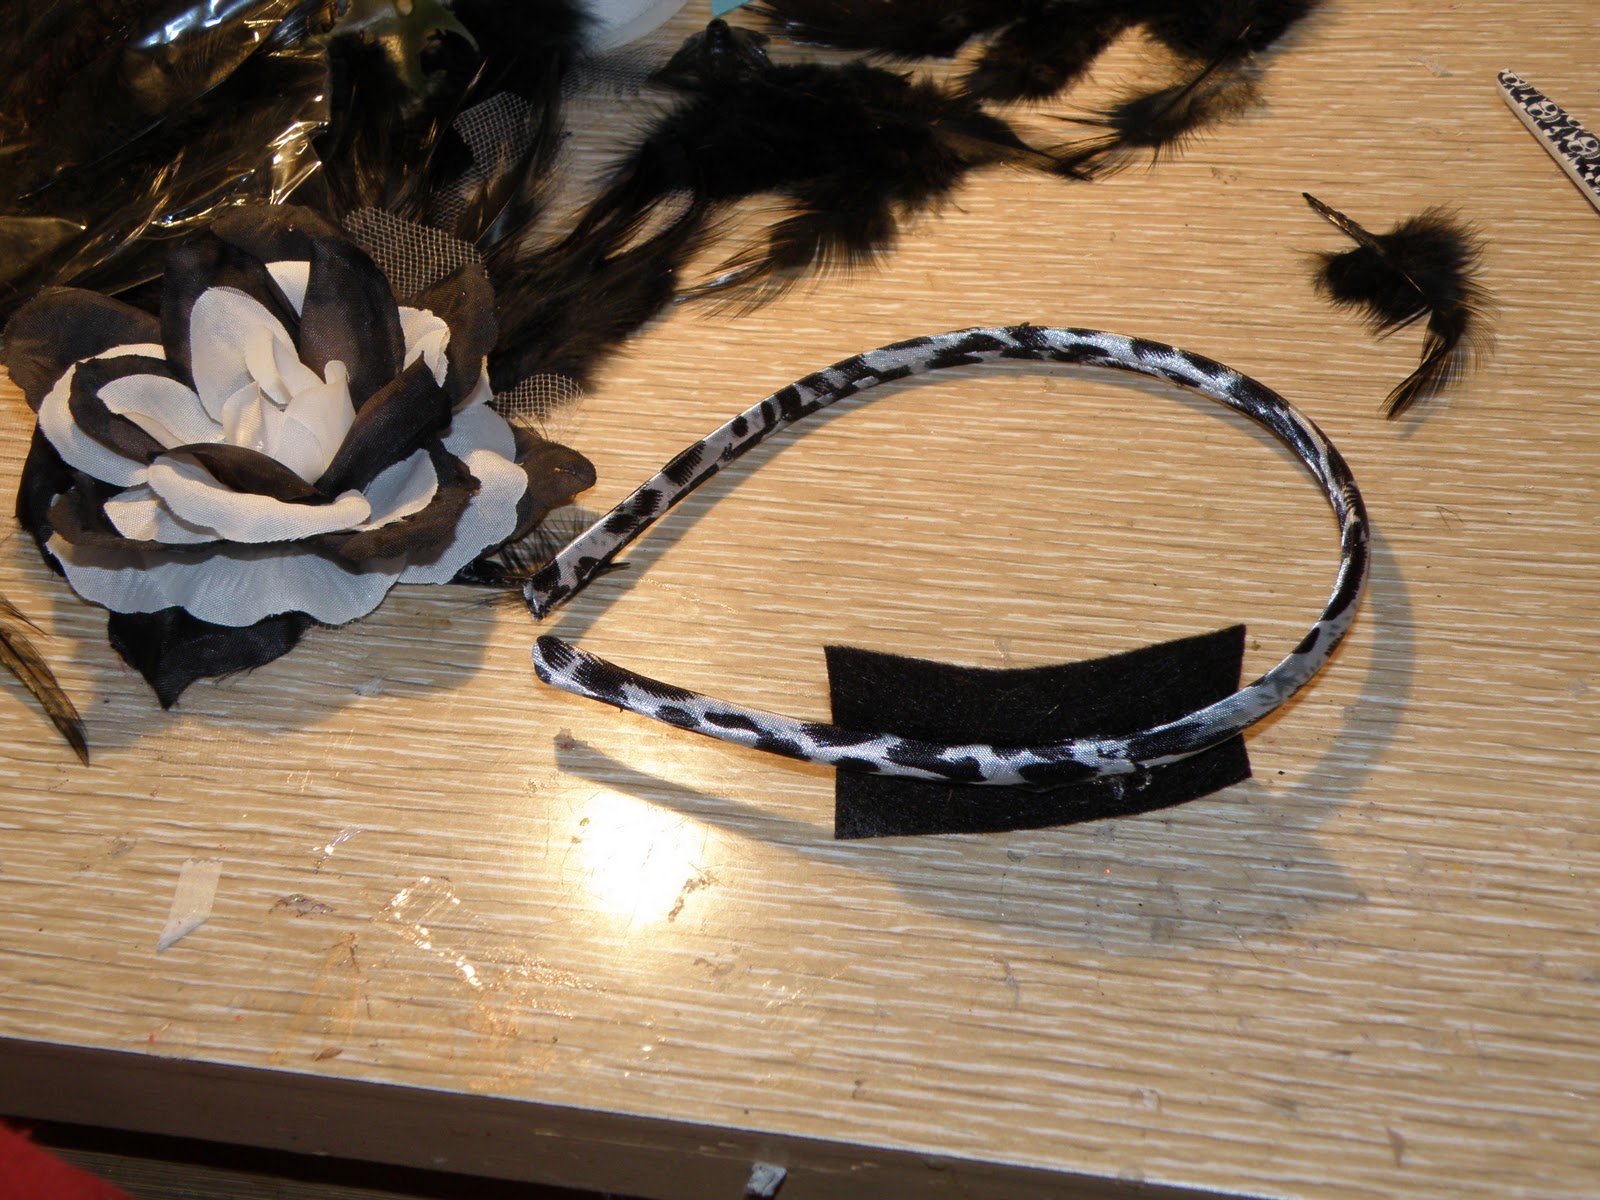
- Cut a long oval or rectangle out of felt- about 1" wide, and no longer than the base of the flower- roughly 2". Add a strip of glue to the underside of the headband on the place you want the rose to go, and press the felt to it, along the center so the edges hang over.
- From there, simply add glue to the entire top side of the felt and headband, and press the flower into place, holding it against the curve while it dries.
And that's all there is to it! I'd estimate that it cost me about a dollar in materials to make this headband, even with craft store feathers and tulle. It's inexpensive, easily customized, and a super cute headband for special events.
And here are some step by step photos of the process. :)


2 comments:
This is REALLY cute! Do you think anyone can pull off one of these? I always want to wear one and then I chicken out!
I think they probably take a bit of confidence to pull off something as big as this on a regular day, but I think most people can look cute in one :)
Post a Comment