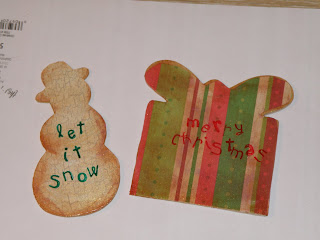
Friday, I drove Nick into work, which put me in "the big city" to do some craft shopping. I had my choice of 2 Michaels, 2 Hobby Lobby's, and 2 Jo-Ann's. Here in my town, my choices are 1 Wal-mart, or 1 Dollar Tree. So, you can see how this was fun for me.
One of the things on my list was Mod Podge, and I had a 40% off coupon to use for it, which makes it much more affordable. I picked up Gold Shimmer Mod Podge, since it can be used as the glue, and as the finish. I thought the Gold Shimmer would be nice for Christmas.
Aged Snowman Ornament
You'll Need:
Wooden Snowman shape (Hobby Lobby- 4/$1)
Scrap Book Paper
Gold Shimmer Mod Podge
Brown Ink Pad
Foam Brushes (These come 6 to a pack for $1 at Hobby Lobby, so they're super cheap!)
Green Ink Pad
Letter Stamps
Drill
Ribbon
Of course, being so excited by Mod Podge, I did not take photos during. Oops!
- Clean off the wooden shape of all price stickers. Trace the shape on the backside of a piece of scrapbook paper. Cut inside the lines, so that it fits on top of the ornament. It does not have to fit perfectly.
- Using your alphabet stamps, stamp the top side of the scrapbook paper with what you want it to say. For my snowman, I choose "Let it Snow". Now, as an aside, when I did this, I did NOT stamp the paper first. I waited until I was done with the ornament, and stamped the top of the ornament. Because of the glossy finish, the ink kept wiping off. So, instead, stamp the paper, and let the paper dry before moving on.
- Using an ink pad and a 2nd foam brush, 'stamp' the edges of the paper with a bit of brown ink, to 'age' the paper. Again, let it dry before moving on.
- Spread mod podge on the top of the ornament, and place the paper on top of the mod podge. Smooth it out from the middle to the edges to prevent bubbles.
- Let it dry for a moment, then spread more Mod Podge across the top to help seal the paper. Let it dry 5-10 minutes until it's dry on the top.
- If you want, you can spread more ink on the edges.
- Spread another layer of Mod Podge across the top. Let dry.
- Once it's dry, brush the backside with the shimmer Mod Podge. Give it another layer in a few minutes, so the back matches the front.
- Using a drill, punch a small hole in the top, and string a ribbon through it to hang the ornament with.
It's a more involved process than some of my ornaments I've posted, but I just love how it turned out! With the snowman, I used a cream colored paper that looks like peeling paint, so it gives it a nice patina of old age, along with the edge distressing I did.
Total Costs:
Scrapbook Paper- $.15, used about an eigth of it, so.. um.. pennies
Wooden Shape- $.25 each, minus 40% off, so $.15 each
Ribbon- Pennies
Mod Podge- Pennies
This ornament can be made for under $.30. Even if it's not on sale, it's under $.50 total.


5 comments:
Not only inexpensive, but very CUTE!
A-DORABLE! I wish I lived near a Hobby Lobby!
Thanks for linking up today!
Thanks!! I've been Mod Podging everying in site the past few days. I just loooove it! I need to get more. I want some glitter, and some shimmer, and some glossy. Now, to win the lotto so I can spend all my time Mod Podging. ;)
Turned out great! Thanks for linking up!
very nice
Post a Comment