Showing posts with label goodwill. Show all posts

Thursday, June 24, 2010

Fun with Spray Paint

Yesterday, after dropping off prints for a client, I stopped at a thrift store I rarely get a chance to go into. The store is run by a local group that supports Catholic schools. The items are hit and miss. I can find something totally amazing for almost nothing, or something all right for a fortune. I have almost never had luck with clothing there.

When I walked in yetsterday, I saw this fantastic set of three large cubes. I thought they would be great for a photography prop, but at $20 for the set of 3, it was out of my budget. Plus, they weren't blocks like I was hoping, but crates.

Because the 4th is next week, the entire set up dead center when you walk in was devoted to Americana items (the blocks were cream with red stars on them), and red, white, or blue items. Including a totally adorable, wooden child size chair in blue. It was scrapped up a bit, but I could hardly believe my eyes when I realized it was only $2.49!

I snatched it up, got a cart, and kept looking. I was further surprised to see that it wasn't the only one. There were 4 more peach chairs similar to it- all nice real wood, all child sized. They were all slightly different in height, and some had ladder backs, some had  just a single slat at the top of the back. My blue one, for instance, had a ladder back, but the slats were arched.

My aunt is also starting to do photography, so I called her, and asked if she wanted one, which she did. I actually ended up grabbing 4 all together, 2 for each of us. That way, we can have one in more girly colors, and one in either a neutral color, or a boyish color.

Last night, I set to sanding my two down. Only to find they were painted in LAYERS of latex paint. I mean like 4 or 5 layers. It was NOT sanding off even with my nifty electric sander. I finally gave up and decided that since kids will be sitting IN them, it's not a big deal if they are sanded out completely smooth.

I was anxious to get painting, so I headed off to Walmart to get some paint. I went with Krylon's glossy indoor/outdoor spray paint. I picked Blue Ocean Breeze for one chair, and Rich Plum for the other.

Best news? If I decide after a few shoots that I don't like the color, or want a new color, I can change it quite easily. I also plan to make two cute cushions for the top, one in zebra minky, and the other in green minky. I'll attach ties for the back, so they can be interchanged, or removed.

I used the Rich Plum color on the peach chair, and the Blue Ocean Breeze on the blue chair. I'm not sure if it was because the plum is darker, or because it's different than the peach, but it took almost a full can of paint to properly cover the peach chair, and only about half a can to cover the blue chair. In the picture below, you can still kind of see the peach, but I plan to go over it one last time tonight.
 

Tomorrow, I have a shoot with a family with young kids. Saturday, I have a shoot with a family that has 3 young girls. Sunday, I have a shoot with a 4 year old girl. I foresee lots of use from these in the near future!


Last week, I had found another cheap prop- a velvet-ish (not real velvet) covered small foot stool with a feather boa edge, and curved legs. It's gorgeous! But, it was broken. The bottom is pressboard, and had a hole in it, but the pressboard was still there, just not attached.

I fixed the pressboard, glued it back in, then had my dad cut a piece of plywood the right size, and attached that under the pressboard for stability.

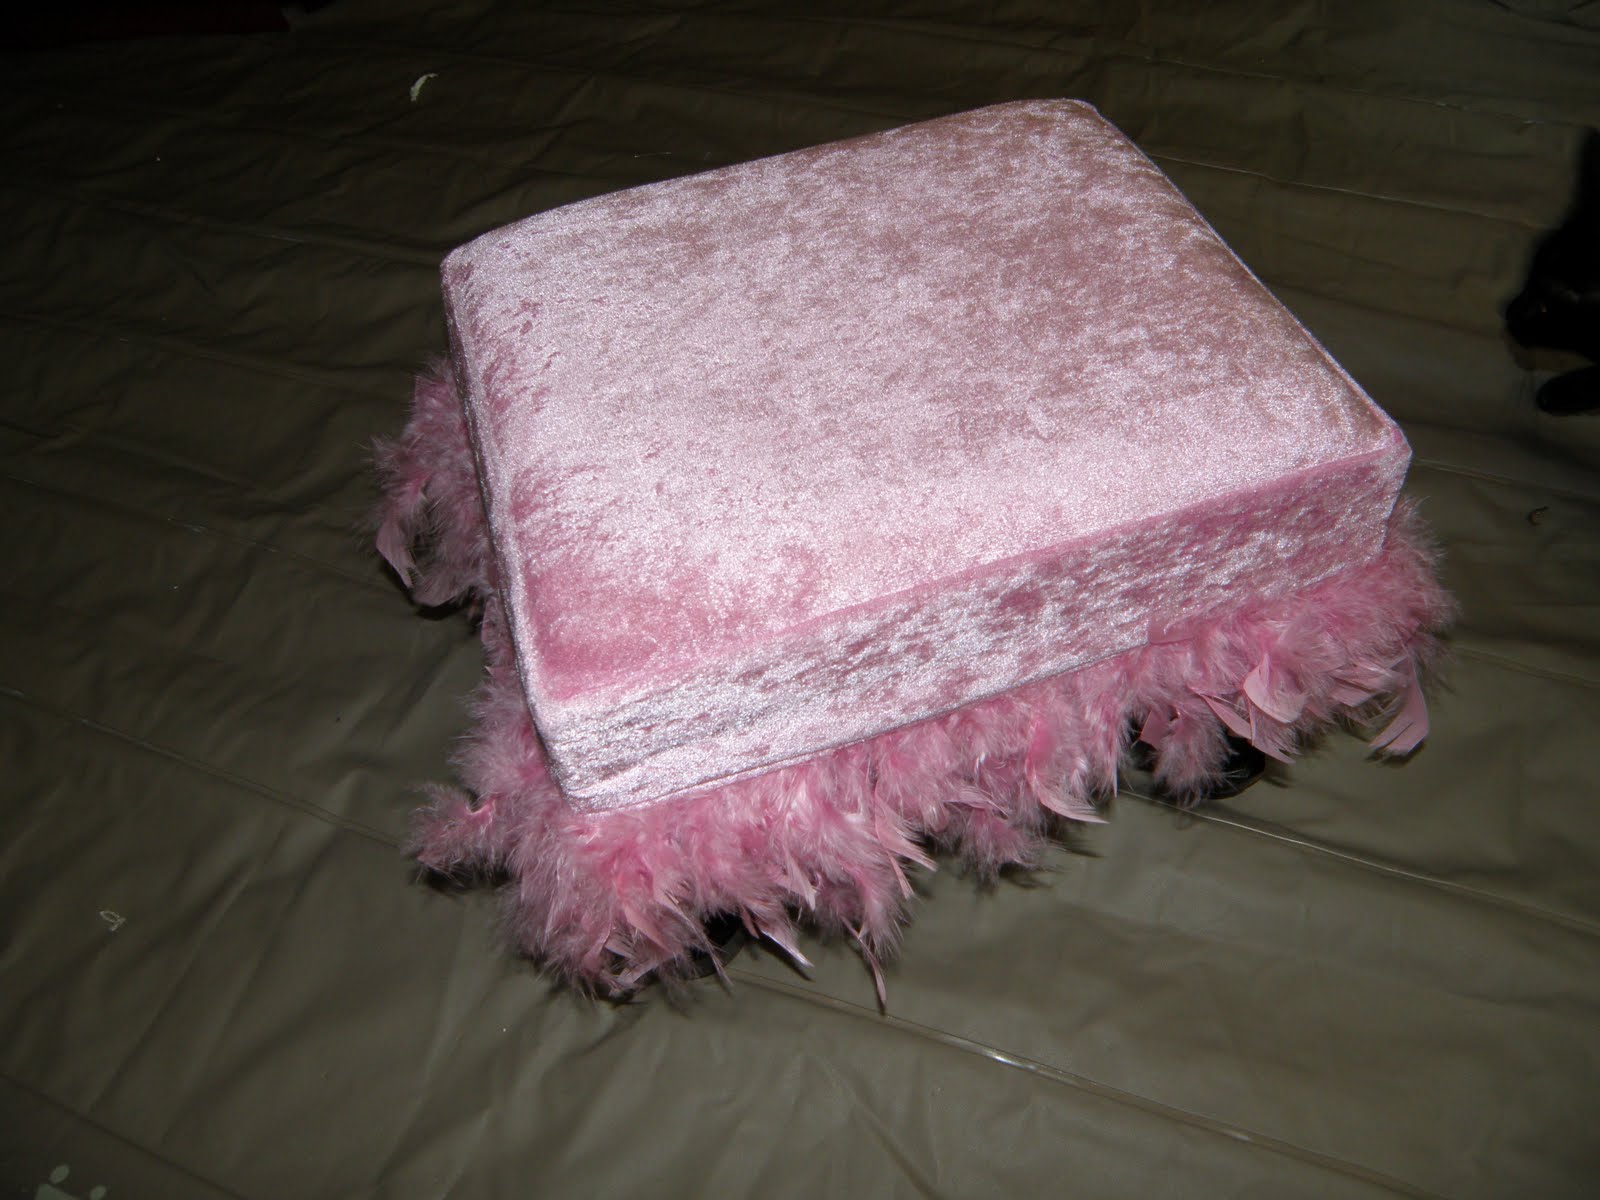
I then sprayed the legs with Krylon's Satin black. I plan to sew a removeable slipcover for it, so it can be used for both boys or girls. I'm debating between a navy blue, or denim. I plan to get use from that stool this weekend, too!

I'm so excited by all the fun props I'm finding at Goodwill lately, and for very little money. Sure, I could order a child size chair from a prop house- to the tune of $50-100. No thanks! My $2.49 chairs will do quite nicely, thank you very much!

Monday, May 3, 2010

Cadee Bug Duds - Clothing ReMake

My niece, Cadence (Cadee or Cadee Bug for short) is outgrowing her clothing. Because I live near such an awesome Goodwill, her mom asked me to look around for clothes in her size. I found a few things, but one of the pairs of shorts were gender neutral, and rather plain. I picked up a shirt with the sole purpose of using it to make appliques out of it.

Well, when I went to cut it apart this morning, I couldn't do it. The shirt was cute by itself, but it was a long sleeve, thermal underwear type shirt- too warm for summer! So, I just started snipping away here and there, and I love what I came up with!

Clothing Remake-

You'll Need:
1 Long Sleeve Shirt
1 pair of shorts
Sewing Machine
Needle & thread for hand sewing
Buttons

(Ignore the messy looking floor...)

  1. Cut the sleeves off- I did this as tight to the seams as possible, while leaving the seam attached to the shirt.
  2. Split the sleeves up the seam, to open it up to a larger bit of fabric. Again, stick close to the seam. To do this, I put the sleeve around my hand, so my fingers could stretch the fabric while I cut.
  3. Stare at the shirt for 20 minutes deciding what you want to do with it. Or, decide that ahead of time, and skip this step. 
  4. Using one of the sleeves, cut long strips of fabric. Serge or zig zag one side to stop fraying.
  5. At this point, I decided the shirt was pretty long (it's a size larger than Cadee needs anyway), so I cut the bottom half inch off, and reused that fabric.
  6. Now, with two matching length strips of fabric from the shirt, I found the middle, pinned it upside down to the outside of the sleeve opening, then pinned it around. I tucked the ends inward before pinning. I sewed these on, which created a slight shoulder ruffle, so the shirt has a bit of femininity to the shape.
  7. Straight stitch one side of 2 more of the fabric strips, then gather them, and sew the two ends together to create a flower shape. I attached 1 larger one to the right side of the shorts, and the smaller one to the left shoulder of the shirt.
  8. Cut a heart shape from the remaining sleeve fabric. Applique to the rear of the shorts.
  9. Hand sew buttons into the centers of the "flowers", to finish the look. Make sure to get them nice and tight with strong thread!
Voila!


All in all, I love how it turned out, especially for me having NO idea in mind for the shirt (heck, there wasn't even going to BE a shirt till I started!). I wanted to do a ruffle butt, but opted against it. I also considered doing ruffles around the leg openings, but again, opted against it.


Total cost (for me) was $.98. The clothing pieces were $.49 each. The buttons were in my huge button jar.

This could easily be done with all on-hand items, though, reusing clothing that is stained, or old, or out of season.


Keeping It SimpleBWS tips button

Wednesday, April 28, 2010

Great Deal Day!

I'm back from shopping. I'm kind of broke, so I shouldn't have gone shopping, but I am SO glad I did! Tomorrow is pay day, so today is broke day, but I had 2 $40 Walmart gift cards in my wallet (one was from my birthday, the other was from Gillian's birthday back in December, but we gave her cash to spend because she found something at Target she wanted instead of Walmart).

I was thinking clothing- capri's, specifically, and I did find a cute pair, but I wound up putting them back because I found a bike! I have a bike. An old, decrepit mountain bike. The gears don't work. One of the breaks doesn't work. It's kind of like taking my life in my hands to ride it. And, worst of all? While I did ride it quite a bit last year, the seat always hurt my rear end. Now, after my broken tail bone, that area is tender (still... almost 5 full months later...). I haven't tried it yet this year.


I've been wanting to get a cruiser bike. For starters- big old seat for a big old, grown up mommy butt.  But, even better- handles that don't force you into that "Oh, please look down my shirt!" position, which is bad for my neck and back. I found one at Walmart for $84, score!


I put everything else back (my capri's, and a dual set of bra's for Rae- 2 bra's for $7!), and got just the bike. I paid like $9 out of pocket after the gift cards.

Before I went there, I stopped at Goodwill, and found some great deals. For starters, a London Fog khaki trench coat- for $.99! I also grabbed a pair of denim overalls for $.99- they resell really well on ebay, I hear. :)


I picked up 4 pairs of cute, trendy, name brand jeans for $.99 each, and a pair of Gap shorts for $.99 as well. All in all, I spent $11 something at the As-Is Goodwill. I hopped over to the regular side, and found a nice red plastic plate with a rim on it. I wanted to find red, black, or silver for a cupcake plate for this weekend. It was $.59, so I grabbed it- then found a larger silver glitter plastic charger plate! It was $.79, so I grabbed both- now I can have a tiered cupcake plate that matches the theme!


Lastly, I found a shirt from Express themed towards Tauruses (which Rae and I both are). It's cute, looks brand new, and was in Rae's size, so I snagged it.

Well, I just got home and I went through the clothing. All of the jeans and the pair of shorts were in Rae's size. I figured she can keep what she likes and fits, and I can resell what doesn't work. I jokingly showed her the overalls, knowing she wouldn't want them, and it felt like there was paper in the pocket.

I checked.

Nope, no paper.

Well, unless you count a $10 bill and 2 $1 bills as paper. Which I do. Money! Score! I got $12 back on a $.99 item! I'm personally amazed. I can't believe people donate without checking pockets. I know I do.


So, Rae's done trying on- all but 1 pair worked, so I have 1 pair of jeans, 1 trench coat, and 1 pair of overalls to resell. Total spent on those- $2.98 ($.99ea).

Monday, March 29, 2010

Fabric.com Sale!


This weekend, I went to Jo-Ann Fabrics, where I bought something that A) I thought was $9.99 a yard, and B) thought was included in the Home Decor Fabrics Sale at 40% off.

I was then A) Shocked and B) Speechless when the fabric that should have cost roughly $6 a yard wound up being $17.99 a YARD!

I about died. Hubby, of course, said "So what, you like it, right? Buy it!" I, of course, did.

Today, I looked through Fabric.com to see if they had any good steals. Of course, they did. I found a cute, very similar medium weight fabric to recover a really cool chair, and I got it for under $5 a yard.

Better yet? They have a sale on all clearance fabrics!

Enter in clearance323 at checkout, and all your clearance items will drop in price by 30%!!

Should you wind up spending $35 or more, you can also get free shipping. But, the prices are low to begin with, so it may take quite a bit of fabric to do that!

They also have other items for crafting, including scrapbooking!

This is the fabric I ordered.


Upon going back to the site, I found more fabric I love even more, though, for a similar price. I may just have to order more, because how CUTE is THIS one?


And I also REALLY like this one:


All of these are home decor fabrics, suitable for making slip covers, or in my case, recovering a chair. I don't know if I would want that last one in a large quantity, but it'll take less than 1/2 a yard to re-do the chair I have, which is just about right.

The chair I keep mentioning? Oh, a total Goodwill SNAG. OMG, I was in love when I saw it!


I did a bit of research. The name on the bottom matches up with a New York furniture company that was around in mid 40's through the early 50's. It's sturdy, it doesn't wobble at all. It's gorgeous- or will be. The vinyl is all in great shape- it isn't cracked or torn at all. But, I want something prettier for my craft space!

I've never recovered a chair, so I'm excited to try it! I'll spray the frame a fun color, too. If I order that last fabric, I think a nice light blue would set the colors off without being too obnoxiously bright. The fabric I have here is bright stripes, very beach-like, and when we were looking at spray paints, the pale blue looked great against it. So did yellow.

Either way, the frame does need a spray job, as the paint is scuffed and marked up on the chair.

Isn't it fabulous, though? Go ahead, you may bask in the glory of it.

Tuesday, February 9, 2010

Goodwill & Dollar Store Finds

I found a lot of fun stuff over the past week at both Dollar Tree, and Goodwill. I can't wait to get creating with some of it!

From Goodwill:

 
A wooden cigar box for $.99

 
Hand written on the top- DEC 1963

 
 A paper towel holder from Target, brand new with tags! Just $.59!! It made it all the way over to the AS-IS side. How? I'll never know! Obviously no one saw it's potential as a ribbon rack.

 
(Click the photo to enlarge it and see the writing better)
An extra long, wooden drawer organizer for $1.99. It has helped me organize that drawer rather well, but I'm not sold on it just yet, as there are several things I used to keep in there that no longer fit. I may yet trade it in for some of those plastic drawer organizers for small things, while leaving space for larger objects. 


This was just $.29 at the AS-IS Goodwill. It was laden with gold ribbons and Christmas ornaments. I removed everything except the red, left the greens, and added pink and red hearts, more red and pink picks, and a red bow for Valentine's Day. I will likely remove all of it after V-Day, and re-do it again next year for Christmas with all new items, since it was sad looking before.

  
This board was TOO CUTE to pass up! The bottom where it says "It's A Girl Thing" is a pocket. I love, love, love it, and it was just $1.99. It's going on my wall above my desk. I love the print of the white fabric. So crafty!
At Dollar Tree this week:

 
Several of the wall decals with words. I'm going to try my hand at using them on signs.
I also picked up a Mickey Mouse wall hanging (to redo), some raspberry votives, a glass cup candle holder, a glass candle stick, and a display easel in silver.


I used E6000 to glue the candle stick to the glass holder. I stuck 1 votive in, but man was he a tiny little thing. After some working around, I found some of this irridescent glittery "grass" to stuff in the bottom, and I stacked 2 candles to make them taller. This will be unlit because of the grass, kids, and cats.

 
When I was at DT picking up the items in the photos above, I kept playing around with the candle holder, and the candle stick, and then I saw some marble discs, and played around with that. I decided that the same cup would make a good cloche on the marble holder, but held off in buying the items.
Obviously, I went back and grabbed them, along with a wooden bead and finial at Hobby Lobby. I put them together to make a nice little Cloche, which are ever so popular in the blog world right now. I like how it turned out, but have few items small enough to fit inside of it, so I'm going to hunt around Dollar Tree and Goodwill for something that will fit! 


Maybe for Easter, I can find a nice little ceramic egg that will fit?


And that is what all I found this week at both places! I really love frugal buys, but have come to realize that buying is buying, no matter what. -sigh- Someday, I'll break this shopping addiction I have.