Showing posts with label sewing. Show all posts

Friday, May 7, 2010

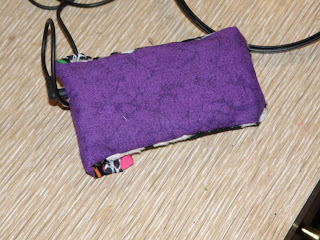
MP3 Cover Tutorial

A few years ago, I entered the modern age with an MP3 player. Actually, I got one for Nick first, then loved it, so he got me the same one (for Valentines Day for both of us!). Somewhere along the way, both players were lost. Of course, this was 5 years ago, so they were pretty old anyway.

Now that I'm taking an active interest in being more active, I wanted some music to listen to while I do it. I talked to Nick, and we decided that we could afford an MP3 player for me this week, so off I went. I found a 4GB MP3 player that also does voice record, plays videos, and stores pictures, and it was only $50. Ok, "Only"... I think it's high priced for what is essentially a toy, but I got it anyway.

The downside- the store had no accessories for this model, and I wanted some way to clip it to my clothing or body, so it wouldn't get lost, or fall from a pocket. So, what did I do? Got out my sewing machine. Three different times, actually!

MP3 Case

You'll Need:
Fabric Remnants- I used 3 different prints
Sewing machine
Elastic
Button
Needle & Thread
Fabric marking pen

  1. Measure the player on a piece of fabric, and cut the fabric about 1/2 inch wider on three sides, and about 2 inches longer on the top side. Repeat an identical size with another piece. Repeat this with a third section of fabric, but measure it just 1/2 inch wider on the top this time.
  2. Stitch the two identically sized pieces of fabric together on three sides, with the face of the fabric facing inward. Once it's sewn on three sides, clip the corners, then turn it right side out, and use a pencil to poke the corners out.
  3. On the remaining section of cut fabric, sew a hem across the top side, just a thin hem. 
  4. Choose which side of the double sided length of fabric you want to be the outer shell. Pin this side to the smaller section, face to face, with the unsewn edges together at the bottom. This section will not match in length- that's fine!
  5. Sew the two sections together on the sides and across the bottom, then trim the edges, and turn it right side out, once more using a pencil to poke the corners out.
  6. Now that it forms a pocket, slip your MP3 player in, and make sure it fits (psst... my first try didn't fit, oops!). Keep it in, and measure where the long section lands when you fold it over the MP3 player. Mark the spot.
  7. Hand stitch your button onto the shorter section of the fabric below where you marked where the flap landed. You'll be using elastic to secure the top flap to the bottom section, and you want it nice and tight. 
  8. Using the elastic, measure how much is needed to fit over the button from the flap, while remaining nice and taut. Sew the loop of elastic to the underside of the top flap.
  9. Now comes the tricky part. put the MP3 player back in, and mark on the outside of the fabric where the headphone cable goes. For mine, I opt to put the MP3 player in upside down, so that the headphone cord comes out on the top flap. It was easier to create the hole there. NOTE: If you have a hole in a different location, such as the side, you may want to do this step before sewing the pouch together!! Once the location is marked, sew a box around it, then use scissors or a seam ripper to cut the fabric out from inside the box, clipping all the loose threads. You could also use a button hole stitch, if you know how to make one!
  10. Lastly, because I used white thread, I sewed a coordinating length of ribbon to the flap to hide all the hideous stitching I had done!

    I have not yet figured out a clip to attach to it, but I have figured something fun out- if you are wearing a tank top, you can slip the player under the strap, then fold the flap and button it over the top of the strap. It'll stay in place nice and easy! I've also buttoned it to my jeans with a belt loop, when I have wider belt loops on. Even with a short sleeved or long sleeve shirt, you can easily use your bra strap for attaching it.


    And, when you are done using it, wrap your headphones cord around it, then button the flap so the cord stays wrapped around it, and they don't get tangled or lost!

    All of this was done with scraps of fabric I had on hand, and notions I had on hand. FREE! Gotta love that!

    Monday, May 3, 2010

    Cadee Bug Duds - Clothing ReMake

    My niece, Cadence (Cadee or Cadee Bug for short) is outgrowing her clothing. Because I live near such an awesome Goodwill, her mom asked me to look around for clothes in her size. I found a few things, but one of the pairs of shorts were gender neutral, and rather plain. I picked up a shirt with the sole purpose of using it to make appliques out of it.

    Well, when I went to cut it apart this morning, I couldn't do it. The shirt was cute by itself, but it was a long sleeve, thermal underwear type shirt- too warm for summer! So, I just started snipping away here and there, and I love what I came up with!

    Clothing Remake-

    You'll Need:
    1 Long Sleeve Shirt
    1 pair of shorts
    Sewing Machine
    Needle & thread for hand sewing
    Buttons

    (Ignore the messy looking floor...)

    1. Cut the sleeves off- I did this as tight to the seams as possible, while leaving the seam attached to the shirt.
    2. Split the sleeves up the seam, to open it up to a larger bit of fabric. Again, stick close to the seam. To do this, I put the sleeve around my hand, so my fingers could stretch the fabric while I cut.
    3. Stare at the shirt for 20 minutes deciding what you want to do with it. Or, decide that ahead of time, and skip this step. 
    4. Using one of the sleeves, cut long strips of fabric. Serge or zig zag one side to stop fraying.
    5. At this point, I decided the shirt was pretty long (it's a size larger than Cadee needs anyway), so I cut the bottom half inch off, and reused that fabric.
    6. Now, with two matching length strips of fabric from the shirt, I found the middle, pinned it upside down to the outside of the sleeve opening, then pinned it around. I tucked the ends inward before pinning. I sewed these on, which created a slight shoulder ruffle, so the shirt has a bit of femininity to the shape.
    7. Straight stitch one side of 2 more of the fabric strips, then gather them, and sew the two ends together to create a flower shape. I attached 1 larger one to the right side of the shorts, and the smaller one to the left shoulder of the shirt.
    8. Cut a heart shape from the remaining sleeve fabric. Applique to the rear of the shorts.
    9. Hand sew buttons into the centers of the "flowers", to finish the look. Make sure to get them nice and tight with strong thread!
    Voila!


    All in all, I love how it turned out, especially for me having NO idea in mind for the shirt (heck, there wasn't even going to BE a shirt till I started!). I wanted to do a ruffle butt, but opted against it. I also considered doing ruffles around the leg openings, but again, opted against it.


    Total cost (for me) was $.98. The clothing pieces were $.49 each. The buttons were in my huge button jar.

    This could easily be done with all on-hand items, though, reusing clothing that is stained, or old, or out of season.


    Keeping It SimpleBWS tips button

    Monday, November 30, 2009

    Sewing Machine Advice

    For Christmas this year, I am getting a new sewing machine. The one I use currently is not a great machine, but it was a free hand me down. The tension has always been wacky, and it won't sew any type of delicate fabric (sheers, lace, decroative costume fabrics, etc, without the feed EATING it!). It gives me headaches. I get into a sewing mood, and put up with it for some time, then fizzle out on it, because I get so fed up with it!

    So, where was I? Yes, a new sewing machine. My budget is $150 (with a tiny bit of budge room), and while I would love to shop anywhere, $100 of that is coming from Walmart in the form of a Christmas gift card, soo.... I need some advice from the sewers out there.

    There are probably 6-7 machines on Walmart.com that range from $70-160. They all have great reviews, with a small handful of not-so-great reviews. Here are the specific machines I am looking at:

    Brother 60 Stitch CS-6000i This machine is $160. This has almost a 5 star average rating. It has 404 user reviews, 299 of which are 5 star, and 77 are 4 star. However, it has the highest 1 star reviews at 17, but given how many reviews there are, the average is lower for 1 star ratings than with other machines. There are 6 3 stars and 5 2 stars, as well.

    Brother 50 Stitch Project Runway Edition This machine is $140. This machine has 115 reviews. 101 are split between 4 & 5 star ratings, with 3 3 star ratings, 3 2 star ratings, and 8 1 star ratings. In all, it has almost a 4 and a half star rating average.

    Brother 35 Stitch XL3750 This machine is $140 as well. This machine has just 20 total reviews, resulting in just a shade over 4 out of 5 stars average. There are 11 5 star reviews, 5 4 star reviews, 2 3 star reviews, and 1 each of a 2 and 1 star review. In looking at the numbers, I'm going to cross this one off the list myself.

    After just now looking at the other, cheaper models, I noticed that most had 20 or less stitch types, and I would like to have more options than that. My current machine boasts all of 13, 3 of which are button hole stitches the machine won't actually do. Heck, out of the 13, the machine can only handle 4. I would love to have lots of stitches available, but in having just recounted just how few my machine actually does, perhaps a 20 or 25 stitch machine isn't so bad? ;)

    Here are some more machines.

    Singer Simple 23-Stitch Machine 2263 This one is $90. This has only 26 total reviews, giving it just a shade over 4 stars in average. 12 are 5 star ratings, 11 are 4 stars. There are 2 2 star ratings, and 1 1 star rating.

    Brother 25 Stitch Free Arm Machine, XL-2600i This machine is also $90. 80 reviews, giving it an average of 4.3 stars out of 5. 46 are 5 star reviews, 26 are 4 star reviews. Only 8 reviews total make up the 3, 2, and 1 star reviews.

    All 5 machines have good reviews for the most part.In an ideal world, I would go with a $600 Singer, and get a Serger as well. But, this is hardly an ideal world. It's my frugal world.

    I'm hoping someone out there has used one of these machines, and can give me some advice. Being that the money is mostly in gift cards, it really limits just what I can do for a machine. We don't have a lot of extra money to put into a sewing machine right now, but I do want one, so I can try to tackle more things.

    Please, leave a comment and help me out! I'd love to hear everyone's thoughts, even if they have not used any of the above machines!

    Friday, November 20, 2009

    1 $.79 Sweater = 2 Great Hats!

    I'll start off by saying that I made 2 because I did not photograph the steps to the first hat. I love this hat! I got the idea from Disney's post at 30 Days, on making a Cardigan hat. Disney runs one of my favorite blogs- Ruffles and Stuff. She has so many cute ideas! I only hope I'm half as good as she is some day. ;)

    Since I did change the hat up a bit, I'll post a tutorial as well, but again, the idea came from Disney! I found my sweater at Goodwill for just $.79, and I was able to make 2 hats out of 1 sweater, with enough fabric on the sleeves for 1 scarf. At that price, each finished piece cost me just about $.27 to make. Can't beat that at the store! If you have an old sweater on hand, you can make this project for free!

    Sweater Hat

    You'll Need:

    1 Old Sweater, adult sized SM or larger for kids, and L or larger for adults.
    Scissors
    Sewing Machine

    1. First, you'll want to cut the sweater apart. To start off, you need a circle, so make sure the sweater is bigger in size. The bigger the circle, the baggier the hat. I used a dinner plate to measure my circle, but in cutting it, I made the circle larger by about an inch around. I used a rotary cutter to cut through it, and stuck my cutting mat in between the layers of the sweater, so only the top was cut.


    2. Cut the bottom ribbing off the sweater. In the sweater I used, it had an extra long ribbing, which came in handy.

    3. The circumference of your sweater circle will be longer than the ribbing, as an aside. In Disney's tutorial, she first sewed the circle with a straight stitch, then pulled the top thread to gather the material. My first try at that was a big fail.


    4. Pin the bottom side of the hat to the ribbing, creating gathers as you pin. This is how I added gather to the hat, without being able to use the thread to create an instant gather. You may have to pin and re-pin a time or two to insure that you have the right size gather to fit the ribbing.


    5. Leave the loose ends of the ribbing unpined. Once the hat is pinned, sew the two loose ends of ribbing together, then pin 1 last gather to the ribbing.

    6. Sew along the gather, going nice and slow, and removing pins as you go- I noticed that some got hidden under the pleats created, and were harder to find at that point.


    7. If you are like me, you'll be in love with the hat once the first 6 steps are finished, and immediatly try it on. Now- if you had extra long ribbing, like I did, you'll note at this point that the hat resembles an odd, knit chef hat, and will create a weird mushroom above your head. It is not a flattering look. At this point, you'll pout a bit, and wonder where you went wrong. Or, since I have already done that for you, you can move on to step 8. Keep in mind, if you have ribbing that is only about 2 inches long, you can stop here, and enjoy your hat! If not, move on to step 8!


    8. To conquer the prior noted problem, I folded the ribbing inward, and looked at the hat inside out. The seam should have some allowance for adding another stitch to it. I did not pin it the second time around, I just went slow, and matched the ribbing seam with the inner seam, and stitched it on top.


    9. Fold the hat right side out, and you'll have a cute little, puffy beret type hat for winter!

    10. Embellish as you like! On one hat, I added a little 4-loop bow, with a big button in the middle.


    This was a fairly easy hat, though some knowledge of sewing and pinning is required. Or, trial and error, if you are a fast learner. Rather than attack my own sweater collection, I have been hitting up thrift shops for materials to use all week. The children's set I made earlier this week was nice, but I much prefer my brightly colored set.