Showing posts with label halloween. Show all posts

Monday, October 11, 2010

Easy Tutu Tutorial

This week, I am making tutu's for Halloween. The first is a Lady Bug tutu for my 3 year old niece to wear, and the second is a lime green Tinkerbell tutu dress for my 8 year old, Gillian. There are lots of costume ideas at the bottom of this post for using Tutu's for Halloween.

In addition, these make great birthday & holiday gifts for girls who love dressing up and just having fun.


These are only the 2nd & 3rd Tutu's I've made, and I just finished the Lady Bug one this morning. The first one I made was for my oldest daughter to wear to school on Spirit day. For that one, I took elastic, sewed it to the right size, then looped the tulle over it.

I found, though, that the stretchy, crochet style headbands work great as waistbands, and make it so that your tulle is evenly spaced.

Easy Tutu - You'll Need:


1 Pre-made Crochet Headband (You can find them online for as little as $.50 each, or at places like Hobby Lobby for $.99 each, or by the yard in the fabric department).  This will stretch to fit anywhere from about 12 months to around a size 8 in girls.

1-3 rolls of 25 yard, 6" tulle- the more you use, the fluffier and more full the tutu is. It took me 25 yards to make a knee length tutu for a 3 year old. It's not as full as I would like, but it isn't bad.

Scissors

A hard cover book to stretch the headband over. It should stretch it, without it being stretched to it's limits- it should be able to move easily.

Total Cost Estimate: The cost will depend on the length, amount of tulle used, and the cost of the supplies you purchase. I was able to make my niece's Lady Bug tutu for just over $2.00. If I had had more red on hand, I would have made it more full, though.

Time Spent: It took me maybe 45 minutes to cut and put together the lady bug tutu. The longer the tulle, the longer it takes, because you spend more time keeping the tulle already added out of the way.


Directions
  1. First, you want to decide on the length of the tutu. I find it's easiest to hold the tulle up to the child, from either the waist or the chest, and measure down from there. You'll need to fold it in half before cutting it, to double the length. Cut your tulle to that length until you have a good stash. For dresses, or anything longer than about 8-10" in length, you will require at least two rolls of tulle. The longer the tulle, the more you will need.
  2. Stretch your head band over the book and adjust it so it's stretched evenly.
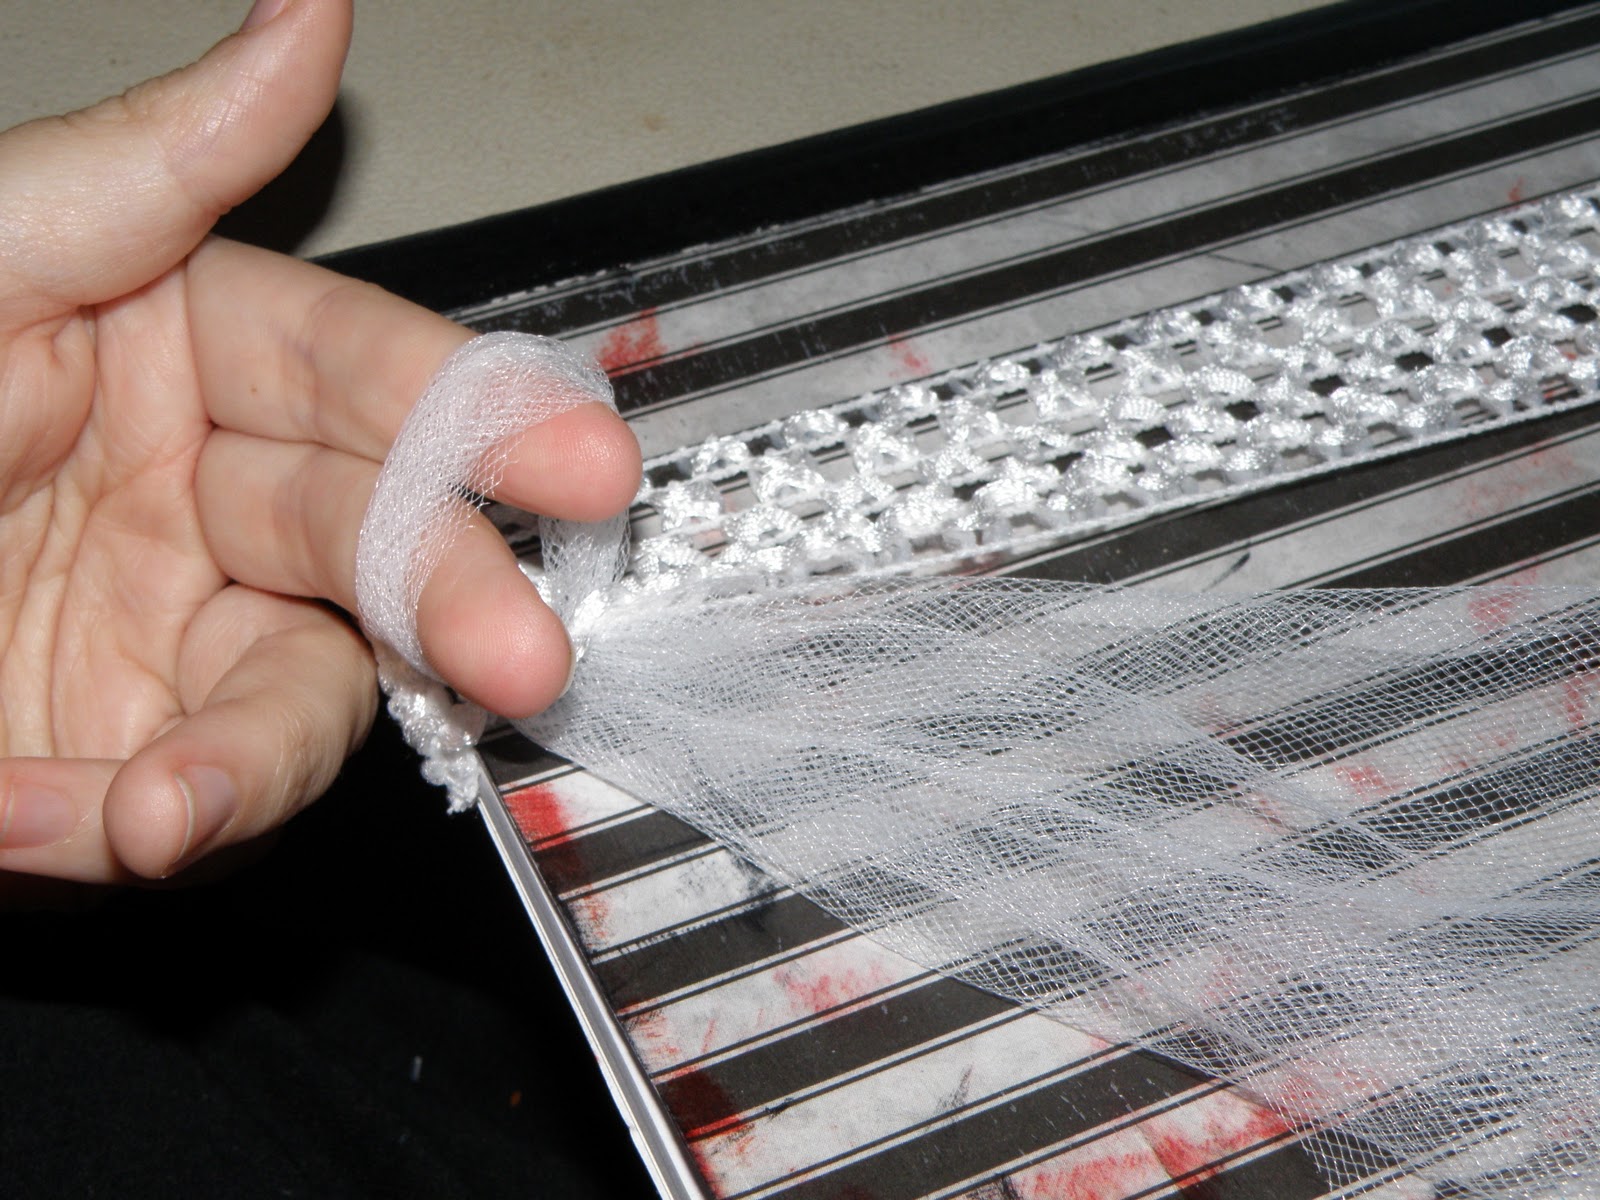
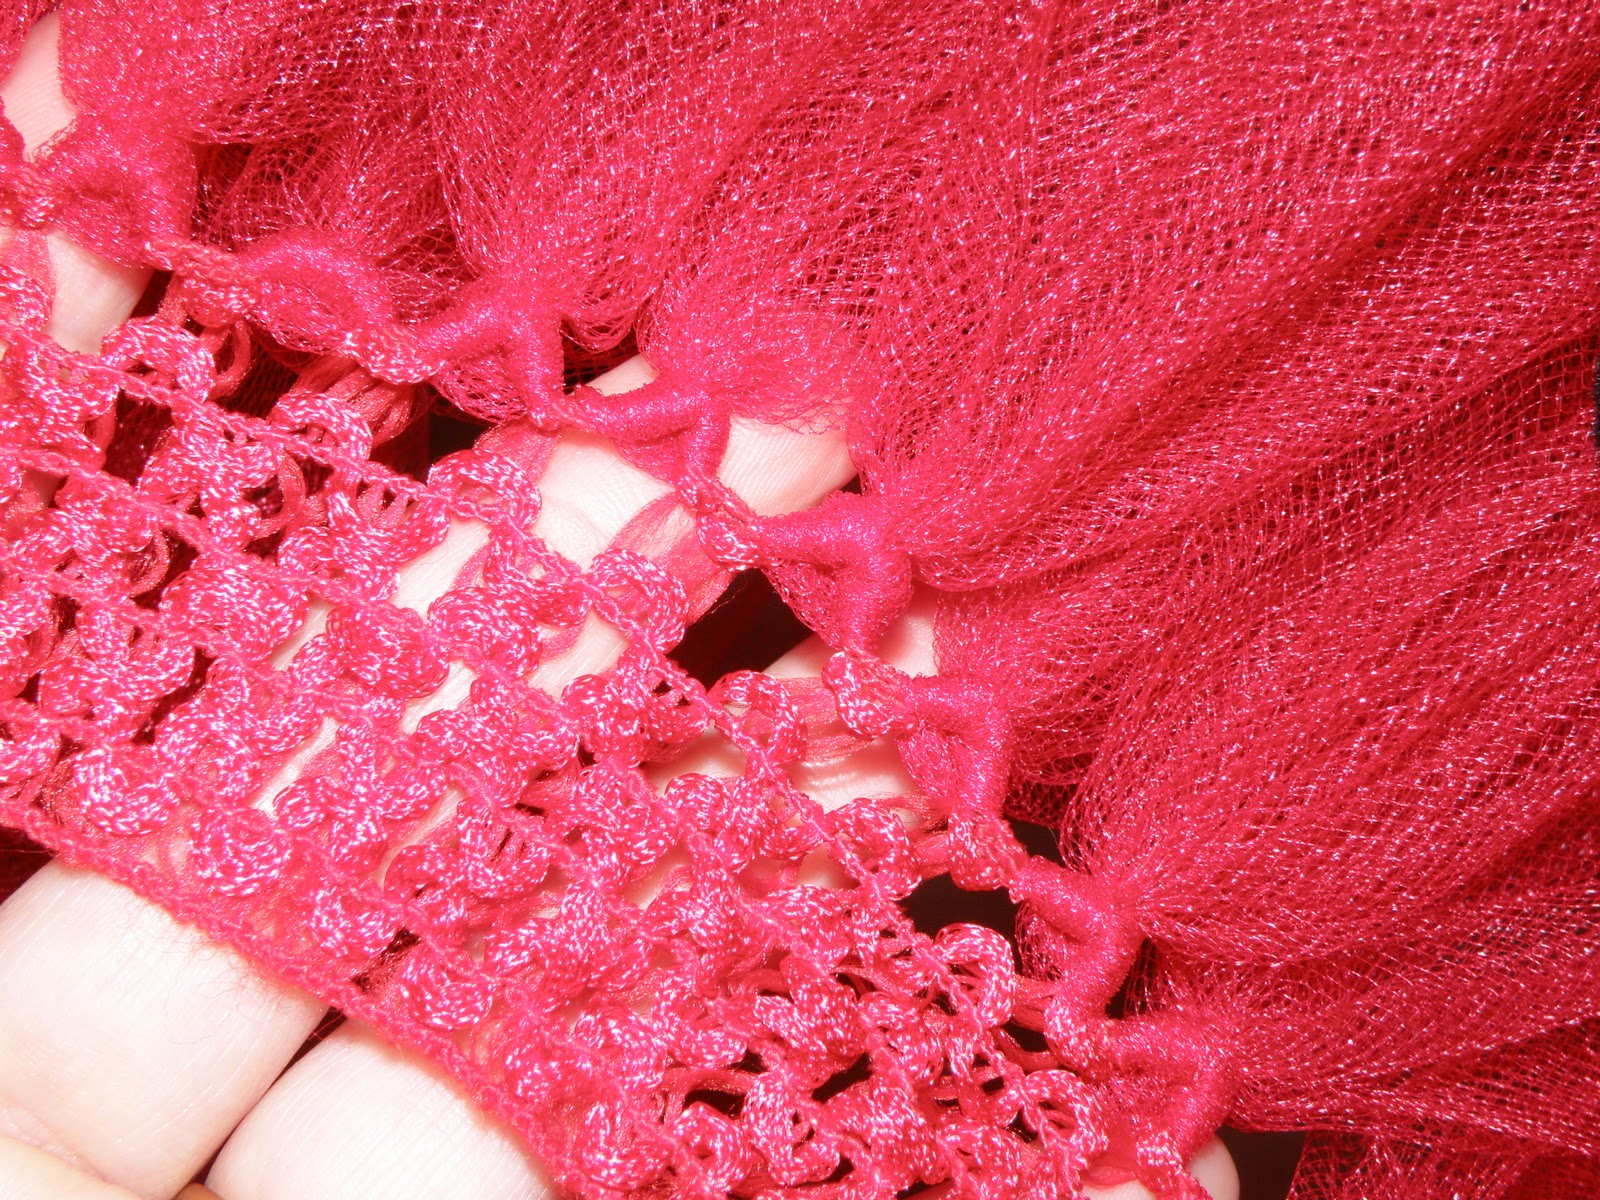
  3. Fold a length of tulle in half, and pinch the folded side. From there, push it through one of the holes from behind so the loop is poking out the top, visible side of the headband. Using your fingers, spread the loop open so there is a hole. Take the ends of the tulle length, and push them through the loop. Once they are through, carefully tug the length until it 'ties' into a tight knot on the headband. Smooth it down, and move on to the next loop. Continue until you have filled that row of holes.
  4. Once it's filled out, lay it on a flat surface so that it forms a circle with all the tulle spread out nice and straight. You will want to give it a 'hair cut' to even the strands out, and this is the easiest way to do that.
  5. Add a bow to the front if you would like!


Tips:

  • When looping the tulle through the checkerboard style holes on the headband, I opted to use the second row of holes from the edge, not the first row. The tulle cinches tightly, and I thought this gave it a bit more material to grab onto.
  • For a more full tutu, fill every hole on two rows. You can use the same hole for two different ties on different layers. 
  • Cut the top later just a bit shorter than the layer under it, so it stands outward more.
  • Experiment with looping ribbon lengths through the holes as well, or strands of sequins.
  • To make your tutu frugally, order your tulle, or buy it on sale. I have never worked with full width tulle bought by the yard from a bolt, but it typically is cheaper than the rolls. It goes on sale for $.77/yard from Hobby Lobby from time to time. You'll want to cut it into strips to use it.
  • Use small dabs of hot glue to affix gems to the tulle for sparkle. Make sure it's pressed firmly to just the strand you want it on, and lift it away from the tutu while it dries. The glue will stick to everything if it's still warm.
  • To keep your tutu fluffy, when storing it, hang it inside out. The tulle will settle as it hangs, and when you flip it back over, it will fluff right back up.
I found my Tulle online at Gifts International. The cost is $1.25 for a 25 yard roll of 6" wide tulle. At Hobby Lobby, it runs $2.99 for a 6", 25 yard roll, so the savings a pretty good. They also have rolls of 3", 12", and 18" tulle, and have 34 colors in stock.

They also have shimmer tulle, which has just a bit of a glimmer to it- it is NOT glitter tulle. The Shimmer tulle is $1.50 for a 6" 25 yard roll. At hobby lobby, this type of tulle is $4.99 a roll. There are fewer color choices in Shimmer, but they do still have 14 colors available.

http://www.giftsintl-us.com/tullefabric.php


If you need plain white, and don't want to wait to order, or pay shipping, Dollar Tree does carry white & ivory. They are only 8 yard rolls, though, so they are still more expensive than getting it from anywhere else, including Hobby Lobby. It would cost $3 to get 24 yards, as opposed to $2.99 for 25 yards at HobLob.

Costume ideas for Tutu's at Halloween-

Tinkerbell- Lime Green (or Citrus Green) and Kelly Green

Witch- Black, or Black with Purple, Citrus Green, Orange, and Shocking Pink


Lady Bug- Red with black puff ball spots

Rock Star- Any bright colors mixed with black, and worn with leggings, a cute shirt, and a jean jacket

Princess- Pink, Purple, White, or a Mix- you can make a dress out of it, or a skirt.

Bumble Bee- Yellow & Black- create vivid stripes by doing 2-3 of black, followed by 2-3 of yellow. Alternating every other one will create a less vivid striped pattern.

Zebra- White & Black striped the same as the Bumble Bee.

Tiger- Orange & Black striped the same as the bumble bee.

Pirate Princess - Red & Black striped the same as the bumble bee- add a striped shirt, striped tights, and a bandana.

Pumpkin- Orange & Green- make a dress, and use the green to create a short, spikey fringe of tulle for the top layer. Use felt to add a mouth, nose, and eyes to the middle of the dress.

Peacock- Aqua, Green, and Royal Blue Tulle- add a pair of wings, and embellish with peacock feathers.

Ballerina- Pink Tulle, paired with a leotard, decorated with gems. Add ballet flats for shoes.

Angel- White Tulle paired with a white leotard. You can add white marabou trim to the tutu and wings to make them more Angel like.

Flower Fairy- Bright Colors of Tulle with a green or brown leotard or shirt under. Add fake flowers for embellishment, and a wand & wings

Wednesday, September 15, 2010

Halloween Wreath

So last weekend, I was amazed once more by the wonderful projects I find over at Dollar Store Crafts. Seriously- lots of frugal minded crafters out there, and I. Love. That. This time, it was a wreath made with bath puffs. Love it!


I know I've seen others use the bath puffs before, so it's not completely original (what is, anymore? I'm pretty sure every thought that enters my head on any given basis is simultaneously being thought up by 12 other people world wide!- yes, even that sentence!), but it is looooovely. And orange. I was surprised that A) someone found bright orange bath puffs in time for Halloween, and B) that I was also able to find them. Usually, when it comes to something like that, I'm SOL.

I picked up the items needed, but my DT does not have yarn. Sadness! I wound up getting some black fuzzy stuff on clearance at HobLob for like $3. Then, we went next door to Big Lots, where I think I found the exact same yarn that Heather at DSC used, also for $1. I picked it up- I liked it better, with it's little rust & orange colored hanging ball thingies. Technical term.


There are detailed instructions at DSC, so I won't add those, but here's what all I used to make mine:

1 Medium Twig Wreath- Dollar Tree
1 Big Fuzzy Black Spider- Dollar Tree
4 Orange Strip Bath Puffs- Dollar Tree
Black Fuzzy Yarn- Big Lots
Gemstones- Dollar Tree (I was ECSTATIC! Dollar Tree got GOOD gems in again! The ones from over the summer SUCKED!)
Hot Glue- On hand


All in all, I spent $8 on all the supplies, and I have a lot of yarn and gemstones left over. I had also picked up a black glittery skull, which I liked, but then I made it into a Dia De Los Muertos skull instead, and no longer liked how it looked on the wreath, so I went with the spider.

 I added small gems and two larger gems to the spider to make him puuurty. I also added small purple & clear gems through out the wreath, so that when it's hanging outside, it will catch the light with a bit of sparkle. I'm all about the bling.

Saturday, September 11, 2010

Love me some Dollar Store!

Today, I hopped on over to two different dollar stores to get some items for my Halloween wreath.

I haven't completed the wreath yet, but here's a spoiler of what it will include!


Check back later this week for more details!

Wednesday, November 11, 2009

CVS Extra Care Bucks- $4 w/$20 purchase!

Today, I stopped in to my local CVS. For a few days, they've had a sign up saying that Halloween items were 75% off, and I hadn't had the time to stop in. While I was paying, the cashier offered me a Holiday Catalog, which includes a coupon for $4 in ECB with a $20 purchase. The ECB's print out after the purchase. Also while I was there, I scanned my card and got a $5 off any $30 purchase coupon.

I also found a few things for Christmas in the Halloween items. First, they had 2 bags of "Game Candy", which are cardboard boxes shaped & printed like popular games- Clue, Life, etc. The candy inside is shaped like the game pieces for that game.

Since we are doing a Family Gift of a Game Night, I thought these would be a great addition to the gift. Each bag was only $1.49.

There were also several Halloween themed Pez dispensers, but there was 1 Disney Fairy's one, and 1 Davey Jones from Pirates of the Caribbean each for only $.37! I grabbed both for stocking stuffers.

Saturday, October 17, 2009

A Nice Halloween Night In

Today, we were able to finally sell our old mini-van. It was a nice boost to our bank account, so it was welcome. After doing my own running around, I came home to rowdy kids.

One of our favorite activities in the fall, is having a movie night, all snuggled in our warm PJ's, with warm blankets around us. In the summer, we just don't do it as often. We're busy, it gets dark so much later, so when fall comes back around, we really enjoy it.

While I was in town today, I splurged on a few treats for the kids- Candy Corn flavored Jones Soda ($1.99 for a 4 pack of cans- pricey, but they talk about it all year!), and 3 different flavors of candy corn- Chocolate Caramel, Caramel, & Caramel Apple. I saw them at Walgreens, and just knew the kids would love them.

They are settled in, blankets all over the living room, with some Candy Corn Soda, and a bowl with some air popped popcorn, and candy corn in it. We rented "Halloweentown" from Netflix, which comes with "Halloweentown 2" on it as well. We love Halloween, and the assorted kid friendly Halloween movies that come out.

I hope you enjoy your weekend!


Thursday, October 15, 2009

Frugal Halloween Meal

This year, with Halloween on a Saturday, Nick and I have decided to host a party before Trick or Treating for the kids and some of their friends. For the party, instead of a bunch of sugary treats, we are going to serve dinner type foods. When Halloween falls during the week, I always feel so rushed- pick the kids up, get them home, make sure they are fed, get them into costume, get makeup done for them, and get them out the door again. Rush! Rush! Rush!

The appeal of a weekend Halloween is that I don't have to Rush! Rush! Rush! to get the kids from one place to another. We can take our time, eat, get ready, and head out later in the day.

Our menu for the party is going to revolve around kid favorites- pizza and bread sticks. My first idea was to make individual pizzas out of English muffins. However, I just stumbled onto a recipe that looks great, and festive for the spooky holiday- a Pizza Snake! As I have yet to try this, the recipe is from the website, Divine Dinner Parties.

Pizza SnakeThis is one of those Halloween recipe ideas that's fun to have the kids help with. If you're making this for the first time, I'd suggest buying an extra can of crescent rolls to have on hand in case you need to patch your dough in places. Any openings in the snake will split and leak during cooking.

Serves 10-12 as an appetizer. (I think I'll make up 2-3 of these, as it'll be used more as a dinner food!)

Ingredients:
2 (8 oz.) cans crescent rolls
flour, for dusting
1/2 C. prepared pizza sauce
10 oz. thinly sliced pepperoni
10 oz. thinly sliced ham, chopped
10 oz. Italian sausage, cooked, crumbled, and drained
12 oz. mozzarella cheese, grated
1/2 C. fine, freshly grated Parmesan cheese

Decorating:
Liquid food coloring, your choice of colors
4 egg yolks, divided
2 peppercorns
2 pimento-stuffed green olives
1 roasted red pepper

Instructions:

1. Preheat the oven to 375 degrees F.
2. On a lightly floured surface, spread out your two batches of crescent dough end-to-end lenghtwise. Be careful not to let the sections separate.
3. Pinch all the seams together until you get one block of dough.
4. With a flour-brushed rolling pin, roll your crescent dough into a large, long rectangle. Don't roll it too thin, or it will split.
5. Spoon pizza sauce on top of dough, leaving an inch of bare dough on all four edges.
6. Sprinkle meats on top of sauce, followed by any other optional toppings.
7. Sprinkle with cheeses.
8. Fold one side of the dough lenghtwise over the topping, up to the half-point of the rectangle.
9. Fold the other side over to meet it. Pinch and press the dough together on all sides to seal.
10. With a pastry brush, brush the beaten yolk of one egg onto the top of the dough.
11. Fold your filled dough in half lengthwise. The egg yolk should help it stick. A seam should be created lengthwise along the dough. Pinch this seam together to fully seal and make a sort of cylinder. Be sure all seams are well closed. Any open seams will open further during baking.
12. Gently manipulate ends into a snake shape-- one end should be tapered for a tail, and the other shaped for the head. Don't curve it into a snake yet. You'll do that right before baking.

Decorating Instructions:

1. Beat each of your remaining three egg yolks in a separate bowl.
2. Add the food coloring of your choice to each bowl to make three separate "paints."
3. With a pastry brush or a food-safe paintbrush, decorate your snake as desired.
4. Transfer painted snake to a foiled-lined, greased baking sheet.
5. Gently shape as desired, into an "S" or other snakey shape.
6. Stick two peppercorns into the front of the snout for nostrils.
7. Slice your roasted red pepper into a forked tongue. Insert into front of head.
8. Bake your snake about 20 minutes, until golden and cooked through.
9. Remove from oven. Attach olive "eyes" to the top of the head using toothpicks. Pimento centers should face forward.

To go with our Pizza Snake, we'll be serving "Hairy Witches Finger Bread Sticks"

I found this recipe online a year or two ago, and it works out great!

Ingredients:

Tubed bread stick or pizza dough
Green food coloring
Shredded cheese (we use Mozzarella)
Almond slivers
Pizza Sauce (for dipping)

Directions:

  1. Preheat the oven according to the package.
  2. While wearing plastic gloves, knead green food dye into the dough, until the dough is a witchy green color- not to bright!
  3. Form the dough into small thin bread sticks, creating a lumpy middle for the knuckles.
  4. Insert an Almond sliver into one end as a finger nail
  5. Bake for half the time the package states, then remove. Sprinkle the cheese on top, and continue baking. You want the cheese melted enough to stay on top, but to retain it's shape and look like hair. You can also sprinkle with Parmesan cheese for some added flavor, before adding the shredded cheese.
  6. Serve on a platter with "blood" (Pizza sauce) as an appetizer!
I was able to luck out a few weeks ago, and found a large glass punch bowl, complete with 12 tiny glasses, for only $.79 at my local Goodwill! I'm excited to use it for the party! We are going to just make green punch, and float frozen creepy crawlies in it.

Green Punch

Ingredients:
Green Hawaiian Punch
Squirt (or a generic Grapefruit Soda)
Ice cubes with plastic spiders in them- you can also add gummy worms, plastic bugs, and anything else creepy crawly. Just make sure the plastic is clean, and there is no glitter that can come off in the punch as the ice melts!

Mix the punch & soda, and add the spider ice cubes to the punch before serving!

Halloween Treat Containers

With Halloween knocking on the door, here are a few fun Halloween crafts to do with the kids this year.

**Make sure which ever container you use, that you wash it out thoroughly with hot soapy water, prior to use!!

Pumpkin Treat Carton- Craft found originally at DLTK's Crafts, though I changed it around a bit.

What You'll Need:
  • 1/2 gallon milk container, or a 2 liter bottle of soda, empty
  • Orange, Black, & Green Construction Paper.
  • Glue or Tape
  • Scissors
  • Stapler if you have one.
What To Do:
  1. Cut the top portion off the milk jug or 2 liter, starting 1" below where the walls curve inward near the top.
  2. Cut a 1" straight strip from the top- this will be used as a carrying handle.
  3. If you have a stapler, use it to staple the plastic strip to the top, creating a carrying handle. If you do not have a stapler, cut a horizontal slit just below the top edge of the carton, one on both sides, just wide enough to slide the strap into. Slide the strap into from the outside, then use tape or glue to secure the ends to the inside of the carton. Let the glue dry before moving on, if you used glue.
  4. Using Orange construction paper, cover the entire outside of the container, securing the paper with either tape or glue to the carton.
  1. Fold the green construction paper to wrap around the handle, securing it with tape or glue. Cut some leaf shapes, and a stem, and glue it to the top of the front of the container, where the face will go.
  2. Cut a Jack O'Lantern face with the black construction paper, and glue it to the front.
  3. You have a cute container for passing out treats, or for Trick or Treating!


Bat Treat Container- Again, this was found at DLTK's Crafts, and adapted. This is pretty much the same as the one above, just decorated as a bat, instead of a Pumpkin.

What You'll Need-
  • 1/2 gallon milk container, or a 2 liter bottle of soda, empty
  • Black & White, yellow, or purple Construction Paper.
  • Glue or Tape
  • Scissors
  • Stapler if you have one.
What To Do-
  1. Cut the top portion off the milk jug or 2 liter, starting 1" below where the walls curve inward near the top.
  2. Cut a 1" straight strip from the top- this will be used as a carrying handle.
  3. If you have a stapler, use it to staple the plastic strip to the top, creating a carrying handle. If you do not have a stapler, cut a horizontal slit just below the top edge of the carton, one on both sides, just wide enough to slide the strap into. Slide the strap into from the outside, then use tape or glue to secure the ends to the inside of the carton. Let the glue dry before moving on, if you used glue.
  4. Using Black construction paper, cover the entire outside of the container, securing the paper with either tape or glue to the carton.
  5. Fold more black construction paper to wrap around the handle, securing it with tape or glue. Cut some wing shapes, and glue it to the back of the container.
  6. Cut a Bat face with the white, yellow, or purple construction paper, and glue it to the front.
  7. You have a cute container for passing out treats, or for Trick or Treating!