Showing posts with label st patricks day. Show all posts

Sunday, March 28, 2010

St. Patty's Day Catch Up

This year, I had an idea for a cute little basket for the kids. And I made it. I even photographed it. A day late. Cause, I forgot to give it to the kids ON St. Patrick's Day. Oops. And, then, in Epic Blogging Fail, I forgot to post it.

So, bask in the glory!


To make this:

1 sheet of Shamrock Scrapbook Paper ($.59 spent)
1 Green Metal Bucket, Dollar Spot at Target ($1 spent)
3 Candy Sticks each, $.10/ea at Cracker Barrel- I went with Lemon, Lemon Lime, and Green Apple for shades of green, and yellow. ($.90 total spent)
Green & Silver Hershey's Kisses left from after Christmas purchases (dirt cheap)
1 Green Ink Pad (on hand from Christmas)
Green Good Luck Stamp, $1 at Michaels (on hand with no purpose)
Shamrock Ribbon, $1 at Michaels (on hand from a Shamrock project)

Total spent FOR this project:
$2.49

Total spent including on hand items:

$7ish.

I cut circles of the scrapbook paper, then distressed the plain white side, stamped the kids names on it, and added the "Good Luck" stamp as well. Then, punch a hole, and tie it around 3 candy sticks with the shamrock ribbon.

I added a larger circle to the front of the bucket, and tied it right with the ribbon the bucket came with. I distressed it, and added the Good Luck stamp again.

To keep the candy sticks standing, I filled the bucket in with the Hershey's Kisses.

While I may be a -tad- bit over due in posting this, it would be really cute in pastel colors for Easter!

This post is linked up at the link parties listed here.

Wednesday, March 3, 2010

St Patrick's Day Round Up

You know yesterday, when I said I hadn't finished (or started) a craft the night before? Well, that's kind of like the same as today. I am craft-less today. I wound up meeting Nick for lunch, then doing a bit of thrift store shopping. Then grocery shopping last night, so lots of running around.


So, here I sit without a craft again. Not a big deal, I suppose. The blog isn't just crafts. But, crafts ARE a fun part of what I do. I saw this morning, though, that Heather over at Dollar Store Crafts featured my Shamrock sign! Then I noticed a link to a blog carnival of St. Patrick's Day items, and found some adorable things!

If you find yourself being featured here, grab this special button I made just for the St. Patrick's Day items!

Photobucket

So, without further ado, some fun St. Patrick's Day crafts!


St Patricks Day Craft

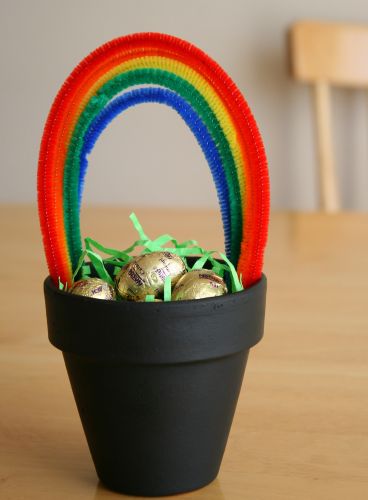
Maria on Make & Takes made this cute little pot of gold! She used gold foil wrapped eggs, but any gold foil wrapped candy would work. I know Dollar Tree is carrying 3-packs of mini terra cotta pots right now, too!


Kelly at Make It Sparkly Mama made this cute Shamrock wall hanging using wooden hearts. Isn't it just darling?


Kimberly at Attempting Creative made cute little felt shamrock pins to give to her co-workers. They are just adorable, and easy to make!


Jessica at Majestic Street came up with this cute Shamrock wall hanging using 3 Heart Shaped straw wreaths from the dollar store! Isn't it cute?


Vickie at Spun Sugar Quilts posted this adorable quilted "Green Beer" table runner. Isn't it adorable? And those dolls are just the cutest!


Erin at Lucky Star Lane made this cute variation on the Book Wreath, using shades of green for St. Patrick's Day. This is cute, and could easily be changed up for other color themes, and holidays.


Serena at Naptime Crafts made this cute plate using vinyl and her Cricut. I just love that slightly un-lined up shamrock in the center!


Now, my own addition to the St. Patrick's Day Fun.

The Homemade Shamrock Shake! I love these, as does the rest of the family, but the price? Not so frugal.

So, here you have it, the top secret copy cat recipe for making your own shamrock shake.

2 Cups Vanilla Ice Cream
1/4 Cup Half & Half
1 Cup Milk
1/4 Teaspoon Mint Extract (Not Peppermint!)
8 drops green food coloring, if you want it green

We found the recipe was a bit liquidy, so next time, we'll probably use a touch more ice cream, and a bit less milk. Otherwise? It was perfect! This will make 2 12 ounce shakes, or 4 6 ounce shakes. 

Enjoy!!

Monday, March 1, 2010

Dollar Tree St. Patrick's Day


This past weekend, I was in Michaels when I decided I wanted to do just 1 more small St. Patrick's Day item. I'm not really into the holiday, but since I started blogging, I've seen the crafting value in every holiday. I made a lot of stuff for Valentine's Day, including 3 wreaths, and loved all of it.

I wound up deciding (as I sat pondering the items) to make a wall hanging. I am not in love with the bows on it.

What I used:


1 Dollar Tree "Canvas" (it was pre-printed)
3 Wooden Hearts from Michaels
3 Foil Cardboard Hearts- On Hand
Shamrock printed ribbon from Michaels
Paint- On Hand
Goldish wide sheer ribbon- on hand, but I got it at Dollar Tree
Matte & Golden Shimmer Mod Podge- On Hand

I love the sign itself. I hate the ribbons used. I painted the canvas brown, then used "Shamrock Green", forest green, and darker brown to streak the canvas. I loved it! Lastly, I coated the canvas in golden shimmer mod podge, to give it a bit of that pot of gold feeling.


I painted the larger wooden hearts forest green, and the cardboard side of the foil hearts Shamrock green. Word of advice- if you have it, skip the cardboard and use wooden hearts, these things curled horribly, and kept tearing when I put my fingers on them. Mucho Re-paint-o.

I mod podged the cardboard hearts to the centers of the wooden hearts with matte finished. I wasn't going to add any gold to it, but it kind of stood out against the golden shimmer background, so I wound up adding a layer of golden shimmer.

Lastly, the ribbon. Oh, the ribbon.


I noticed right off the bat that the white shamrock ribbon was too white against the rich, earthy tones I had used. I had some thing sheer tan ribbon, so I added that, made a bow, glued it on, and called it good over night.

Looking at it today, I hated it (though, to be fair, I hadn't really loved it last night). Today, I got the bright idea to distress the ribbon with brown ink. It wasn't horrible, but not great. I have a regular green ink pad, so I used that, too. Big mistake- while that pad works for distressing the edges of paper, it really soaked into the ribbon, leaving green blobs.


Being truly frugal, I was not about to give up on that bow, so I glued it on. Let it sit. Ripped it back off. Dollar Tree plasticy canvas is a lot stronger than one would think, as it's held up to having the bow ripped off it twice now.


I decided to stain the ribbon with the left over coffee from this morning. It accomplished 2 things. 1- it washed all the ink distressing from it except two random, huge green blobs. 2- it stained it. Faintly. It was far more white now than it was before staining it, since it washed the ink off.

I finally gave up. I pitched the hideous bow. It was useless. I really do like my sign without it, but since I don't have a stem for the shamrock, I felt like I should have something there.

Well, whose going to judge my 3 leaf, stemless clover? No one, it's in my house, not an art museum!


And while this photo was taken early on, before the ribbon debacle,  this is what it looks like again. Well, except I did skip a step. That wide sheer ribbon I had? I used it to make a hanger for it. 


See? The top part, not the ugly bow.

This post is linked up at the link parties listed here.

Monday, February 22, 2010

Top O' The Morning

Good Morning (again)!

This morning, I worked on a wreath for St. Patrick's Day. I love how it turned out, but I'm kind of sad I can't hang it outside to show off. It's too cute to keep hidden! Maybe I'll hang it outside on the 17th, if it's not too wet out.

St. Patrick's Day Wreath for $3.75

You'll Need:
8 sheets of felt- I used 2 sheets each of white, lime green, kelly green, and forest green. $2 @ 4/$1 not on sale
Green Marabou trim- Clearance at 75% off- $.75
Foam Wreath Form- Dollar Tree- $1
Ball Point Pins- On hand (I've heard that the flat end pins hurt your thumb after a while of pushing them in!)

  1. Find something circular to use, and draw as many circles as you can on your sheets of felt. I used a smaller than average size spool of ribbon, and was able to get 12 circles. Anything larger will likely yield less. Smaller, and I could have easily gotten 16, but I don't know how smaller circles would have looked. Cut the circles out.
  2. Fold a circle in half. Fold that half into thirds. Pinch it together, and use a pin through the bottom to attach it to the wreath. You could also use hot glue and a pen or pencil to glue the circles straight to the wreath if you are so inclined, but I imagine it would take more work.
  3. Fill out the wreath. I added a line around the edge to hide the green florist foam I used for the wreath. If you use a wreath form that's rounded, and not flat like mine, you could wrap the form in ribbon first, and you wouldn't have to add extra circles.
  4. Once that was done, and all my circles were gone, I dug out a spool of marabou "ribbon" trim I got on clearance after Christmas for 75% off. I ran it around the edge of the the wreath twice, pinning the rope to the form. I repeated this on the inside. The fur doesn't show up real great from the front, but it completely covered the edges of foam that were visible. 
I was going to add a bow, but I didn't have anything on hand that really matched, and was wide enough ribbon to show up good. I like how it looks without a bow, though. I had also picked up little plastic green "coins" at Big Lots to use, but decided not to.

This style of wreath has been all over the blog world over the past month, so it's hardly original. In fact, Heidi at Craft Monkey did one very similar to mine back before Valentine's Day, instead of doing a red, white, and pink one.


This post is linked up at the link parties listed here.