Showing posts with label wall art. Show all posts

Thursday, April 15, 2010

Wall Art & A To-Do List

I am happy to report that with the help of a muscle relaxer, I slept last night. Like a log. Or a baby. Neither makes much sense- logs don't sleep, and babies toss and turn all night, waking up all the time. Ok, fine then, I slept like the dead.

It was glorious, though I'm reminded today of why I hate to medicate unless it's absolutely necessary. I'm all jittery feeling. I'm hyper sensitive to a lot of medications, so this is typical. Nothing horrible, I suppose, but just a weird feeling.

Moving on... I have a to-do list today. Will it get finished? No clue. Probably not. But I'll try. It's 11:30, and I've gotten 2 things done, though, so that's not too bad.

  • Start & Finish a Wall Hanging someone won- this was a bit slow, but I only finally heard from the winner last week, and it's been one of those weeks so far. Happy to report this project was started and finished- and I. Fell. In. Love.
  • Schedule all of the Birthday Week Giveaway posts, so everyone knows when their prize will be posted. Done, and done- and everyone emailed! Thank you again to everyone who offered a prize up! I'm so excited to post the contests!
  • Finish the minky blanket for the shower this weekend. Dreading this- the minky is not easy to sew, it stretches just enough that it stops lining up after a while. I have 2 sides sewn, 2 left, then I can add the binding. 
  • Bake the neighbor some thank-you brownie-cookie bites. He fixed my car muffler for me this week, and he gives us way too much of a good break on labor. Shops around here charge $80-100/hour for labor. He spent close to 3 hours doing the work, and charged us $50 total for labor. Not even, actually- the muffler wound up being about $10 more than it should have been, so he wound up only making $40 for all that work. I bake for him every time he fixes a car.
  • Go to the store, because I have no cookie dough, or mixes, or stuff to make cookie dough. Will cheat, and buy pre-made dough. Yep, cheat. 
I think that's all. I have today & tomorrow to finish the blanket. The giveaways are scheduled, and I have a week to get the actual posts done up ahead of time. There will be a giveaway every day from Saturday the 24th to Friday the 30th. I am so excited to show all of my readers the awesome goodies that so many wonderful ladies donated!

I guess all I need to really do is the blanket, the store, and the brownie-cookie bites. Have you ever tried them? I found the recipe the other day, and man, does it sound GOOD.

You scoop brownie batter into the bottom of a mini muffin pan, filling it just under halfway. Then, drop a blob of cookie dough in the middle. Bake, cool, frost, sprinkle, eat, enjoy. I can't wait to try one. I'm sure my body will thank me, as will my rear end and thighs.

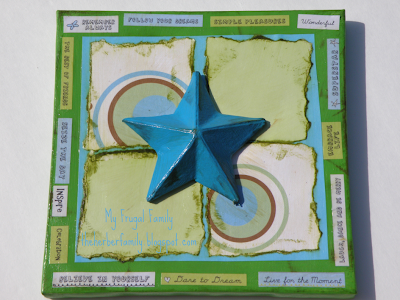
On to the Wall Art. This was done basically the same as the wall art I made for my Mom's bathroom, except the colors (obviously), and to incorporate all the colors, I used 3 different papers, plus stickers. I had all these little saying stickers that came in a packet for $.50 at Michaels. The blue & green paper were in that packet, too (it was from the $1 section, 50% off). The polka dot paper was $.59 at Jo-Ann's, the star was $.50 at HobLob. The base is another $1 store canvas.

Total Costs: $2.59 if you count the cost for ALL the paper, not just what I used. The paint & mod podge was on hand.


Tell me that isn't just FUN? It's for a teen's room, and she likes polka dots, bright blue, lime green, and brown. I thought the stickers were great for a teen. I really want one myself, now! I'll have to try and find more of those types of stickers- too fun!

Monday, March 29, 2010

Aunt Deb's Wall

My Aunt recently bought a lovely new house, and with that lovely new house, came lovely empty walls. Which, of course, she would like filled. Going on very little, this is what I came up with for her new dining room. The room has 1 wall painted sage green, and she added a sand colored table runner and table cloth to the table.


You'll Need:

Mod Podge
1" bristle paint brush (3/$1 at DT)
Wooden Embellishments ($1.99 at Hobby Lobby, $2.99 at Michaels)
Scrapbook Paper
Paint
Distress Ink (I used a color called Peeled Paint)
3 Saints pictures from DT
Sand Paper


The wooden embellishments

  1. Because the paint will need time to dry, start this process first. I painted my embellishments all Ivory color. I wound up needing 2 coats, but next time, I think I'd choose to use spray paint for reasons I'll note below.
  2. Once the embellishment is covered and dry, water down your brush, and use a second color. I choose Moss Green. Water down the paint with the brush, and cover the object, paying close mind to fill in crevices, creases, dimples, etc. Let it set for just a moment, then use a slightly damp paper towel to wipe the paint off. This should leave just a slight hint of color in the creases.
  3. After it has dried completely again, I took my Peeled Paint distress ink, and just brushed it against the surface, so that some ridges were brushed with a deep sage green color.
Note about these embellishments:

I'm not sure if it was the paint I used, or the quality of the wooden embellishments, but every last one of them showed little surface cracks, and the tops were peeling from the backs after I painted them. Given that I used 4 different packs, and 3 different designs, I think it was the quality of the embellishments, and not the paint. One of them even had to be glued together. I have used these once before, and spray painted them first, and they did not do this. Maybe it was a bad lot, but given that it was 4 packs and 3 different designs, I'm not sure.


The picture
  1.  Sand the surface of your picture down, first. The Mod Podge will adhere better. Once it is sanded, make sure to thou roughly wipe it down, so that the dust is all gone.
  2. Measure the paper- I measured it wide enough to wrap around the edges. Cut it out, and set it aside. 
  3. Apply a thin layer of Mod Podge to the front of the picture. I chose to use Matte finished. Once it's coated, smooth the paper on. In my case, I turned the paper upside down, and put the picture down on it so I could more easily center it. Using pressure, your hand, your distress ink- whatever you have, smooth out the paper as it dries, to limit or eliminate wrinkles. 
  4. Once it's dry, choose your next paper. For my second paper, I ripped a sheet of cream colored, slightly pearlized scrapbook paper in half, then tore the remaining edges. Once torn, I distressed each edge.
  5. Mod podge the paper onto the center, paying close attention to smoothing out wrinkles. If you are happy with the over all picture at this point, and have no desire to add to the basic design, Mod Podge over the entire surface for a top coat, and let dry.
  6. Once it's dry, take your now dry wooden embellishments, arrange them how you like, and hot glue them into place.
  7. Lastly, seal the wood with a coat of Mod Podge.


 My total costs:

Wooden Embellishments: $8
Scrapbook Paper: $1.35
Saints Pictures- $3
Paint, Ink, Mod Podge- Pennies, it was on hand, and reusable

Total Cost: Roughly $12.50 for 3 8x10 Wall Hangings


This post is linked up at the link parties listed here.

Monday, March 22, 2010

Talented Tuesday

Interested in sponsoring next week's Talented Tuesday post with your own crafts, shop items, or a tutorial? Contact me for details at herberkids3(at)yahoo(dot)com!

Welcome to another edition of Talented Tuesday. For today's post, I am showing off a wall hanging I did for my Mom's bathroom, as a follow up to the wall hanging set I helped her make for her kitchen. If you haven't seen it yet, check it out!

For this set, I had a concrete idea in mind. My mom recently repainted her bathroom from yellow to a pale lime green, with white wainscotting. She changed out her shower curtain from yellow flowers to green, blue, brown, and white stripes. Now, we just need to add a few things to the room!

Over the weekend, we picked up lots of supplies for the main project, including paint we never even opened, too much scrapbook paper, and a couple extra canvases, for a "Just In Case" moment. We wound up not needing those.

Star Wall Hanging

You'll Need:
Dollar Tree Pre-Printed Canvas
Paint
Mod Podge
Scrapbook Paper
3-D Paper Mache Barn Star
Hot Glue


  1. Paint the edges and part of the top of each canvas in the color of your choosing. I used Moss Green. I painted about 1 1/2" in on the tops. Let it dry, then add another coat if needed. My white bird picture needed 2 coats, and the brown lily picture needed 3 to cover the darker colors.
  2. Paint your stars the color of your choice while the pictures dry. I used 2 coats of Moss Green, but one would have been enough.
  3. Using a wet paintbrush, add a darker color paint to the stars, especially in the edges. I used plain old Brown, very watered down. Once it's coated, wipe it off with a damp paper towel. Repeat until you've achieved a good distressed look. I also used a brown pad of Distress Ink to just lightly ghost over the top ridges of the stars, so the brown was a bit darker in spots.
  4. Measure out two squares of scrapbook paper. I had a lot, but ended up deciding to use the same paper for both. Cut it just a bit larger than you want, then tear the edges for a more ragged, rustic look.
  5. If you want, you can distress those edges with ink. I used Vintage Photo Distress Ink to do this, and very lightly distressed the paper itself.
  6. Apply a thin coat of Mod Podge to the picture, and press your paper on, smoothing out the wrinkles as you go. Apply another thin coat, coating the entire front and sides of the picture. I chose Glossy for this project.
  7. Hot glue the star onto the front of the picture, and Viola! You're done!


Notes-
It only took me about 15 minutes to do this, NOT counting the time I was waiting for the paint to dry. It might be easier to paint it, and go about doing something else, then going back to it. If you try to paint over it before it's fully dry, it wipes the paint off due to the plastic like feeling from the pictures.

Like my last project, this project is fully customizable to any decor with the multitude of paints and scrapbook paper available.

Total Costs:
DT Canvas- $1/each, $2 total
Scrapbook Paper- $.59, half used, $.30 total
Barn Stars- $.50/each, $1 total (actually, I think I got them cheaper, back at Christmas, but I can't recall. They've just been sitting here ever since)
Paint- $.50 (while this WAS on hand, it was a brand new bottle, so I'll count the cost. We got it 2/$1 at Michael's this past weekend).

End Cost: $3.80, or $1.90 each.


The Rules


1) Post a blog about something you've made- a refurnish, recipes, a craft project, a sewing project, room decoration, anything you've done!

2) Add a link to your blog post- not to the blog itself, but to the individual posts! You can post more than one project, just add more links! The links should look something like:

http://theherberfamily.blogspot.com/2010/01/love-banner.html

and NOT like this:

http://theherberfamily.blogspot.com/

3) Add the code below to each post you link to the MckLinky, so that others can post their projects here as well! The list will accept new links through Saturday, so if you make something new, come back and post it! Don't forget to look at the links on the list, and let people know where you found their post at!

This MckLinky will remain open and accepting links through Thursday evening!! 


Photobucket