Join Bowtique Critique for the 2nd annual Black Friday Online Craft Show!
With over 30 vendors, we're bigger than last year, and have hundreds of awesome items available this year! New to the show this year is the Bargain Corner- where all items are just $1.00- and most of what is available is Hand Crafted With Love!
And don't forget to check out the great FREE giveaways available through out the entire show!
The show is from 8pm Wed November 23rd to 6pm Sat November 26th.
Stop by Bowtique Critique Fan Page on Facebook to get ready for the auction!
Showing posts with label frugal. Show all posts
Sunday, November 13, 2011
Friday, May 7, 2010
MP3 Cover Tutorial
A few years ago, I entered the modern age with an MP3 player. Actually, I got one for Nick first, then loved it, so he got me the same one (for Valentines Day for both of us!). Somewhere along the way, both players were lost. Of course, this was 5 years ago, so they were pretty old anyway.
Now that I'm taking an active interest in being more active, I wanted some music to listen to while I do it. I talked to Nick, and we decided that we could afford an MP3 player for me this week, so off I went. I found a 4GB MP3 player that also does voice record, plays videos, and stores pictures, and it was only $50. Ok, "Only"... I think it's high priced for what is essentially a toy, but I got it anyway.
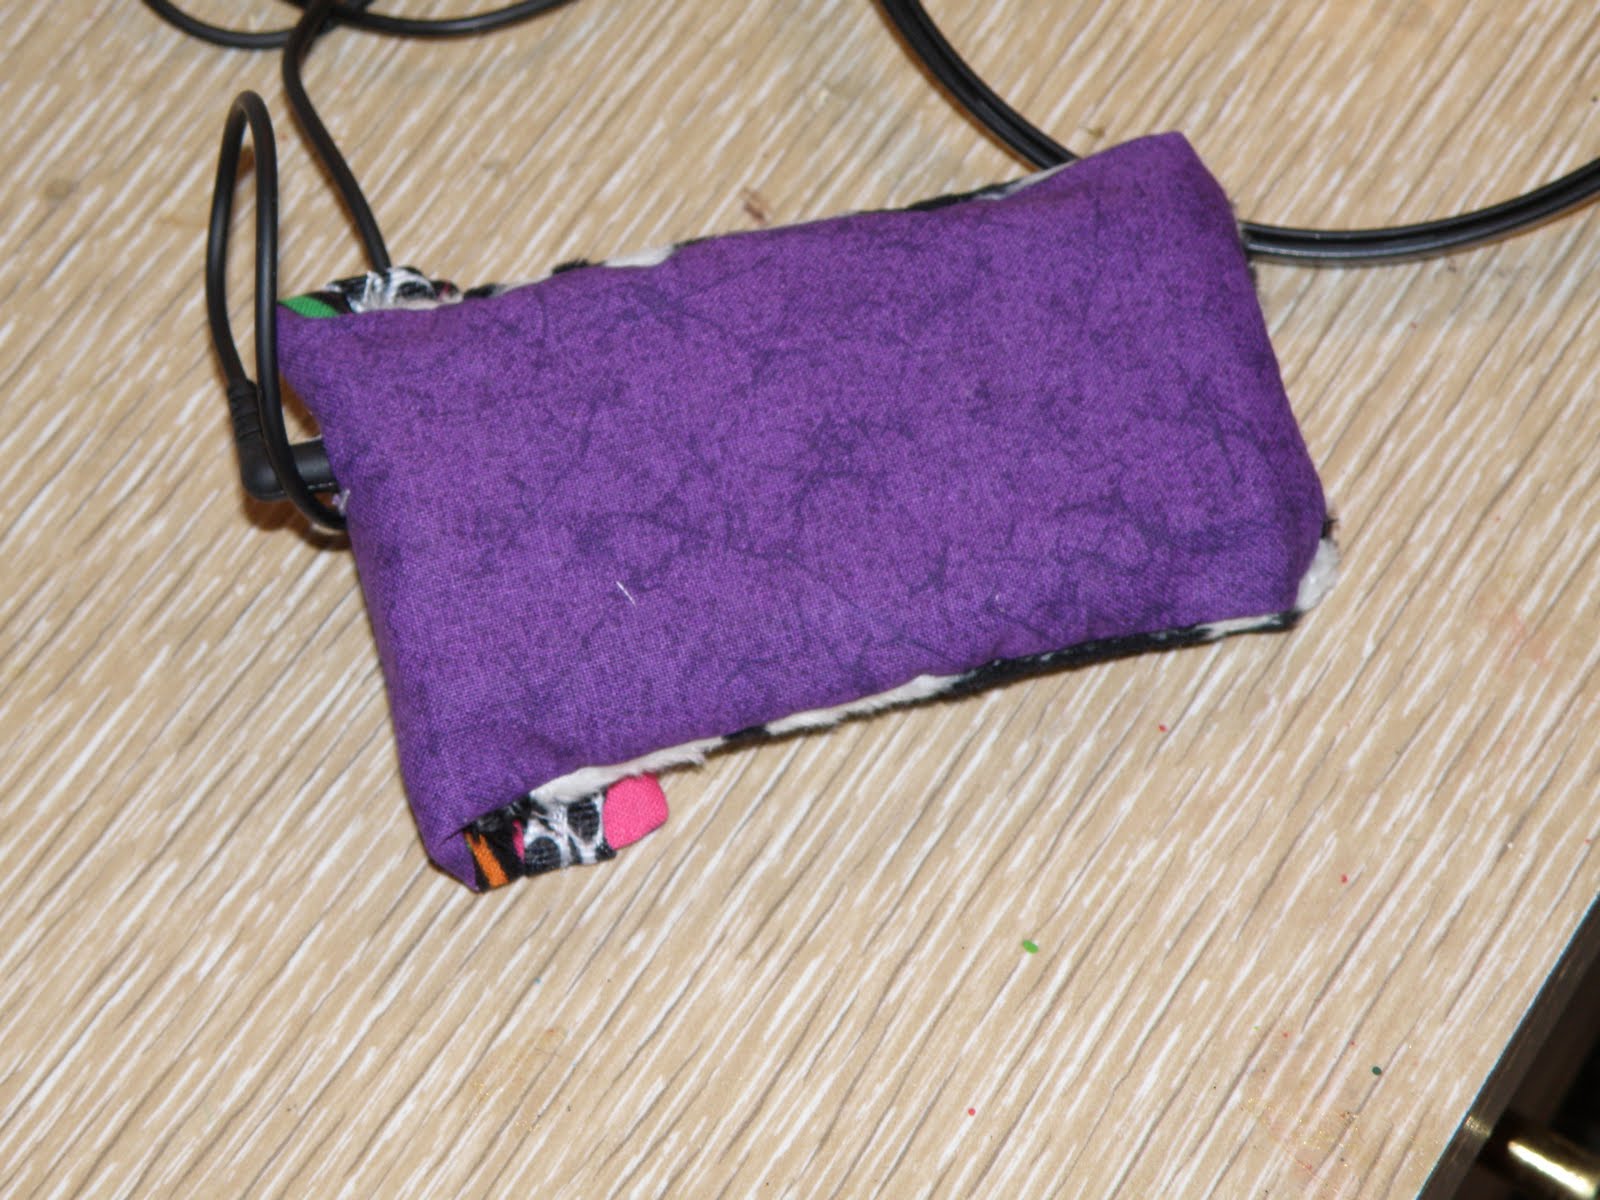
The downside- the store had no accessories for this model, and I wanted some way to clip it to my clothing or body, so it wouldn't get lost, or fall from a pocket. So, what did I do? Got out my sewing machine. Three different times, actually!
MP3 Case
You'll Need:
Fabric Remnants- I used 3 different prints
Sewing machine
Elastic
Button
Needle & Thread
Fabric marking pen

And, when you are done using it, wrap your headphones cord around it, then button the flap so the cord stays wrapped around it, and they don't get tangled or lost!
All of this was done with scraps of fabric I had on hand, and notions I had on hand. FREE! Gotta love that!
Now that I'm taking an active interest in being more active, I wanted some music to listen to while I do it. I talked to Nick, and we decided that we could afford an MP3 player for me this week, so off I went. I found a 4GB MP3 player that also does voice record, plays videos, and stores pictures, and it was only $50. Ok, "Only"... I think it's high priced for what is essentially a toy, but I got it anyway.
The downside- the store had no accessories for this model, and I wanted some way to clip it to my clothing or body, so it wouldn't get lost, or fall from a pocket. So, what did I do? Got out my sewing machine. Three different times, actually!
MP3 Case
You'll Need:
Fabric Remnants- I used 3 different prints
Sewing machine
Elastic
Button
Needle & Thread
Fabric marking pen
- Measure the player on a piece of fabric, and cut the fabric about 1/2 inch wider on three sides, and about 2 inches longer on the top side. Repeat an identical size with another piece. Repeat this with a third section of fabric, but measure it just 1/2 inch wider on the top this time.
- Stitch the two identically sized pieces of fabric together on three sides, with the face of the fabric facing inward. Once it's sewn on three sides, clip the corners, then turn it right side out, and use a pencil to poke the corners out.
- On the remaining section of cut fabric, sew a hem across the top side, just a thin hem.
- Choose which side of the double sided length of fabric you want to be the outer shell. Pin this side to the smaller section, face to face, with the unsewn edges together at the bottom. This section will not match in length- that's fine!
- Sew the two sections together on the sides and across the bottom, then trim the edges, and turn it right side out, once more using a pencil to poke the corners out.
- Now that it forms a pocket, slip your MP3 player in, and make sure it fits (psst... my first try didn't fit, oops!). Keep it in, and measure where the long section lands when you fold it over the MP3 player. Mark the spot.
- Hand stitch your button onto the shorter section of the fabric below where you marked where the flap landed. You'll be using elastic to secure the top flap to the bottom section, and you want it nice and tight.
- Using the elastic, measure how much is needed to fit over the button from the flap, while remaining nice and taut. Sew the loop of elastic to the underside of the top flap.
- Now comes the tricky part. put the MP3 player back in, and mark on the outside of the fabric where the headphone cable goes. For mine, I opt to put the MP3 player in upside down, so that the headphone cord comes out on the top flap. It was easier to create the hole there. NOTE: If you have a hole in a different location, such as the side, you may want to do this step before sewing the pouch together!! Once the location is marked, sew a box around it, then use scissors or a seam ripper to cut the fabric out from inside the box, clipping all the loose threads. You could also use a button hole stitch, if you know how to make one!
- Lastly, because I used white thread, I sewed a coordinating length of ribbon to the flap to hide all the hideous stitching I had done!
And, when you are done using it, wrap your headphones cord around it, then button the flap so the cord stays wrapped around it, and they don't get tangled or lost!
All of this was done with scraps of fabric I had on hand, and notions I had on hand. FREE! Gotta love that!
Monday, March 1, 2010
Dollar Tree St. Patrick's Day
This past weekend, I was in Michaels when I decided I wanted to do just 1 more small St. Patrick's Day item. I'm not really into the holiday, but since I started blogging, I've seen the crafting value in every holiday. I made a lot of stuff for Valentine's Day, including 3 wreaths, and loved all of it.
I wound up deciding (as I sat pondering the items) to make a wall hanging. I am not in love with the bows on it.
What I used:
1 Dollar Tree "Canvas" (it was pre-printed)
3 Wooden Hearts from Michaels
3 Foil Cardboard Hearts- On Hand
Shamrock printed ribbon from Michaels
Paint- On Hand
Goldish wide sheer ribbon- on hand, but I got it at Dollar Tree
Matte & Golden Shimmer Mod Podge- On Hand
I love the sign itself. I hate the ribbons used. I painted the canvas brown, then used "Shamrock Green", forest green, and darker brown to streak the canvas. I loved it! Lastly, I coated the canvas in golden shimmer mod podge, to give it a bit of that pot of gold feeling.
I painted the larger wooden hearts forest green, and the cardboard side of the foil hearts Shamrock green. Word of advice- if you have it, skip the cardboard and use wooden hearts, these things curled horribly, and kept tearing when I put my fingers on them. Mucho Re-paint-o.
I mod podged the cardboard hearts to the centers of the wooden hearts with matte finished. I wasn't going to add any gold to it, but it kind of stood out against the golden shimmer background, so I wound up adding a layer of golden shimmer.
Lastly, the ribbon. Oh, the ribbon.
I noticed right off the bat that the white shamrock ribbon was too white against the rich, earthy tones I had used. I had some thing sheer tan ribbon, so I added that, made a bow, glued it on, and called it good over night.
Looking at it today, I hated it (though, to be fair, I hadn't really loved it last night). Today, I got the bright idea to distress the ribbon with brown ink. It wasn't horrible, but not great. I have a regular green ink pad, so I used that, too. Big mistake- while that pad works for distressing the edges of paper, it really soaked into the ribbon, leaving green blobs.
Being truly frugal, I was not about to give up on that bow, so I glued it on. Let it sit. Ripped it back off. Dollar Tree plasticy canvas is a lot stronger than one would think, as it's held up to having the bow ripped off it twice now.
I decided to stain the ribbon with the left over coffee from this morning. It accomplished 2 things. 1- it washed all the ink distressing from it except two random, huge green blobs. 2- it stained it. Faintly. It was far more white now than it was before staining it, since it washed the ink off.
I finally gave up. I pitched the hideous bow. It was useless. I really do like my sign without it, but since I don't have a stem for the shamrock, I felt like I should have something there.
Well, whose going to judge my 3 leaf, stemless clover? No one, it's in my house, not an art museum!
And while this photo was taken early on, before the ribbon debacle, this is what it looks like again. Well, except I did skip a step. That wide sheer ribbon I had? I used it to make a hanger for it.

See? The top part, not the ugly bow.
This post is linked up at the link parties listed here.
Wednesday, February 3, 2010
From Christmas Tree to Valentine Tree
This year, I put up my beloved white Christmas tree, and my newest cat (whom we adopted about a year ago, so she wasn't here for Christmas last year), decided that it was too beautiful to let stand there unclimbed. She loved sitting in the branches. Unfortunately, she ruined the tree, as it was a cheap one to begin with.
I was going to donate it, but then I decided that since the top section was intact, I would keep that, and use it as a mini tree next year. As Nick and I were packing things away, though, I decided it would make a lovely little Valentine Tree, so I unpacked it.
I also unpacked a set of 10 mini Christmas bulbs I had that were shiny, pearlized hot pink. Ooo, pretty! I had everything on hand I needed to decorate, or create decorations, except 1 thing- garland. For some reason, I just hate tinsel garland on that white tree. It looks horrid, so even though I had some red sitting out, I refused to use it.
In all honestly, I wasn't going to add garland at all, but I found some cute wired heart garland at Dollar Tree, so I grabbed it. It's pink and lavender, and I'm really glad I did! I love how it looks on the tree.
I made several unique heart ornaments out of felt, and added those to it. I also dug out the last of my flocked red, and pink glitter heart stakes from Dollar Tree (I picked them up for a craft, then hated them in it, and never used most of them), and stuck those in the branches.
For a topper, I took a pink sequined pick I got on clearance 90% off at Michaels after Christmas, and I bent the two middle strands into a heart shape, then two others outward. The lone stray (it was a 5 strand spray), I spiraled around the base. I also formed a heart from some of the left over wire garland, and added that, and one pink glittery heart pick.
Instead of a skirt, I used one of my Valentine's Day placemats under the stand. Last weekend, I picked up 2 glass apothecary jars at Goodwill, and filled them with left overs. One has a couple of pink bulb ornaments, and the left over flocked & glittery hearts, sans picks. The other has the last of the wired garland wrapped around inside of it.
I love, love, love the jars filled with candy, but 2 of my 3 kids have ADHD, with a large emphasis on being impulsive, so leaving candy laying out is an open invitation for them to chow down until it's gone, then look at each other and say "I don't know who did it, Mom!"
So, until the kids are out of the house in 10+ years (my youngest is 8, and this is totally counting on them all going to college, which we are pretty insistent on), the candy displays will just have to wait.
I was going to donate it, but then I decided that since the top section was intact, I would keep that, and use it as a mini tree next year. As Nick and I were packing things away, though, I decided it would make a lovely little Valentine Tree, so I unpacked it.
I also unpacked a set of 10 mini Christmas bulbs I had that were shiny, pearlized hot pink. Ooo, pretty! I had everything on hand I needed to decorate, or create decorations, except 1 thing- garland. For some reason, I just hate tinsel garland on that white tree. It looks horrid, so even though I had some red sitting out, I refused to use it.
In all honestly, I wasn't going to add garland at all, but I found some cute wired heart garland at Dollar Tree, so I grabbed it. It's pink and lavender, and I'm really glad I did! I love how it looks on the tree.
I made several unique heart ornaments out of felt, and added those to it. I also dug out the last of my flocked red, and pink glitter heart stakes from Dollar Tree (I picked them up for a craft, then hated them in it, and never used most of them), and stuck those in the branches.
For a topper, I took a pink sequined pick I got on clearance 90% off at Michaels after Christmas, and I bent the two middle strands into a heart shape, then two others outward. The lone stray (it was a 5 strand spray), I spiraled around the base. I also formed a heart from some of the left over wire garland, and added that, and one pink glittery heart pick.
Instead of a skirt, I used one of my Valentine's Day placemats under the stand. Last weekend, I picked up 2 glass apothecary jars at Goodwill, and filled them with left overs. One has a couple of pink bulb ornaments, and the left over flocked & glittery hearts, sans picks. The other has the last of the wired garland wrapped around inside of it.
I love, love, love the jars filled with candy, but 2 of my 3 kids have ADHD, with a large emphasis on being impulsive, so leaving candy laying out is an open invitation for them to chow down until it's gone, then look at each other and say "I don't know who did it, Mom!"
So, until the kids are out of the house in 10+ years (my youngest is 8, and this is totally counting on them all going to college, which we are pretty insistent on), the candy displays will just have to wait.
Tuesday, February 2, 2010
A is for Alex
My niece, Alex, turns 3 in early April. She was born on Good Friday, actually! My sister, Brooke, saw my monogrammed "H" art last week, and requested one for Alexandria for her birthday. Alex is learning the alphabet, and loves the letter "A" because she knows Alex starts with A.
Now, who am I to deny a request like that?
This is basically the same as last week, but not exactly. For starters, I wanted it smaller- I felt the big old 16 x 20 was probably over kill. Also, I didn't use any paint, so the entire thing is covered in scrapbook paper. I picked up 2 pressboard type "art" works at Dollar Tree, one smaller than the other by about an inch all around.
I grabbed a 2 pack of the letter A at HobLob last week, and picked out the scrapbook paper I wanted.
What You'll Need:
1 sheet of 12x12 Scrapbook paper
2 sheets of 8x10 Scrapbook paper
2 pieces of lovely dollar store "art", one smaller than the first
An Initial, Number, or Design made from wood
Glue
Mod Podge
Ribbon
Stamp Pad, markers, or paint
Sand paper
Cost- $3.52 for the paper & dollar store products, and the A. The ribbon was $2 and $.33, but such small amounts used, maybe $.25 total. The other items were all on hand.
I'd estimate this project can be done for $4 or less, depending on what all you have on hand. If I'd had bright colored paper, that would have knocked just over $1 off the cost. The letter was cheap- it was a 2 pack for $.99, minus 30%, so I got it for about $.69, divided by 2 for the cost of 1.
I started off by sanding the surface of both pieces, as they had kind of a slick, glossy finish. Make sure to wipe all the dust off.
For the top, smaller piece, I used 2 sheets of scrapbook paper- 1 solid color, and 1 floral pattern. I cut the solid color to size for the board, then I cut the patterned piece about 1/2 an inch smaller all the way around.
Spread Mod Podge over the surface, and add the first sheet of paper. Once it's dry, mod podge over top of it, and add the second sheet of paper, centered. After that is dry, add one more layer of mod podge to seal it.
For the letter A, I didn't have any bright colors of paint, so I improvised. First, I stained it with a lavendar ink pad. Then, I colored the edges with markers. Yep, tricky, I know. The only thing I don't love, is that in some places, the marker bled onto the top, just a bit.
I then glued the A onto the top board, and set to work on the bottom one. Again, spread Mod Podge on, and smooth the paper on, cut to size. Spread another layer on top of that. I don't know if the board was slightly off, or if I was, but I wound up with a tiny sliver showing from the bottom layer. I opted to sand down the edges to distress them, so that it didn't show.
Once it's dry, glue the top section to the bottom section, centered. Now, for me, the bottom piece came equipped with a pretty light blue ribbon to hang it from. If yours doesn't, you can easily add this with a good stapler, or you can use a traditional hanger on the back.
My last step was to add some ribbon. I just picked up a really cute spool of striped ribbon, so I made a loop, then used darker pink thin satin ribbon to tie it off, and add a bow. I hot glued this to the surface, then glue tacked the ribbon trails down.
Now, who am I to deny a request like that?
This is basically the same as last week, but not exactly. For starters, I wanted it smaller- I felt the big old 16 x 20 was probably over kill. Also, I didn't use any paint, so the entire thing is covered in scrapbook paper. I picked up 2 pressboard type "art" works at Dollar Tree, one smaller than the other by about an inch all around.
I grabbed a 2 pack of the letter A at HobLob last week, and picked out the scrapbook paper I wanted.
What You'll Need:
1 sheet of 12x12 Scrapbook paper
2 sheets of 8x10 Scrapbook paper
2 pieces of lovely dollar store "art", one smaller than the first
An Initial, Number, or Design made from wood
Glue
Mod Podge
Ribbon
Stamp Pad, markers, or paint
Sand paper
Cost- $3.52 for the paper & dollar store products, and the A. The ribbon was $2 and $.33, but such small amounts used, maybe $.25 total. The other items were all on hand.
I'd estimate this project can be done for $4 or less, depending on what all you have on hand. If I'd had bright colored paper, that would have knocked just over $1 off the cost. The letter was cheap- it was a 2 pack for $.99, minus 30%, so I got it for about $.69, divided by 2 for the cost of 1.
I started off by sanding the surface of both pieces, as they had kind of a slick, glossy finish. Make sure to wipe all the dust off.
For the top, smaller piece, I used 2 sheets of scrapbook paper- 1 solid color, and 1 floral pattern. I cut the solid color to size for the board, then I cut the patterned piece about 1/2 an inch smaller all the way around.
Spread Mod Podge over the surface, and add the first sheet of paper. Once it's dry, mod podge over top of it, and add the second sheet of paper, centered. After that is dry, add one more layer of mod podge to seal it.
For the letter A, I didn't have any bright colors of paint, so I improvised. First, I stained it with a lavendar ink pad. Then, I colored the edges with markers. Yep, tricky, I know. The only thing I don't love, is that in some places, the marker bled onto the top, just a bit.
I then glued the A onto the top board, and set to work on the bottom one. Again, spread Mod Podge on, and smooth the paper on, cut to size. Spread another layer on top of that. I don't know if the board was slightly off, or if I was, but I wound up with a tiny sliver showing from the bottom layer. I opted to sand down the edges to distress them, so that it didn't show.
Once it's dry, glue the top section to the bottom section, centered. Now, for me, the bottom piece came equipped with a pretty light blue ribbon to hang it from. If yours doesn't, you can easily add this with a good stapler, or you can use a traditional hanger on the back.
My last step was to add some ribbon. I just picked up a really cute spool of striped ribbon, so I made a loop, then used darker pink thin satin ribbon to tie it off, and add a bow. I hot glued this to the surface, then glue tacked the ribbon trails down.
This post is linked up at the link parties listed here.
Don't forget, today is Tuesday, so link up with my Talented Tuesday Link Party!!
Monday, February 1, 2010
LOVE is in the Air
Yesterday, we took the Christmas items down, and as we sorted things out, I got a few ideas. It seems stores are marketing towards more and more holidays, with more and more decorations available all year round. And pricey! I just can't stand the thought of spending $10 on a decoration that might hang in my house for 2-3 weeks out of the year. I can't do it, so I don't.
Instead, I scan clearance sales, yard sales, and thrift stores, and I come up with a lot of things on my own as well. Yesterday, I posted about my new heart shaped wreath, which I made from 2 Dollar store candy canes I got on clearance for $.50 each.
After that, we were taking down the white tree, and deciding it's fate. The cats kept climbing it this year, and it's such a lightweight tree, that it did not handle the abuse well. Most of the lower branches are bent to a point where trying to bend them back would likely snap them off.
I decided to just pitch it, but at the last minute, saved the top section to reuse next year as a mini tree (which brings my tree count to 1 full size, and 3 mini's). While we were putting it away, I joked about how it would make a cute Valentine's Day tree. And, it did- but more on that later.
I wound up making another wreath yesterday, this time just a circular one from one of those wooden wreath forms at Dollar Tree. Of course, I was so excited to get started, that I failed to take pictures.
What I used:
1 "grapevine" (except, not actual grapevine) wreath from Dollar Tree
1 long strand of really old, overly used red garland from the Christmas Crap pile
1 foam "LOVE" shape, bought on clearance for $.10 at CVS a few weeks ago
1 section of hot pink tulle that I've had for years
Cash wise, this puppy set me back $1.10. I won't factor in the cost of garland headed for the dumpster, or an itty bitty section of tulle from a large roll I found at a thrift store 4 or 5 years ago.
I wrapped the wreath with my old red garland (seriously, it was so old, some spots were devoid of tinsel). I came up just a bit short, so in the area where I was planning to attach the LOVE foam, I spread it out thin.
I then hot glued the LOVE foam piece on it, and attached the pink tulle to the top, tied part if it in a bow, and used the streamers to tie it to the curtain rod.
Originally, my Ribbon & Tulle wreath was in that place, but it was much larger, and the tulle really fascinated my cats. 3 separate times over the course of 2 days, I came out to find it no longer hanging, with 1 or 2 cats tearing at it. Thankfully, it survived just fine, and I moved it back to it's place in the front door window.
So far this year, I've done up a nice little batch of Valentine's Day crafts:
Ribbon & Tulle Wreath
LOVE Banner
Candy Basket
Heart Placemats
Candy Cane Wreath
Garland Wreath
I'm just feeling so stinking crafty and sweet about Valentine's Day this year! Check back later this week for more projects I've worked on.
Instead, I scan clearance sales, yard sales, and thrift stores, and I come up with a lot of things on my own as well. Yesterday, I posted about my new heart shaped wreath, which I made from 2 Dollar store candy canes I got on clearance for $.50 each.
After that, we were taking down the white tree, and deciding it's fate. The cats kept climbing it this year, and it's such a lightweight tree, that it did not handle the abuse well. Most of the lower branches are bent to a point where trying to bend them back would likely snap them off.
I decided to just pitch it, but at the last minute, saved the top section to reuse next year as a mini tree (which brings my tree count to 1 full size, and 3 mini's). While we were putting it away, I joked about how it would make a cute Valentine's Day tree. And, it did- but more on that later.
I wound up making another wreath yesterday, this time just a circular one from one of those wooden wreath forms at Dollar Tree. Of course, I was so excited to get started, that I failed to take pictures.
What I used:
1 "grapevine" (except, not actual grapevine) wreath from Dollar Tree
1 long strand of really old, overly used red garland from the Christmas Crap pile
1 foam "LOVE" shape, bought on clearance for $.10 at CVS a few weeks ago
1 section of hot pink tulle that I've had for years
Cash wise, this puppy set me back $1.10. I won't factor in the cost of garland headed for the dumpster, or an itty bitty section of tulle from a large roll I found at a thrift store 4 or 5 years ago.
I wrapped the wreath with my old red garland (seriously, it was so old, some spots were devoid of tinsel). I came up just a bit short, so in the area where I was planning to attach the LOVE foam, I spread it out thin.
I then hot glued the LOVE foam piece on it, and attached the pink tulle to the top, tied part if it in a bow, and used the streamers to tie it to the curtain rod.
Originally, my Ribbon & Tulle wreath was in that place, but it was much larger, and the tulle really fascinated my cats. 3 separate times over the course of 2 days, I came out to find it no longer hanging, with 1 or 2 cats tearing at it. Thankfully, it survived just fine, and I moved it back to it's place in the front door window.
So far this year, I've done up a nice little batch of Valentine's Day crafts:
Ribbon & Tulle Wreath
LOVE Banner
Candy Basket
Heart Placemats
Candy Cane Wreath
Garland Wreath
I'm just feeling so stinking crafty and sweet about Valentine's Day this year! Check back later this week for more projects I've worked on.
This post is linked up at the link parties listed here.
Check back on Tuesday to link up with Talented Tuesdays at My Frugal Family!
Sunday, January 31, 2010
Quick, Easy & Cheap Heart Wreath
Today's the day- my house is a total disaster (though, with 3 kids, that's not new), and the living room is over run with taken down, yet to be packed away Christmas decorations. We even got the decorations that were outside down (thanks Nick!). Go us!
Psst... if you think YOUR house is messy, you haven't seen THIS yet:
While I was taking stuff down, I remembered I had a stash of post-Christmas goodies in my closet, so I sorted out the things that are gifts for next year, from the items that are just decorations. In my stash were 2 candy canes from Dollar Tree.
Inspiration hit when I had to lay them at an angle to get them in the box. They formed a heart. Oh, love it! They are red and white, but not striped, more of a mix. They are just as adorable as can be in the shape of a primitive heart.
I bemoaned that I only bought 2, especially since they had them in solid red as well. Oh, well, next year, right? Anyway, as I sat there thinking of my misfortune, I thought... Why can't I just use these two? DUH! Yes, a blonde moment (I'm naturally blonde, but should have been a natural red head- true story.)
I quickly took time out for crafting. ;) All I did was use two white pipe cleaners- 1 to tie the curved tips together, and 1 to tie the ends together. Then, I had some red and silver ribbon left over from my Ribbon & Tulle Heart Wreath, so I grabbed it- just enough for an easy bow, with streamers long enough to wrap around it.
I am in love with it, and I have a wreath that can be put outside.
It cost me $1 for 2 candy canes (50% off at DT), and I got the ribbon for $1 at Goodwill, but most of it went to my other heart wreath, so maybe $.30 worth of ribbon.
End total? $1.30 for a super cute, kind of primitive looking heart wreath!
Just last night, I was looking at heart shaped wreath forms at HobLob, and cringing at the thought of spending $2.79 for the TINY one. I didn't even bother to look at the full size ones. Too pricey.
Psst... if you think YOUR house is messy, you haven't seen THIS yet:
Click on it to enlarge and play a rousing game of I Spy!
Inspiration hit when I had to lay them at an angle to get them in the box. They formed a heart. Oh, love it! They are red and white, but not striped, more of a mix. They are just as adorable as can be in the shape of a primitive heart.
I bemoaned that I only bought 2, especially since they had them in solid red as well. Oh, well, next year, right? Anyway, as I sat there thinking of my misfortune, I thought... Why can't I just use these two? DUH! Yes, a blonde moment (I'm naturally blonde, but should have been a natural red head- true story.)
I quickly took time out for crafting. ;) All I did was use two white pipe cleaners- 1 to tie the curved tips together, and 1 to tie the ends together. Then, I had some red and silver ribbon left over from my Ribbon & Tulle Heart Wreath, so I grabbed it- just enough for an easy bow, with streamers long enough to wrap around it.
I am in love with it, and I have a wreath that can be put outside.
It cost me $1 for 2 candy canes (50% off at DT), and I got the ribbon for $1 at Goodwill, but most of it went to my other heart wreath, so maybe $.30 worth of ribbon.
End total? $1.30 for a super cute, kind of primitive looking heart wreath!
Just last night, I was looking at heart shaped wreath forms at HobLob, and cringing at the thought of spending $2.79 for the TINY one. I didn't even bother to look at the full size ones. Too pricey.
This post is linked up at the link parties listed here.
Check back on Tuesday to link up with Talented Tuesdays at My Frugal Family!
Saturday, January 30, 2010
Cheap Craft Supplies
Today, Nick and I took a drive into Lansing to do some craft supply shopping. You gotta love a man who is willing to shop for craft supplies with you, while holding the bags, and paying. Ahh.. true love!
My main goal was to just get to Hobby Lobby. We also stopped into the Dollar Tree next to it, and the Big Lots across the street, both of which yielded some supplies for very little cash. I love frugal crafts!
At Hobby Lobby, my main goal was finding some sort of wooden doo dad (technical term) to put in the middle of a picture I'm working on, similar to the monogrammed "H" picture I worked on earlier this week. It's smaller, and I wanted something different in the middle, but lacked anything on hand.
I was hoping for a Fleur De Lis, but alas, did not find any. Instead, I found a little wooden medallion thing that is similar in shape to a Fleur, but isn't. I also wanted to look over the scrapbook paper.
My niece, Alex, is turning 3 in April, and my sister loved the monogrammed "H" picture, and requested one for Alex in bright colors. Since I don't scrapbook, I only get paper when I have an idea of what I want to make, and because it's been mostly Christmas and house items, I had nothing in bright colors.
I found 2 pretty bright colored flower paper, then I saw some nice antiqued looking paper with old letters on it. I picked up 2 of those to use on the wooden cigar box I found at Goodwill yesterday. I can't wait to work on it!
I picked up a 2 pack of wooden letter "A"s, a wooden cross, and an oval medallion to put the cross on. I also picked up a Distress Ink pad, since so many people use them. I found, though, that while it's supposed to be easier to use, it really is just a regular ink pad, simply raised up. I thought it would have some sort of pattern on it for distressing. Anyway, it was 40% off, so not a horrible buy. Oh, and ribbon! I found some cute, bright colored striped grosgrain, which I'll use to make a banner for my niece's birthday- 50% off!
Next, we stopped at Dollar Tree, where I just wanted to look around a bit. I did find some things, though. I picked up a 10-pack of flower shaped wooden shapes, a 7-section shadow box, 2 "pictures" (which will be sanded down, mod podged with paper, and made into 1 "A" sign), plus 2 letter "H" wooden shapes, marked down to $.50 each. I forgot to get the shadow box in the photo.
What I'll do is layer the smaller picture ontop of the larger one for the "A" sign. The big one already has some pretty light aqua sheer ribbon to hang it from, too!
At Big Lots, I wasn't doing much looking, but found a great deal- scrapbooking kits for $2 each! They each had 8 sheets of 12x12, and an assortment of embellishments, plus some letter shaped post-it notes. I also grabbed 4 small spools of decorative ribbon. One is lavender and says "Heaven Sent" on it, with stars. One is white and says "Father's Day" on it. One is lavender canvas ribbon, and the last is wired, sheer lavender & green gingham ribbon. The ribbon was only $.75 each for 2 yards.
As for the shapes themselves, I plan to add at least 1 to the "A" sign I make.
I hope everyone is having a great weekend!
Oh, and on a final note... I was amazed and flattered to find out that I've been featured on 4 sites since yesterday.
My main goal was to just get to Hobby Lobby. We also stopped into the Dollar Tree next to it, and the Big Lots across the street, both of which yielded some supplies for very little cash. I love frugal crafts!
At Hobby Lobby, my main goal was finding some sort of wooden doo dad (technical term) to put in the middle of a picture I'm working on, similar to the monogrammed "H" picture I worked on earlier this week. It's smaller, and I wanted something different in the middle, but lacked anything on hand.
I was hoping for a Fleur De Lis, but alas, did not find any. Instead, I found a little wooden medallion thing that is similar in shape to a Fleur, but isn't. I also wanted to look over the scrapbook paper.
My niece, Alex, is turning 3 in April, and my sister loved the monogrammed "H" picture, and requested one for Alex in bright colors. Since I don't scrapbook, I only get paper when I have an idea of what I want to make, and because it's been mostly Christmas and house items, I had nothing in bright colors.
I found 2 pretty bright colored flower paper, then I saw some nice antiqued looking paper with old letters on it. I picked up 2 of those to use on the wooden cigar box I found at Goodwill yesterday. I can't wait to work on it!
I picked up a 2 pack of wooden letter "A"s, a wooden cross, and an oval medallion to put the cross on. I also picked up a Distress Ink pad, since so many people use them. I found, though, that while it's supposed to be easier to use, it really is just a regular ink pad, simply raised up. I thought it would have some sort of pattern on it for distressing. Anyway, it was 40% off, so not a horrible buy. Oh, and ribbon! I found some cute, bright colored striped grosgrain, which I'll use to make a banner for my niece's birthday- 50% off!
Next, we stopped at Dollar Tree, where I just wanted to look around a bit. I did find some things, though. I picked up a 10-pack of flower shaped wooden shapes, a 7-section shadow box, 2 "pictures" (which will be sanded down, mod podged with paper, and made into 1 "A" sign), plus 2 letter "H" wooden shapes, marked down to $.50 each. I forgot to get the shadow box in the photo.
What I'll do is layer the smaller picture ontop of the larger one for the "A" sign. The big one already has some pretty light aqua sheer ribbon to hang it from, too!
At Big Lots, I wasn't doing much looking, but found a great deal- scrapbooking kits for $2 each! They each had 8 sheets of 12x12, and an assortment of embellishments, plus some letter shaped post-it notes. I also grabbed 4 small spools of decorative ribbon. One is lavender and says "Heaven Sent" on it, with stars. One is white and says "Father's Day" on it. One is lavender canvas ribbon, and the last is wired, sheer lavender & green gingham ribbon. The ribbon was only $.75 each for 2 yards.
This is 1 kit opened up- 2 chipboard alphabets, 1 accent stickers, 1 6pack of boarder art, some chipboard tags, sticky buttons, card kit, and more. LOTS of stuff for only $2!
This is kit 2- similar items, but some differences. Accent paper instead of boarders, different colored chipboard tags, 1 different chipboard alphabet, different buttons, and 1 of the 4-packs of paper is patterned instead of all solids.
All in all, I got 16 sheets of paper- 12 are solid colors (with some duplicates), and 4 are patterned.
Both kits came with a 20 count pack of stickers, but they are cardstock stickers. Both sets were identical, with the stickers shown above.
All of the paper from the packs. I love having some solids to work with, since I rarely buy solid colors.
Some of them upclose.
It was nice getting out of the house, though my bottom is really sore now. It's been doing really well, but I've noticed on the days I'm active, especially if I have to stand up a lot, my tailbone gets REALLY sore. Tomorrow, we're planning to start putting the Christmas stuff away. I know, I should have already. Honestly, though, there have been times the tree was still up just before Valentine's Day.
It would have gotten taken down before now, but the weekend we planned to was just 2 days after I broke my tailbone, so alas, it did not happen.
If we can haul rear on getting it all down tomorrow, and put away, then I want to do some crafting. On my block for this week:
- "A" sign for Alex
- ALEX Banner for her birthday, similar to my LOVE banner
- Aged Cigar Box
- Finish the extra sign for me
- Do some more organizing in my craft area
As for the shapes themselves, I plan to add at least 1 to the "A" sign I make.
Oh, and on a final note... I was amazed and flattered to find out that I've been featured on 4 sites since yesterday.
- My LOVE Banner was featured on Dollar Store Crafts for Friday
- My Post It Note Holder was featured on Mad In Crafts for Friday
- My Post It Note Holder was featured on The Girl Creative for Saturday
- My "H" sign was featured on Sweet Sumo for Saturday
Subscribe to:
Posts (Atom)