Showing posts with label frugal craft. Show all posts

Friday, May 7, 2010

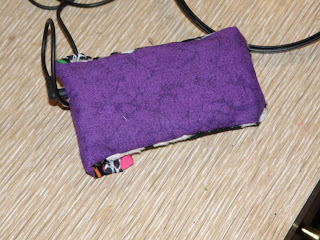
MP3 Cover Tutorial

A few years ago, I entered the modern age with an MP3 player. Actually, I got one for Nick first, then loved it, so he got me the same one (for Valentines Day for both of us!). Somewhere along the way, both players were lost. Of course, this was 5 years ago, so they were pretty old anyway.

Now that I'm taking an active interest in being more active, I wanted some music to listen to while I do it. I talked to Nick, and we decided that we could afford an MP3 player for me this week, so off I went. I found a 4GB MP3 player that also does voice record, plays videos, and stores pictures, and it was only $50. Ok, "Only"... I think it's high priced for what is essentially a toy, but I got it anyway.

The downside- the store had no accessories for this model, and I wanted some way to clip it to my clothing or body, so it wouldn't get lost, or fall from a pocket. So, what did I do? Got out my sewing machine. Three different times, actually!

MP3 Case

You'll Need:
Fabric Remnants- I used 3 different prints
Sewing machine
Elastic
Button
Needle & Thread
Fabric marking pen

  1. Measure the player on a piece of fabric, and cut the fabric about 1/2 inch wider on three sides, and about 2 inches longer on the top side. Repeat an identical size with another piece. Repeat this with a third section of fabric, but measure it just 1/2 inch wider on the top this time.
  2. Stitch the two identically sized pieces of fabric together on three sides, with the face of the fabric facing inward. Once it's sewn on three sides, clip the corners, then turn it right side out, and use a pencil to poke the corners out.
  3. On the remaining section of cut fabric, sew a hem across the top side, just a thin hem. 
  4. Choose which side of the double sided length of fabric you want to be the outer shell. Pin this side to the smaller section, face to face, with the unsewn edges together at the bottom. This section will not match in length- that's fine!
  5. Sew the two sections together on the sides and across the bottom, then trim the edges, and turn it right side out, once more using a pencil to poke the corners out.
  6. Now that it forms a pocket, slip your MP3 player in, and make sure it fits (psst... my first try didn't fit, oops!). Keep it in, and measure where the long section lands when you fold it over the MP3 player. Mark the spot.
  7. Hand stitch your button onto the shorter section of the fabric below where you marked where the flap landed. You'll be using elastic to secure the top flap to the bottom section, and you want it nice and tight. 
  8. Using the elastic, measure how much is needed to fit over the button from the flap, while remaining nice and taut. Sew the loop of elastic to the underside of the top flap.
  9. Now comes the tricky part. put the MP3 player back in, and mark on the outside of the fabric where the headphone cable goes. For mine, I opt to put the MP3 player in upside down, so that the headphone cord comes out on the top flap. It was easier to create the hole there. NOTE: If you have a hole in a different location, such as the side, you may want to do this step before sewing the pouch together!! Once the location is marked, sew a box around it, then use scissors or a seam ripper to cut the fabric out from inside the box, clipping all the loose threads. You could also use a button hole stitch, if you know how to make one!
  10. Lastly, because I used white thread, I sewed a coordinating length of ribbon to the flap to hide all the hideous stitching I had done!

    I have not yet figured out a clip to attach to it, but I have figured something fun out- if you are wearing a tank top, you can slip the player under the strap, then fold the flap and button it over the top of the strap. It'll stay in place nice and easy! I've also buttoned it to my jeans with a belt loop, when I have wider belt loops on. Even with a short sleeved or long sleeve shirt, you can easily use your bra strap for attaching it.


    And, when you are done using it, wrap your headphones cord around it, then button the flap so the cord stays wrapped around it, and they don't get tangled or lost!

    All of this was done with scraps of fabric I had on hand, and notions I had on hand. FREE! Gotta love that!

    Thursday, February 25, 2010

    Pottery Barn Easter For Less

    Jess over at Mad in Crafts is a Pottery Barn for Pennies guro. Seriously, she should be hired by PB. Anyway, I saw some of her stuff, and started to peruse the catalog a bit more. Now, I'm not really a PB kind of girl, for the most part. It's just not my overall style. However, every now and then, something cute sticks out.

    One of the projects Jess made for her "Dollar Barn Easter" collection was the splattered eggs, similar to the ones shown below (which sell 12 for $14, AND are not shipping until the end of April- you know, AFTER Easter).


    I found the perfect vase at my Goodwill AS-IS center, which clearances out items that don't sell in the regular Goodwill's.  Here's my end version:


    So, how much did I spend?


    3 Eggs: $.09 total ($.67 for 2 dozen at Hobby Lobby, regular price)
    Vase: $.29 (Originally $2.17 at Wal-Mart, priced $.99 at Goodwill, marked down to $.29 on "clearance")
    Candle Stick: $.29 (Heavy, wrought iron- marked $.99 at Goodwill, marked down to $.29 on "clearance")
    Moss: $.10 (A bag from Dollar Tree, but I used barely any- the bag still looks full)

    So, for $0.77, I was able to recreate the full Pottery Barn look, and I love it! The Hurricane vase shown on the PB website runs $29-$59, depending on size. The filler is another $14. I'll count myself lucky to have escaped with a very similar look for under $1!
    Here is the before of the candle stick. It was spotted with rust, and had a tacky gold paint job. I didn't achieve exactly what I was hoping for, but I prefer my own paint job to the one it came with.


    For the eggs, I sponge painted them cream first, letting the colors show through in some spots. I then splatter painted them with a mix using burgundy, golden yellow, and a touch of black to get a brownish shade. 


    This post is linked up at the link parties listed here.

    Sunday, January 31, 2010

    Quick, Easy & Cheap Heart Wreath

    Today's the day- my house is a total disaster (though, with 3 kids, that's not new), and the living room is over run with taken down, yet to be packed away Christmas decorations. We even got the decorations that were outside down (thanks Nick!). Go us!

    Psst... if you think YOUR house is messy, you haven't seen THIS yet:

    Click on it to enlarge and play a rousing game of I Spy!

    While I was taking stuff down, I remembered I had a stash of post-Christmas goodies in my closet, so I sorted out the things that are gifts for next year, from the items that are just decorations. In my stash were 2 candy canes from Dollar Tree.

    Inspiration hit when I had to lay them at an angle to get them in the box. They formed a heart. Oh, love it! They are red and white, but not striped, more of a mix. They are just as adorable as can be in the shape of a primitive heart.

    I bemoaned that I only bought 2, especially since they had them in solid red as well. Oh, well, next year, right? Anyway, as I sat there thinking of my misfortune, I thought... Why can't I just use these two? DUH! Yes, a blonde moment (I'm naturally blonde, but should have been a natural red head- true story.)

    I quickly took time out for crafting. ;) All I did was use two white pipe cleaners- 1 to tie the curved tips together, and 1 to tie the ends together. Then, I had some red and silver ribbon left over from my Ribbon & Tulle Heart Wreath, so I grabbed it- just enough for an easy bow, with streamers long enough to wrap around it.

    I am in love with it, and I have a wreath that can be put outside.


    It cost me $1 for 2 candy canes (50% off at DT), and I got the ribbon for $1 at Goodwill, but most of it went to my other heart wreath, so maybe $.30 worth of ribbon.


    End total? $1.30 for a super cute, kind of primitive looking heart wreath!


    Just last night, I was looking at heart shaped wreath forms at HobLob, and cringing at the thought of spending $2.79 for the TINY one. I didn't even bother to look at the full size ones. Too pricey.

    This post is linked up at the link parties listed here

    Check back on Tuesday to link up with Talented Tuesdays at My Frugal Family!

    Thursday, January 28, 2010

    Gold & Tacky to... Not Gold & Tacky

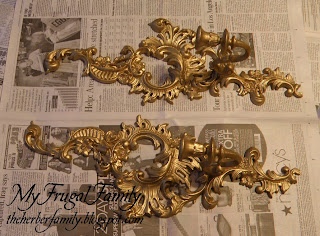
    Last week, I found these gloriously tacky looking, gold plastic candle holders for the wall. They have a great design, but they're gold. Yes, really. Gold. Not like gold metal. More like fake, metallic-ish gold.

    I immediatly wanted to spray paint and dry brush or glaze them. I'm not entirely certain if I'm happy with them, or if I want to redo them. Time will tell, and since they are for a room re-do that hasn't been redone yet, I have plenty of time to decide if I love them, or if they're getting another makeover.

    They cost me all of $.29 each.

     
    Painted Cherry Red- they were darker than these pictures turned out.


    After dry brushing on black paint- it was too wet, and I added more than I had planned to.


     The pair

     
    Held against the wall.
    Like I said, I'm not sure if I'm in love with these or not. If I redo them, I'll likely go straight black, and add just a hit of a red glaze to them, instead of the dry brushing. I wanted the crevices to show black, but that didn't work out.

    This post is linked up at the link parties listed here

    Check back on Tuesday to link up with Talented Tuesdays at My Frugal Family!

    Saturday, January 23, 2010

    Quick Craft

    Yesterday, I drove for the first time in nearly two weeks. I went to Goodwill, Dollar Tree, and Walmart. Oh, how I've missed driving!

    I did a quick mod podge craft last night to take to my mom this morning. It's just an office post-it note holder, made with one of those acrylic photo frames that slide the photo in. You cut paper to fit on the outside, mod podge it on, mod podge over it, add embellishments, and viola!

    For the post it pad, I found decorative ones at DT. Peel the back off, and stick to the frame.


    Linked up with the sites listed here.

    Sunday, January 17, 2010

    LOVE Banner


    As many of you know, I've been off my feet (and subsequently, my rear as well) for the past 11 days now, with a broken tailbone. It's allowed a lot of time to read, watch movies, grow increasingly antsy, with bouts of cabin fever, and, lastly, nurse my creative bones.

    For instance, when I craft, I normally handle almost all my stitching by machine. I'm not a patient girl. But, I've discovered over the past week- if there is no other place pulling me to be, nothing else that needs to be done, I can be a very patient girl.


    And thus started "The Great Banner Project" of 2010. It's not all that grand, or large, and certainly, if I had been up to long bouts at the machine, I probably would have done a lengthier word than LOVE. However, doing it by hand means it takes longer. I must say, though, that I love the look of the contrasting thread stitches. They look folksy, or countryish.


    So here it is, the hand made (by actual hands) LOVE banner. I only used the sewing machine for a frustrating 30 minutes last night to stitch all the pieces to the ribbon. Frustrating because my machine was acting out. Probably feeling ignored and petty. Pfft. It's such a child.


    I used felt in red, white, and light pink. I used red and white thread, and added red and white pom poms to the tips of the triangles and the hearts. I tried to add sequins, but they glitz did not look right, so I ripped em off.


    I stitched it all to a length of light pink satin ribbon, and on the ends, I added a length of wider red satin ribbon for the hang-downs. To hang it up, I used clothes pins to pin it to my curtain.

    All in all, this project is easy, and inexpensive. I used about 2 sheets of red felt, 2 sheets of white felt, and half a sheet of pink felt. The ribbon was a cast off left over I had on hand. The pom poms were left from Christmas projects. All in all, it was done with on-hand items. Price wise, I got the sheets of red & white felt in large packages from DT. I used 2 of the sheets each, and there are 14 sheets to a package. Those sheets were $.07 each, or $.28 for the red & white I used. The pink was $.47 a sheet at Walmart, but I only used half, so $.24 for the pink. The poms were in a package of around 30 of them for $1 from DT, and I used 7, so roughly $.23 for 7 puff balls. The ribbon was from a $1.99 roll of 9 yards, but I only used about 2 yards, so about $.44 for that.


    Total cost would be roughly $1.19 for the banner. This project can be made with a variety of on-hand items, and the length can be adjusted up or down. I could have used less ribbon and felt had I left out the hearts, for instance.


     After taking a few photos, I decided to add the Ribbon & Tulle wreath I made last week behind the banner. I love it! It's so festive! Later this week, I'll photograph my new, hand decorated place mats I made while laying in bed.


    I am hoping to be out of bed for longer periods of time this week, and to try and tackle some decoupage. I have some wooden hearts, and 1 fiber-board heart plaque I found at DT, and I want to get them done soon. I'm itching to do more crafts, and it's bothering me that I'm fairly limited in just what all I can do from bed.


    This post has been shared at the following websites. If you have a craft project you want to share, these sites are a great way to share them, and get your blog seen!


    Linked up at the parties listed here.

    Friday, December 11, 2009

    A Sweater to a Santa Hat

    Actually, that's misleading, as it takes 2 sweaters to make the Santa hat. These turned out so cute, I just love them!

    Sweater Santa Hat

    You'll Need:
    1 Red or Burgundy Sweater
    1 Cream, White, or Tan Sweater
    Sewing Machine
    Thread
    Hand Sewing Needle
    Fleece or Ribbon *This is optional, and just depends on how you make the ball for the end of the hat
    Pins

     
    {My new machine, when it worked, and I loved it}

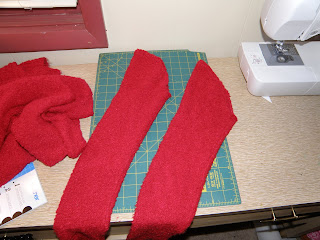
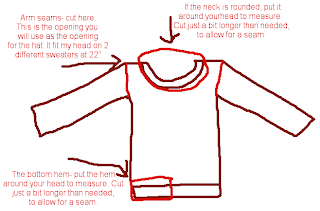
    1. Cut the sleeves off the sweater, at the seam. From here, try the sleeve on the person's head the hat is meant for, using the cut opening for the head. If it fits, you can move on. If it's too big, pull it tight, and pin where you will need to sew. If it is too tight, cut the seam off. If the seam was already cut off, but is not too tight, move on, as this part is not actually the part that will go around your head.
    2. Once the arm opening for the sleeve works right and fits around your head, measure the waist or (if it is rounded and not V shaped, boat shaped, or square) neck of the cream/white/tan sweater. To do this, do NOT use a measuring tape, as the material will stretch. Use your head, and wrap it around, pulling it taut. cut this portion of the sweater hem off.
    3. Pin the two sections together, with the sleeve turned right side out, and the hem inside out & upside down. You want to pin it so the raw side is pined to the sleeve, allowing for the finished side to be unsewn.
    4. Sew a zig zag stitch around the pinned side, so the hem is firmly attached to the hat. I always leave the two ends of the hem free until it is attached to the hat, then I sew them together, and add another stitch to the top to attach the ends to the hat.
    5. For the end of the hat, you can do a few things. You could attach a bell to a ribbon, and attach it to the end, pulling the material into as tight of a V shape as you can, and hand stitching it together. You can use fleece to make a fleece fringe ball, and again, hand sew it in. What I did with this particular hat, though, is take a square of the cream sweater, and fold & roll it into a ball shape, then hand stitch it into that shape. From there, I hand stitched it to the end of the sleeve. When I pulled it out, it looked odd, though, so I used ribbon to tie a tight bow in place, then I hand stitched the bow to the hat, so it won't untie.
    6. The last thing I did was to run a straight hand stitch loosely down the seam of the sleeve, from the opening to the top of the hat. Then, I pulled it, so that the underside of the sleeve gathered up. 
    These hats will slouch off to the side naturally, because of the shape of the arm & arm opening. I loved how easy they are, and I can make 2 hats from 1 sweater, and still have the torso of the sweater left for future projects.

    They are just adorable, and while a traditional hat is red and white, you can certainly customize it to meet your needs- matching jacket color, different colors for different kids, etc. My oldest daughter and my son both requested red with green instead of white. I made mine with a burgundy colored sweater, and cream sweater, so it looks more old fashioned.

    The nice thing about these, are that they are custom fit, so they stay on, and they are warm, so they can be warn as winter hats.


    My cost per hat is roughly $.79, as that's how much I pay per sweater at Goodwill. Honestly, though, the cost is cheaper than that, as I still have plenty of the sweater material left over after having made 2 of these.