Showing posts with label twilight craft. Show all posts

Monday, May 3, 2010

Twilight Party: The Banner

Growing up, my step-mom owned a sign shop. She would use vinyl, paint, markers, etc, to make signs, posters, lettering on trucks, and so much more. One of the things she's always done, though, are banners for big events like Graduations, Weddings, Benefits and more.

She asked if Rae would like a banner for her party, and I said YES! I knew she'd do a great job, and she really did an awesome job with it.


The banner is done 100% with MARKER! No paint, no vinyl, just marker! And, it's all free hand. Isn't she amazing??


I love the dripping blood effects she added! The gray all shows up metallic silver in person, but looks more gray here. The black background? She must have spent a LOT of time on that, because it's all colored in with marker!

I didn't tell Raegan about it until it came. I was going to try and wait until the day of the party, but I got too excited! It just looked way too cool to keep hidden away. It was a great addition to the party!

I added black sheer ribbon with silver glitter to drape across the top like crepe paper, then added lights as well around it. It looked great! The girls at the party all said they'd never seen such a cool party set up as we had.


Keeping It SimpleBWS tips button

Wednesday, April 28, 2010

Twilight Craft Time

Today, my oldest 'baby' turns 14. OMG. Yes, I went there. For her birthday party this weekend, we are doing a Twilight theme. She has a few surprises in store that I won't mention here, because she does occasionally stop by and have a peek at the blog.

Over the past few months, I've made a few gifts for her (one of which she already received- a red, black, and white jewelry box). Last night, I set about starting a few items to decorate for the party with. It won't be much, but it'll be fun!

 For this box, I used the Live, Laugh, Love decals from DT to decorate the sides. I stained the surface red, instead of painting it, and distressed the edges with sand paper. A black rounded floral stamp was used on the lid, and partially on the sides. I used Silver glitter Mod Podge on the lid, and Matte on the sides (those letters were not sticky enough on their own!).

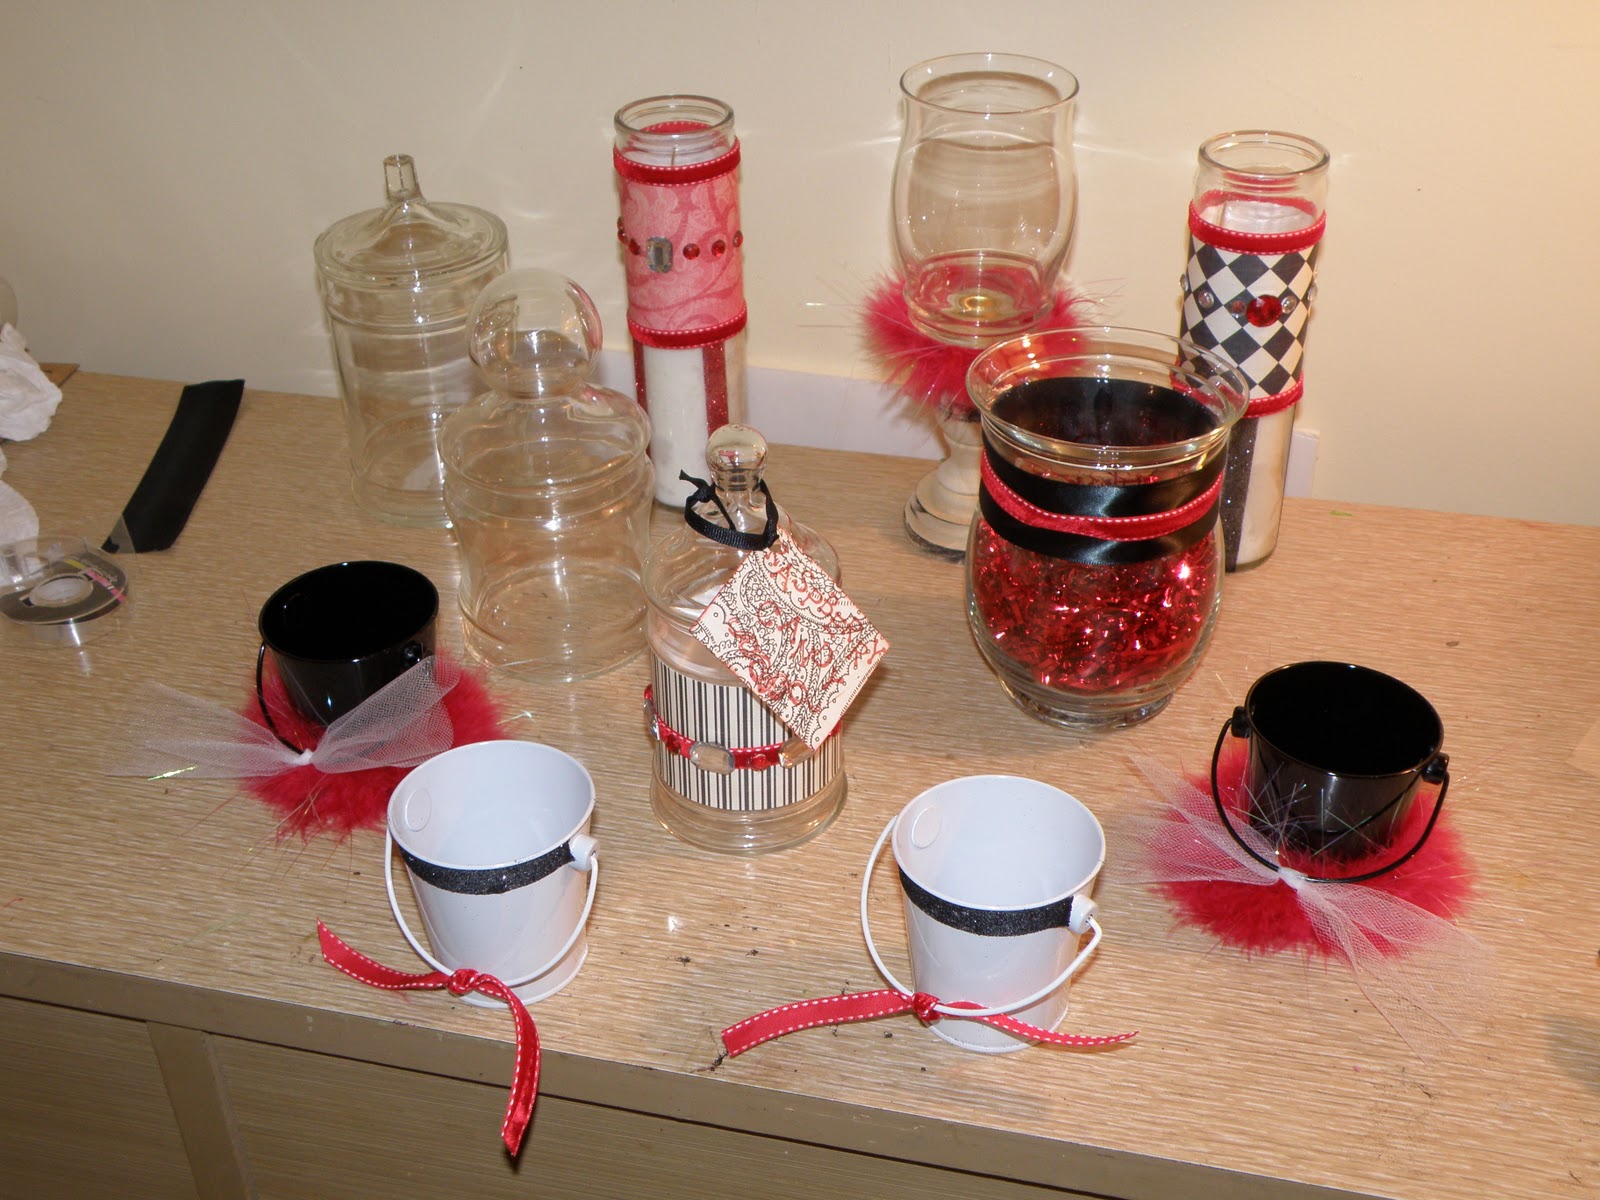
Anyway, here are a few of the things I made. With the exception of the small metal buckets, everything pictured was made with items I had on hand (yes, nosy, I did have red, glittery feather boa's on hand- I bought 4 bright colored ones a month ago with no immediate purpose).


I decorated two tall candles, 1 large candle holder (which is clean and will be used for candy), a large vase, an apothecary jar (along with 2 undecorated ones), and 4 tin buckets.


These little buckets were 2/$1 at Target, and are larger than the tin buckets at Dollar Tree that come 3/$1. I used double sided tape (Dollar Tree) and glitter (again, DT) to add the glitter rim to the white bucket. I used ribbon and tulle scraps for around the handles. I cut up a dollar store (not DT- my DT isn't that cool!) feathered boa, and glued it around the bottoms of the black buckets.


 This is 2 items- 1 large, rounded vase, and a bell shaped jar that I had on hand to sit inside of it. I added red shimmery stuff left over from Valentine's Day, and glued ribbon scraps around the outer vase.


These are two tall, skinny glass candles from Dollar Tree. They only get them in once in a while, and sell out fast! I used double sided tape again to make glittery stripes along them (also from DT). The gems were on hand from last summer at DT (I wish they'd get those in again! I'm running low!), and the scrapbook paper and ribbon were all scraps. Everything should be able to be easily removed when the party is done!

This jar was badly stained or etched by hard water, so to cover it, I used scraps of scrapbook paper, ribbon, and more gems. Today, I also added a hang tag to the top with the name of the candy that will go inside (gummy Raspberries in black & red!).

All of the decorations I've added to the jars were done with either tape or hot glue, so it can all be pealed off afterwards, and the items can be reused. I doubt I'll be hosting ANOTHER Twilight party, so they won't get much extra use, ya know?

For the party, I opted for a color theme for the Candy Buffet. And boy, do I regret that! It is next to impossible to find non-licorice, black colored or wrapped candy this time of year. I'm sure at Halloween, it would have been easier. My goal was that the candy itself (if unwrapped) or the wrapper (if it was staying wrapped) had to be black, red, white, or silver. I did relent a bit, and added in some touches of pink just yesterday (I found hard candy sticks in blackberry flavor- black with pink stripes!).

I have only picked up a few things, but here's what I have so far:
  • Hershey's Kisses in Red & Silver (thanks to the 6 bags I picked up after Christmas- some was used for Valentines Day, some for St. Patricks Day, and the rest, for the party!)
  • Red Licorice Bites
  • Black Licorice Bites
  • Red & Black Raspberry Gummies
  • Blackberry, Cherry, Cinnamon, and Horehound Candy Sticks (thanks to a birthday lunch at Cracker Barrel with Nick yesterday!)
  • Strawberry Poprocks (black, red, & white wrappers!)
  • Milky Way Dark (black & silver!)
  • Special Dark Pieces (like reeses pieces- they are red, purple, and blackish in color)
  • Root Beer Barrels (they were so dark, they're almost black)
I don't have much of each item, just a small bag or so. I'm also going to add oreo cookies to the buffet, and red delicious apples. Hey, I gotta cram something other than candy down em, right? I suppose I could also add marshmallows, but I think maybe I'd rather skip MORE candy items. We'll see. I'm planning to let the kids each take home candy, so it's not ALL sitting here afterwards.

For cupcakes, Raegan settled on these:

I will be making them a bit differently, and much more easily. I do want to pick up either plain white or silver wrappers, though. I will be filling them with strawberry or cherry pie filling, and baking the filling in, where as the recipe calls for you to hallow out the baked cupcake, add the filling, then close it back up. Too much hassle, when I already know it can be baked in.


I think that's about all! The rest of the stuff is surprise items, so I can't blog about that. I'm excited- this is my first semi-grownup party I get to throw! The only thing I haven't found, and have given up hope of finding, are fangs. I thought Walmart had them in the party section year round, but apparently not! I have looked a few places, and no fangs! :(

Tuesday, February 23, 2010

Talented Tuesday & A Twilight Craft Box

Happy Tuesday everyone! Hope everyone's week has been going great so far!

Welcome back to Talented Tuesday, where you, my awesome readers, strut your stuff, and show us all the cool stuff you've made recently. From food, to furniture, to clothing, and so much more, you guys continue to amaze me with your fun projects.

Below is one of my weekend crafts- a wooden box made over in black, white, and red (with pink, since I had a very hard time finding just dark red printed scrapbook paper, after stopping at 3 stores). My oldest daughter is going to be 14 soon, which is enough of a shock to my system. Right now, she's very into Twilight, so I've been making Twilight inspired crafts.

I found a cubed wooden box at the local grocery store, of all places, on clearance for $2-something. Perfect! I snagged it without an immediate project in mind, but it only took a few days to come up with an idea. When I had my Girls Day Out with one of my good friends last Friday, I picked up some fun supplies- scrapbook paper (like, a ton!), Glitter mod podge (ooOOOOoOOoo...), ribbon, wooden 'knobs' (a 3 pack), lots of felt, 2 Distress Ink ink pads (black soot, which I am NOT in love with, and Fired Brick, which I do love), and much more.

Below is the project. I was overly zealous, and did not stop to take any before or during photos (that's becoming a bad habit...), so all you have is the finished project. I also didn't stop to paint the box first, but... that's not really something it -needed-, just thought it would be a nice touch.

What I Used:
5 Sheets of Scrapbook Paper (not a whole sheet needed of each, but I wanted a different pattern on each side)
1 Wooden Knob
Paint
Mod Podge
Distress Ink


  1. Measure and cut your paper. I used 5 different patterns. Because the lid has edges, I tore the paper in half for a more distressed look. In some instances, I had to tear more off to allow for where the wood meets.
  2. I used Black Soot Distress Ink on the red paper. I don't feel the black soot was up to the same quality as the Red Brick I also bought, or the Vintage Photo I have had for a few weeks. It got ALL OVER my hands, and it did not dry anywhere near as quickly- when I mod podged it to the wood, it smeared on the first one. You can kind of see it in the photo above, on the red swirly side of the box.
  3. I used Red Brick Distress Ink on the black & white sides, and it worked wonderfully. For the most part, I distressed all the sides of the paper (all paper used, actually), and a few smudges here and there in the middle of the papers.
  4. For the top section, I tore each of the four edges. 
  5. I used Matte Mod Podge to attach the paper to the box. Once it was dry, some of the paper had an over hang on the corners, so I sanded down each corner and edge on the box, and some of the sections where the lid meets the box, so the paper wouldn't get in the way. 
  6. For the top coat, I went with Glitter Mod Podge, so it sparkles, like the Vampire Wannabe's in Twilight. (can you tell, it's not my favorite book ever?) Glitter Mod Podge sparkles nicely, and I can't wait to use it in some Easter crafts.
  7. While this dried, I painted one of the wooden knobs. I first thought the red I had on hand would be too bright, so I added a few drops of black, but the color came out all together too rustic and brownish, so I wiped as much of it off as I could, then repainted it red. The dark color showed through in some spots, for a distressed look, so my mistake? Totally on purpose to distress it. Or so I'll tell anyone who asks. I also added some spots of black ink around it with a foam brush, for added depth to the color.
  8. When the knob dried, I used E6000 to glue it to the center of the lid, then I mod podged over it with Glitter Mod Podge. 
And, really, that's all she wrote. It was an easy craft. Unfortunately, when I went back for more boxes, they were sold out. But, I did score a really cool, unfinished wooden jewelry box. Can't wait to try that one out!

I wish I had the Glitter Mod Podge on hand last week, when I made a springy heart in twilight colors. They match, but not totally, since I used Gold Shimmer, and used the Vintage Photo Distress Ink, which is brown. But, there you have it. I now have 2 Twilight inspired crafts for Raegan's birthday in April.

Hopefully, I'll come up with more before then!


This post is linked up at the link parties listed here.

The Rules

1) Post a blog about something you've made- a refurnish, recipes, a craft project, a sewing project, room decoration, anything you've done!

2) Add a link to your blog post- not to the blog itself, but to the individual posts! You can post more than one project, just add more links! The links should look something like:

http://theherberfamily.blogspot.com/2010/01/love-banner.html

and NOT like this:

http://theherberfamily.blogspot.com/

3) Add the code below to each post you link to the MckLinky, so that others can post their projects here as well! The list will accept new links through Saturday, so if you make something new, come back and post it! Don't forget to look at the links on the list, and let people know where you found their post at!

This MckLinky will remain open and accepting links through Wed night, so feel free to come back and add more links if you post new things!!