Sunday, November 22, 2009
Thanksgiving Side Dishes: Noodles
The house was always packed, like I said. One of the traditional side dishes we have are just plain old egg noodles. My Grandpa always made them- sometimes with delicious homemade noodles, which were thick and tasty, but more often with store bought noodles.
It's a cheap & easy recipe, and tastes oh-so-good, even in left overs. They also make for a great turkey soup base.
Noodles
You'll Need:
1 package of Egg Noodle Pasta- these are usually found in a bag, not a box.
3-4 cans of Broth- I always use Chicken broth, but this year, I'll be using 1 can of Vegetable Broth, as well.
Boil the noodles in the broth- that is very important! The first year I made these, they were tasteless. I had boiled the noodles in water, then strained them, and added the broth. They were horrible!
Once the noodles are tender, put them in a bowl with the broth, and serve up!
Like I said- simple, and cheap to make. This is a side dish I make for all of our holiday meals now.
Monday, November 16, 2009
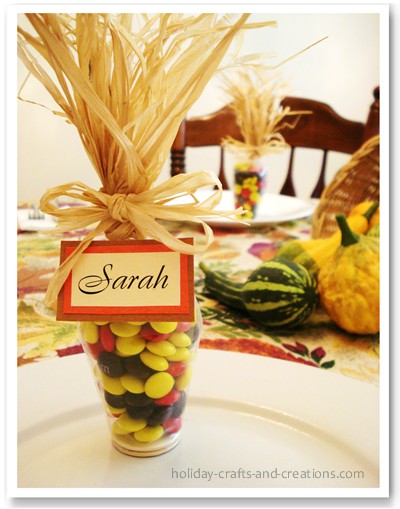
Thanksgiving Indian Corn


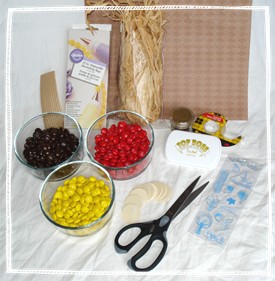
Materials for Thanksgiving Crafts to Make: Indian Corn Place Cards

What You Will Need:
Clear pastry bags (12")
Wooden circles (about 1-1/4” diameter)
M & M’s (yellow, red & brown)
Double sided tape
Twisty ties (tan)
Raffia
Scissors
Optional:
Brown scrapbook paper
Gold embossing powder and embossing ink
Small autumn stamps
Colored paper for a name tag
Wednesday, November 11, 2009
Thanksgiving Crafts & Treats!
Are you looking for some Thanksgiving treats & crafts to make? Here are links to some of my older posts with recipes and craft instructions for Thanksgiving. Almost all of them are easy enough for school age & preschool kids to enjoy and take part in, but still fun for older kids. Several of them would make great time fillers for Thanksgiving Day, in keeping kids occupied while dinner is being made.
Oreo or Sugar Cookie Turkey's
Turkey Treat Holder
Candy Cornucopia, Harvest Necklace, or Turkey Thumbprint Name Cards
Thanksgiving Pilgrim Hat Cookies
Hot Cocoa Pudding & Pudding Pie
Easy Homemade Pumpkin Peeps
Sunday, November 8, 2009
Thanksgiving Place Cards
After finishing the wreath, I started to sort through the tub, and clean & organize it somewhat. In the process, I found 3 packs of fake autumn leaves I had picked up to use last year. I also uncovered a metallic gold paint marker. I was messing around with the leaves, and drew gold lines along the veins of the leaves, then I got an idea.
Why not glue several leaves together, then add one of the ornaments to the top? And my lovely little Thanksgiving Place Cards (I use that term loosely, as they are not cards at all) were born.
I just love them, and they are VERY inexpensive to make!
Thanksgiving Place Cards
You'll Need:
Shatter Proof Ornaments in Harvest Colors
Fake Fall Leaves
Glue Gun
Metallic Gold Paint Marker
Total Cost:
For me, I used only left overs from past projects, so while I paid for the items, the costs were accounted for already, so.. free. The ornaments can be found at Dollar Tree in packs of 5 for $1 ($.20 each). The leaves can also be found at some Dollar Tree's in packs of around 30 for $1. I used 3 per grouping, costing roughly $.03 each. That would make each one roughly $.23 to make.
- Glue leaves in a grouping of 3-4. I used 3, so they line the front and sides, but not the back.
- Using the paint marker, draw along the veins of the leaves, for a bit of glitz.
- Spread hot glue along the top in a slightly curving line, and glue the ornament with the hook side down against one end. This helps stabilize it.
- Carefully pick it up, and if it's not too hot, use your finger along the under side to tack the leaves securely against the bulb

Frugal Dollar Tree Wreath


Christmas Ornament Wreath
You'll Need:
50 Christmas Bulbs- I would recommend getting Shatter Proof. I found these 5/$1 in coordinating colors at Dollar Tree
12+ small Christmas bulbs- again, I would recommend getting Shatter Proof. These were 12 or 15 for $1 for plain, or 8/$1 in glitter finish at Dollar Tree. I bought 12, but probably could have used a few more.
1 Wire Hanger
1 Glue Gun
1 Spool of Ribbon
Pipe Cleaners
Total Cost: $13, not counting on hand items. I had to buy 11 total packs of ornaments, 1 spool of ribbon, and a package of wire hangers (I've gutted my own closets for these in the past, and knew I was out, but on the plus side, I do have a lot more now). I had the glue gun & pipe cleaners on hand.
- First off, you will want to shape the hanger into a circle. Once that's done, untwist the hook, so you can string the ornaments on them.
- Start by sorting your ornaments into piles, and then add them one at a time to the wreath in whatever order you want, adding in small ones every now and then, to help fill in the games that show.
- Once they are strung on, give the wreath a good shake- some of the ornaments don't stay in their hanger, and will need to be glued back on.
- When you are satisfied that the wreath is full enough, twist the top shut again. I used needle nose pliers to make sure it was shut tight.
- Arrange the bulbs, and if you would like, glue them together. In spots where my bulbs wanted to spin to the other side, I glued them in place against each other.
- Add a bow to the top. I also added ribbon trails, and wrapped them around the hanger to keep it in the places I wanted. I used gold glitter pipe cleaners to attach the ribbon to the hanger (use whatever you have on hand- I happened to have that already)
- Use an over the door wreath hanger to hang it on your door!


Monday, November 2, 2009
Thanksgiving Treats Seems To Be Big
Now that Halloween is done, Thanksgiving is the next holiday looming ahead for most people. I've noticed that in often, Thanksgiving is over looked as a plan-ahead holiday, in lieu of people frantically trying to figure out what they are going to do for Christmas. Seeing how many hits I am getting from people looking up Thanksgiving, it makes me smile.
So, in honor of the many wonderful web hits I've gotten from people wanting to find new treats, here area few additions to my growing list of Thanksgiving Treats.
Hot Chocolate-Marshmallow Pudding
What You'll Need:
1 4oz package of pudding mix- any chocolate flavor (white chocolate, dark chocolate, milk chocolate, etc)
1 cup mini marshmallows
2/3 cup whipped cream topping.
Prepare the pudding according to the directions, and stir in the marshmallows.
Scoop the mix evenly into single serving size microwaveable dishes.
Microwave on high for 35 secs, or until the marshmallows begin to melt & the pudding is heated through. Stir, and top with a scoop of whipped cream.
5 Minute Triple Layer Cookie Cream Pie
What You'll Need:
Milk
2 4-serving size packages of pudding mix (The recipe calls for Chocolate, but you can mix & match with great results!)
1 tub of whipped cream, thawed, divided
1 pie crust- either graham cracker or Oreo cookie, depending on the flavor you go for.
10-12 sandwich cookies
This pie is super easy, and goes over VERY well.
Mix 1 box of pudding according to directions, and add the 2nd mix in. Do not add extra milk!
Set aside 3 cookies, then break and crumble the rest.
In a bowl, mix half the pudding mix with half of the whipped cream, and the cookie crumbles.
In the pie crust, smooth the plain pudding across the bottom. Top with the cookie, pudding, whipped cream mix.
Top the pie with plain whipped cream. Break the remaining 3 cookies into halves, and insert into the top of the pie. Keep cold until you serve.
Notes:
First off, do not use canned whipped cream- it melts!
When I was first given this recipe, it was called the Oreo Cream Pie. I used chocolate pudding, an oreo crust, and oreo cookies. Over time, I came to realize that the flavors could change easily, by using different types of sandwich cookies, puddings, and crusts. Here are some ideas:
Oreo Double Chocolate: Oreo Cookies, Oreo Crust, Chocolate Pudding & Chocolate Whipped Cream
Strawberry Vanilla: Vanilla cookies, Graham crust, vanilla pudding & Strawberry whipped cream
Oreo 2: Oreo cookies, Oreo crust, 1 box vanilla or Oreo pudding, 1 box Chocolate pudding- for this one, prepare the puddings apart using half the required milk in each package. mix the cookies in with the Vanilla or Oreo pudding OR the chocolate pudding, and layer it.
Butterscotch Vanilla: Use butterscotch pudding, with vanilla cookies & a graham crust.
I'd love to hear more ideas! This pie takes about 5 minutes to make, and there is almost always a little left over mix to dip cookies into. I remember one Christmas eve where the kids and I sat around dipping oreos and watching Christmas specials.
Both recipes are easy for kids to help make, and tasty, kid approved flavors. The pie is a fantastic addition to any holiday meal, and can be done easily, quickly, and best of all, frugally.


