Showing posts with label magnet. Show all posts

Monday, March 29, 2010

Talented Tuesday!

Interested in sponsoring next week's Talented Tuesday post with your own crafts, shop items, or a tutorial? Check out the details here!

For today's post, I'm featuring a trio of Dollar Store crafts I did over the weekend. All small, quick projects, but fun! First up is a craft I made for this week's challenge over at Dollar Store Crafts. The challenge required the use of place mats. 


We've seen purses, pillows, even diaper wipe covers made from them. I didn't want to do something I've seen before, but I was stumped. Finally, I saw something in the store that was perfect- belts. Thus, my idea was born.


Dollar Store Beach Bag


You'll Need:
2 woven belts
2 woven placemats
Scissors
Sewing Machine
10 minutes- yes, 10 minutes.


  1. First, cut the end tab and the buckle off the belt. I cut a bit of excess off at the buckle, in case I find a use for them at some point.
  2. Pin the placemats wrong side out together, end to end. Sew the short ends together. 
  3. These belts were so thick, I could not pin the belts into place. I had to hold them into place as I sewed. I did my best to match them- you'll see how well THAT went later. I just sewed them so that the two ends were both on the same side of the placemat- it forms an upside down U so that the "handles" go all the way down the bag. Did that make sense?
  4. Once the handles are sewn on both sides, turn the bag inside out again, and just do a quick zig zag across the bottom. I clipped the corners to try and get straight corners when I turned it right side out. I failed.


Notes-

This was SUPER easy, and is somewhat customizable, though it really depends on the colors of place mats available at any given time, and the availability of the belts. You could mix and match colors, or check your local thrift store, as well.  

Costs:

$4 total- $1 each for place mats, and $1 each for 2 belts.


Want some cute Flip Flop appliques on your bag? Check out the tutorial I made for that! I added cute little Flip Flops to my bag today, and posted all about it.


Next, how about some SUPER quickies?


Flower & Butterfly Magnets

You'll Need:

Sheer Butterflies (2 large for $1 or 3 medium for $1 at DT)
Ribbon & Flower sets ($1 for 2 ribbons & a few assorted single color flowers at DT)
Hot Glue
Magnets (a great way to use up promotional magnets!)
Wire Cutters

  1. First, the butterflies each have wire on the back- clip that off with the wire cutters, or OLD, CRAPPY scissors (not new ones, or good ones!!)
  2. Add a dot of hot glue to a magnet, and press the butterfly onto a magnet.
  3. For the flowers, I did 2 layer, 2 color flowers. Glue a small flower onto a larger flower, then glue it onto a magnet.
 Costs- $2

These will be another magnet set for my niece Alex's magnet board that I made for her birthday!


And for 1 last Dollar Store craft...

Bunny Picks

These are something cute I found on the DSC's website, and they were too adorable not to make! Especially since I had EVERYTHING on hand! I had extra egg picks from making a quick wreath, so waste not, want not!

You'll Need:

Egg Picks, or Plastic Eggs
Pom Poms- White & colors
Googly Eyes
Hot Glue
Felt- White & colors

  1. Cut bunny ears in 2 colors, with white being smaller than the color. Glue the smaller portion onto the larger portion.
  2. Glue the ears to the egg on the backside, so the white middle is showing to the front.
  3. Take 2 white pom poms and 1 colorful pom pom. Glue them together in a triangle.
  4. Glue the triangle to the bottom front of the egg, with the color forming the top point of the triangle.
  5. Glue two google eyes to the front of the egg, above the triangle.
  6. Lather, Rinse, Repeat! You're done!


Costs:

FREE or up, depending on what you have on hand! I was able to make 5!

Don't they look cute in my flowers? I had stuffed all the fake flowers I had into a vase simply for storage. I did the same with the bunnies, but now? I think they'll wind up going on the table on Easter Sunday.

This post is linked up at the link parties listed here

Now... without further ado.... Talented Tuesday!


The Rules


1) Post a blog about something you've made- a refurnish, recipes, a craft project, a sewing project, room decoration, anything you've done!

2) Add a link to your blog post- not to the blog itself, but to the individual posts! You can post more than one project, just add more links! The links should look something like:

http://theherberfamily.blogspot.com/2010/01/love-banner.html

and NOT like this:

http://theherberfamily.blogspot.com/

3) Add the code below to each post you link to the MckLinky, so that others can post their projects here as well! The list will accept new links through Saturday, so if you make something new, come back and post it! Don't forget to look at the links on the list, and let people know where you found their post at!

This MckLinky will remain open and accepting links through Thursday evening!! 


Photobucket


Sunday, March 28, 2010

Dollar Store Magnet Board

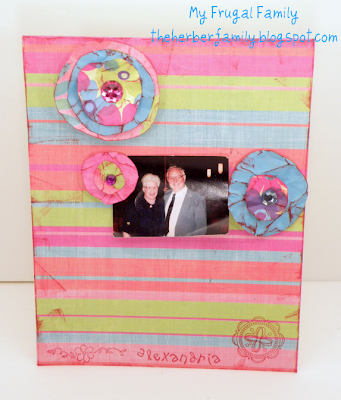
Last week, I was the guest host at one of my favorite craft sites, Dollar Store Crafts. The project I made for the site is a magnet board, which was made for very little money, and totally customized.

I had meant to post about it here as well, and never got around to it. Here are a few pictures of the board I made, and a link to the tutorial over at DSC's!


This would make a cute picture frame, and a totally customizable gift for a graduate, bride, or teacher!

This post is linked up at the link parties listed here.

Friday, November 20, 2009

Magnetic Christmas Clips

As I sat at my craft desk today, waiting for inspiration to strike, I started to sort through my bottom drawer. It's where all sorts of odds and ends are swept, or stored, waiting for a future project. Right under a ginormous bag of clothes pins was a box of small red and silver Christmas ornaments. Some are shiny, some are sparkly. All of them were beautiful.

The clothes pins were a pick up I found at Goodwill, probably close to a year ago now. I saw them, that huge, beautiful bag of clothes pins, and I just knew they were a crafting gift from some former crafter, right to me, a present crafter.

But alas, inspiration never hit, and they got stashed away in my bedroom. When I recently started to really go head first back into crafting, I rediscovered them.

I'm rambling again, aren't I? All right, let's get on with the tutorial.

Christmas Magnet Clips

You'll Need:
Small ornaments, buttons, or bells
Hinged Clothes Pins
Hot Glue
Magnet Strips (Tip- save all those odd-ball, flat printed promotional magnets you get, and cut them up to use for projects like this!)
Ribbon

  1. Start by cutting out strips of both magnet and ribbon the length and width of the clothing pins. If the ribbon is prone to fraying, use your favorite no-fray method. There are products available, or you could just use a dab of glue on the ends.


  2. Spread a thin layer of hot glue on one side, and smooth the magnet onto the pin.


  3. Spread another thin layer of hot glue on the other side, and smooth the ribbon onto it.


  4. Position your embellishment on top, and figure out how much and where to put the glue, then spread thin layers of hot glue to the places where you need it. Press the embellishment firmly into place, and let dry.


These clips are super easy, and while not original, they are fun, and cheap to make. You can use them to showcase your child's artwork, photos, shopping lists, or just about anything, really!

My total cost was FREE, because it was items I had on hand. To go out and purchase the items, though, would still be pretty inexpensive.

Christmas Ornaments- $1 for 12 at Dollar Tree
Clothing Pins- $1 for 24 at Dollar Tree
Ribbon- 3-4 yards for $2 at Walmart

I picked up a multi-pack of Christmas ribbon over at the Target Dollar Spot- $1 for 6 spools of thin Holiday printed ribbons. The downside is that each spool contains just 18 inches of ribbon. Right now, they have 2 sets. The first is traditional Christmas- red, green, white, with some solids and some patterns. The other is pinks, purples, blues, with checkered material, and snowflake material. At 18", it's just right for small bows, or making one of these clips! Or rather 6-8 of these clips per ribbon. I only used a small section and made 3.

It would be easy enough to make a dozen of these for around $2-$2.50 total.

Good luck! Don't forget, if you see something here that you like, and make, share your photos with us! I would love to see things I've helped inspire.

http://media-files.gather.com/images/d406/d74/d746/d224/d96/f3/full.jpg

In the above photo, you'll see my lovely little snowflake Christmas candle holder, again, right? Well, note the small one next to it! I was at Goodwill (yes, again) the other night, and found that little guy. It's a picture frame that can be hung as an ornament, or it has the stand on the back to stand it up. The enamal is a really deep red, but unless it's directly under a bright light, it looks black. I just love it next to the big one, though, since it matches it so well!