Showing posts with label hat. Show all posts

Friday, December 11, 2009

A Sweater to a Santa Hat

Actually, that's misleading, as it takes 2 sweaters to make the Santa hat. These turned out so cute, I just love them!

Sweater Santa Hat

You'll Need:
1 Red or Burgundy Sweater
1 Cream, White, or Tan Sweater
Sewing Machine
Thread
Hand Sewing Needle
Fleece or Ribbon *This is optional, and just depends on how you make the ball for the end of the hat
Pins

 
{My new machine, when it worked, and I loved it}

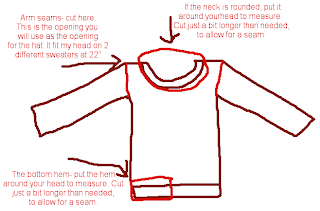
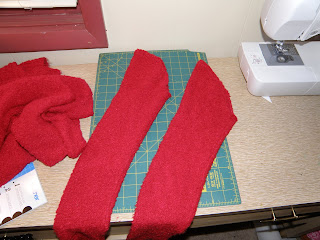
  1. Cut the sleeves off the sweater, at the seam. From here, try the sleeve on the person's head the hat is meant for, using the cut opening for the head. If it fits, you can move on. If it's too big, pull it tight, and pin where you will need to sew. If it is too tight, cut the seam off. If the seam was already cut off, but is not too tight, move on, as this part is not actually the part that will go around your head.
  2. Once the arm opening for the sleeve works right and fits around your head, measure the waist or (if it is rounded and not V shaped, boat shaped, or square) neck of the cream/white/tan sweater. To do this, do NOT use a measuring tape, as the material will stretch. Use your head, and wrap it around, pulling it taut. cut this portion of the sweater hem off.
  3. Pin the two sections together, with the sleeve turned right side out, and the hem inside out & upside down. You want to pin it so the raw side is pined to the sleeve, allowing for the finished side to be unsewn.
  4. Sew a zig zag stitch around the pinned side, so the hem is firmly attached to the hat. I always leave the two ends of the hem free until it is attached to the hat, then I sew them together, and add another stitch to the top to attach the ends to the hat.
  5. For the end of the hat, you can do a few things. You could attach a bell to a ribbon, and attach it to the end, pulling the material into as tight of a V shape as you can, and hand stitching it together. You can use fleece to make a fleece fringe ball, and again, hand sew it in. What I did with this particular hat, though, is take a square of the cream sweater, and fold & roll it into a ball shape, then hand stitch it into that shape. From there, I hand stitched it to the end of the sleeve. When I pulled it out, it looked odd, though, so I used ribbon to tie a tight bow in place, then I hand stitched the bow to the hat, so it won't untie.
  6. The last thing I did was to run a straight hand stitch loosely down the seam of the sleeve, from the opening to the top of the hat. Then, I pulled it, so that the underside of the sleeve gathered up. 
These hats will slouch off to the side naturally, because of the shape of the arm & arm opening. I loved how easy they are, and I can make 2 hats from 1 sweater, and still have the torso of the sweater left for future projects.

They are just adorable, and while a traditional hat is red and white, you can certainly customize it to meet your needs- matching jacket color, different colors for different kids, etc. My oldest daughter and my son both requested red with green instead of white. I made mine with a burgundy colored sweater, and cream sweater, so it looks more old fashioned.

The nice thing about these, are that they are custom fit, so they stay on, and they are warm, so they can be warn as winter hats.


My cost per hat is roughly $.79, as that's how much I pay per sweater at Goodwill. Honestly, though, the cost is cheaper than that, as I still have plenty of the sweater material left over after having made 2 of these.

Wednesday, December 2, 2009

All Dressed Up

A few months back, Raegan picked out a hat she wanted for winter. It was $12, and while it was cute, it was simply not in my frugal budget. I did keep it in mind, and watched for it to go on sale, but it was also at a store not near us.

A few weeks ago, I found the same hat design without embellishment at Family Dollar for just $4. Well, $4 I can do. I found one in black, to match her jacket, and picked it up. I had, at the time, intended for it to just be a plain winter hat that she would get for Christmas.


Fast forward a few days later, and I bought a container of buttons. One of the buttons was a large black faceted button. It was just perfect to embellish the hat, but there was only 1. I did some button digging, but nothing else was really dressy enough.


I finally sorted through my beads, and pulled out a lot of clear faceted beads to use. I hand stitched everything to the hat. I can't wait to see if she likes it! It's a cute, somewhat dressy looking hat now!


Friday, November 20, 2009

1 $.79 Sweater = 2 Great Hats!

I'll start off by saying that I made 2 because I did not photograph the steps to the first hat. I love this hat! I got the idea from Disney's post at 30 Days, on making a Cardigan hat. Disney runs one of my favorite blogs- Ruffles and Stuff. She has so many cute ideas! I only hope I'm half as good as she is some day. ;)

Since I did change the hat up a bit, I'll post a tutorial as well, but again, the idea came from Disney! I found my sweater at Goodwill for just $.79, and I was able to make 2 hats out of 1 sweater, with enough fabric on the sleeves for 1 scarf. At that price, each finished piece cost me just about $.27 to make. Can't beat that at the store! If you have an old sweater on hand, you can make this project for free!

Sweater Hat

You'll Need:

1 Old Sweater, adult sized SM or larger for kids, and L or larger for adults.
Scissors
Sewing Machine

  1. First, you'll want to cut the sweater apart. To start off, you need a circle, so make sure the sweater is bigger in size. The bigger the circle, the baggier the hat. I used a dinner plate to measure my circle, but in cutting it, I made the circle larger by about an inch around. I used a rotary cutter to cut through it, and stuck my cutting mat in between the layers of the sweater, so only the top was cut.


  2. Cut the bottom ribbing off the sweater. In the sweater I used, it had an extra long ribbing, which came in handy.

  3. The circumference of your sweater circle will be longer than the ribbing, as an aside. In Disney's tutorial, she first sewed the circle with a straight stitch, then pulled the top thread to gather the material. My first try at that was a big fail.


  4. Pin the bottom side of the hat to the ribbing, creating gathers as you pin. This is how I added gather to the hat, without being able to use the thread to create an instant gather. You may have to pin and re-pin a time or two to insure that you have the right size gather to fit the ribbing.


  5. Leave the loose ends of the ribbing unpined. Once the hat is pinned, sew the two loose ends of ribbing together, then pin 1 last gather to the ribbing.

  6. Sew along the gather, going nice and slow, and removing pins as you go- I noticed that some got hidden under the pleats created, and were harder to find at that point.


  7. If you are like me, you'll be in love with the hat once the first 6 steps are finished, and immediatly try it on. Now- if you had extra long ribbing, like I did, you'll note at this point that the hat resembles an odd, knit chef hat, and will create a weird mushroom above your head. It is not a flattering look. At this point, you'll pout a bit, and wonder where you went wrong. Or, since I have already done that for you, you can move on to step 8. Keep in mind, if you have ribbing that is only about 2 inches long, you can stop here, and enjoy your hat! If not, move on to step 8!


  8. To conquer the prior noted problem, I folded the ribbing inward, and looked at the hat inside out. The seam should have some allowance for adding another stitch to it. I did not pin it the second time around, I just went slow, and matched the ribbing seam with the inner seam, and stitched it on top.


  9. Fold the hat right side out, and you'll have a cute little, puffy beret type hat for winter!

  10. Embellish as you like! On one hat, I added a little 4-loop bow, with a big button in the middle.


This was a fairly easy hat, though some knowledge of sewing and pinning is required. Or, trial and error, if you are a fast learner. Rather than attack my own sweater collection, I have been hitting up thrift shops for materials to use all week. The children's set I made earlier this week was nice, but I much prefer my brightly colored set.

Wednesday, November 18, 2009

1 Sweater = Hat & Scarf Set!

Photobucket

Also featured on Sewing Gossip!


Yesterday, I made a trip to the local Goodwill AS-IS center, which sells items that don't sell fast enough in the regular Goodwill stores. It takes in items from as many as 15 near-by Goodwill's, so they have quite the selection. Items are marked down according to what they are, and how much it was to begin with. Nothing is more than $3.29, or cheaper than $.29, though.After seeing so many neat tutorials lately using sweaters as a base, I decided to try my hand at some. I scooped up probably 7 or 8 sweaters for $.79 each, and 1 children's sweater for only $.29. I didn't get real fancy, just quick & easy projects.

Sweater Hat & Scarf Set

You'll Need:

1 old sweater- For children, get an XL children's sweater, or SM adult sweater. For adults, XL works best. This is more for scarf length than for the hat, though.
Sewing Machine
Thread
Scissors
Yarn* OptionalCarefully cut the sleeves off the sweater first, right at the seam.
  1. Turn the sleeves inside out. You'll notice that in the large opening, the top where it met the shoulder is going to be wider than the bottom part of the opening. Smooth the sleeves flat, and turn one upside down, so that the curves meet each other- wide to narrow. If you put it narrow to narrow and wide to wide, you'll have a V shaped scarf!
  2. Pin the edges together, and sew the seams together, taking care not to sew the tube it forms together.
  3. Turn it right side out, and you have a quick, easy scarf! You can embellish it further, if you like.
  4. For the hat, first measure the person's head. You'll want to add 1 inch for seam allowance to that measurement. Measure it out on the sweater. I measured half of it, and cut using the side seam. For the height, children's hats work good at 10 inches in height. Adults work good at 12 inches. Make sure to make use of the waist line, if there is a different stitch- this makes for a great band on the hat!
  5. Once you have cut the fabric for the hat, stitch the open seam straight up with the machine.
  6. For the top of the hat, you can stitch straight across, but for a more fitted look, I made a cross style seam- I sewed an inch inward on the two edges, then puffed out the open section to create two side seams doing the same. You will want to round this off, or you will have a "crown" on the hat, and (not that I know this from personal experience -innocent-), your 13 year old daughter will look at you like you are nuts in requesting that she wear it to school. Of course, I did not get a photo of this. Here, have a nifty drawing!
  7. Admit it, I should have been an artist. Here is another drawing, showing how to curve the seam.
  8. Once you have rounded it off, turn it right side out for a cute little hat! I also made a "puff ball" (I use that term loosely, since it was not a ball, but rather like curly cooked spaghetti) for the top of my youngest daughter's hat set. To do this, I wrapped a lot of yarn around my fingers, then tied it together, and cut the loops. It was too long, but I still thought it was really cute. I hand stitched the puff ball to the top.

Pretty easy, huh? It took me maybe 20 minutes to make this set, and cost me all of $.29! I still have enough sweater left over for another hat, or a pair of mittens, too! However, since my almost-8-year-old refuses to wear anything but gloves, I skipped the mittens.

I made a set for my 13 year old daughter, and one for myself as well. I also did a scarf for my step-mom, but haven't completed the hat yet. Each set was under $1 to make, and they look great. Most of them were made from thick, bulky sweaters, for warmth. My own set was made from a thin white sweater, but it matched my jacket!

My next project after this set, is the set of hats below, also made from just 1 sweater! Are they not adorable? I love them!

Friday, October 30, 2009

Homemade Scarves & Hats

I have been making fun fleece hats for several years now. The kids love them, they're warm, and they are pretty cheap to make, if you shop right. At the bottom of the post, it tells you how I get my fleece dirt cheap, all year round.

This is an article I wrote a few years ago on Gather, and the original can be found here.

First things first- pick out 1 or 2 fleece fabrics. When you lay it out, you want the fabric to be laid out so that the stretch is what will fit around your head. Usually, that means using the raw edges as the top and bottom of the hat, not the material finished edge.

Next, using a tape measure, measure your head circumference- or the circumference of the person who will be wearing the hat. If it's for a gift, use a comparable sized head. ;)

Now, you want to measure the fabric. The general rule is to make the bottom edge the length of the head measurement, plus 2 inches. That gives an allowance for seams, while giving a snug fit.


If you want to use just 1 fabric, you'll want it to be 16-18" wide (tall) for an adult, or 14-16" wide (tall) for a child. If you use 2 fabrics, you want the adult width to be 14-16", and 12-14" for children.

If using the 2nd fabric, cut the contrasting fabric to be 4 to 4.5 inches wide, and the same length as the hat- your head circumference, plus 2 inches.


Next, we start the sewing. You want to pick a side of the fabric that you want to face "out". Usually, one side has a slightly fuzzier side. I usually put that side to face inward.


So, lay the fabric with the right side facing down on the work surface (which for me is the floor), then lay the shorter strip along the bottom edge (which can be either side if it's unpatterened, or without a specific direction to the pattern). This strip should also be right side down.


In comes the sewing machine! After it's lined up, sew a straight edge along the bottom edge of the two fabrics. Once it's done, snip the excess thread, and fold the flap so that both of the right side's are facing out.


Now, you want to fold the top edge of the 2nd fabric inward, and pin it into place. Sew another straight edge, this time along the top edge of the thin band of fabric to hold it into place.


You can sew another line under that one, and a third along the bottom half if you choose.


Now that this is sewn into place, you need to fold the fabric in half, so that the two side edges (the short edges) are lined up, and the hat is inside out again. Sew a straight edge down the side, but leave the top 3-4" of fabric unsewn.


From here, you'll need either yur scissors or a rotary cutter to fringe the top 3-4" of fabric. Turn the hat right side out. Gather the fringe, and take a spare peice of fleece fabric to tie around the top of the hat, gathering a "puff ball" of fringe.


Viola! You have a cute hat that took about 20 minutes, and only cost a dollar or two. To keep the price low, and your options high, I recommend scanning the remanent bins every time you go to a fabric store.

Anytime there's fleece, go ahead and pick it up. It's half the price it would be on the shelf for the same cut of fabric, and often, it's marked down even further. Joann Fabrics regularly has their remanents on sale 50-75% off the marked price, making it pennies on the dollar of buying it off the bolt.

And again, it gives you some awesome choices as you stock pile it. Of course, you eventually start to run out of room when storing it, but that's just semantics, right?

My favorite winter hat is a "Santa" hat I made- instead of a contrasting fleece, I used fake white "fur", which can be found at Craft stores. Instead of a straight hat, I cut it on an angle, to make it triangular. For the end puff, I made loops instead of fringe, and I attached a big jingle bell to it. The kids love that hat, and I get so many compliments on it!

Another thing I like to make in the winter are handmade fleece scarves. It seems like my kids are forever losing stuff, and these things can cost up to $5-6 at the store. This is a repost from an old Gather post of mine as well, found here.

What you need:

Fleece Fabric, 2 or 3 strips 60-80 inches long, 3-4 inches wide. Cut so that it is stretchy width wise, not length wise. I buy my fleece in remenents at Jo-Ann's & Wal-mart, and usually get it 25-75% off the price of buying the same cut from the bolt, and I get LOTS of patterns and colors to choose from this way.
Sewing Machine
Scissors

What to do:
  1. Lay the fleece strips on top of each other. The edges do not have to match perfectly.
  2. Sew a zig zag stitch straight down the very MIDDLE of the fabric, not the edges.
  3. Use your scissors or a rotary cutter to fringe the edges. You can do it narrow or wide. Make sure you leave about 1/2 inch of space near the middle uncut, so the scarf doesn't cut apart!
Decorative Touches-

Use contrasting colors & patterns for the layers to make a full and colorful scarf.
Twist and pull the fringe to curl it.
Use school colors!


This project takes roughly 10 minutes, and can be done with help from little ones. Make sure to help them with the actual sewing!

One of the best parts of both of these items, are that you need almost no sewing "Know-How" to make them. You can even make them without a sewing machine, though it IS much faster with a machine. These make wonderful gifts for adults and children both!