Showing posts with label homemade. Show all posts

Wednesday, March 31, 2010

Homemade Birthday Gifts

Next week, my niece Alexandria (Alex for short) turns 3. She's our Easter baby, and was born on Good Friday. For her birthday this year, my sister Brooke asked me to make her a wall hanging for her bedroom. I did- then I kept going, matching other items to it.

So far, I've posted all of them except the last two- which I only just did today.

First up today, I made her a banner for her bedroom. Alex has learned to spell ALEX, and loves anything with her name on it, or her first letter. I've focused on that with several of her gifts.

Name Banner


You'll Need:
Foam Shapes- Dollar Tree has many right now! 1 pack has 24 of 1 shape in 6 assorted colors for $1
Foam Sheets- Dollar Tree, again- 32 small sheets for $1
Hot Glue
Ribbon

  1. Start by picking your colors. I chose to go with an assortment of bright colors, and mixed them all up together. 
  2. Next, I used the shaped foam to make a template on the square foam, so I knew what size to make the letters. I just traced the top and bottom outline, since all the shapes were wider than the plain foam. Once I did that, I used a ruler to help make letter shapes- remember to do the letters backwards!
  3. Cut the letters, and hot glue them onto the foam shapes.
  4. To attach them, you could sew them together, or sew them to ribbon. I chose to cut small lengths of ribbon, and hot glue them each together. For the two ends, I made the ribbon much longer, and added ribbon tails to it with 3 other ribbons.


Tada- all done! I would say it took me about 30 minutes to do, but it really didn't feel time consuming. I had planned to sew her a banner with felt- this was MUCH faster, and so fun! Alex can use it at her birthday party, and then hang it in her room.

Costs-
Foam Shapes- 24/$1 x 2, 10 used for a total of $.42 worth of foam shapes.
Foam Sheets- 32/$1 x 1, 11 used (1 OOPS) for a total of $.34 worth of foam
Ribbon- $3.99/5 yards, 1 yard used- $1.25 worth of main ribbon
Ribbon 2- $1/3 yards, 1/2 yard used- $.17 worth of ribbon
Ribbon 3- $1/3 yards, 1/2 yard used- $.17 worth of ribbon
Ribbon 4- $.40/3 yards, 1/2 yard used- $0.07 worth of ribbon

Total Costs- $2.42 (yes, I was being nit-picky... I hate saying "on hand", when it was still bought whether I owned it before or FOR the project)


Next up... A Beach Bag!

I loved the beach bag I made over the weekend out of placemats, and thought Alex would love one as well. This one I made a little different. I had a hard time finding bright colored placemats that were fabric. The Dollar Tree had them in plastic, and those round wicker-y type things, but not fabric. So...

Beach Bag

You'll Need:
2 Dish Towels
2 Belts
Scrap Fabric & Ribbon
Sewing Machine


I loved those towels when I saw them!

  1. The dish towel is going to be larger than you need, but it works out great- because they are also much thinner than you need, material wise. Fold it in half, and stitch up the open ends, to make 1, double the thickness pad of material. For me, it did not come out evenly shaped, so I sewed straight lines, and trimmed excess fabric.
  2. Once both towels are sewn into the right size 'pads', I attached my appliques. MUCH easier when it's not already a bag, for the record. In this instance, I chose to do 2 appliques, one is the letter A, and the other is a pair of flip flops. I  used the paper pattern I created yesterday to make the flip flops again today. This time, I sewed it with a wide, close together zig zag stitch. I chose a purple fabric to match the purple straps. For the letter A, I stitched ribbon right onto the fabric. It worked beautifully, and brought in the colors yellow, orange, pink and green. I stitched it with a decorative flower stitch.
  3. Once your appliques are done, sew the handles onto the fabric. I started on the free end each time, so that it would leave as much extra for the handle as possible. I used a zig zag stitch, though if you want a neat clean look, twin rows of single straight stitches would look nicer, in the same or contrasting color. For my belts, I chose to sew them on with the pattern against the fabric. It's still visible on the handles, and matches the colors on the towels, but it felt like too much running all the way down the straps.
  4. When both handles are attached, pin the two sides together from the middle of the bottom, attempting to match the handle straps up as much as possible. Stitch the sides and bottom all closed, trim the excess fabric, and turn it right side out.
You're done!


It also worked as a wonderful "gift" bag for the items I've made for her! All of them are inside it, nice and neat!


This project took about 30 minutes, start to finish, but might be able to be done faster without the appliques. It is super cute, though, and I love how this one turned out. I'm tempted to start making these to sell. Tempted. Not sure I will, though.

Cost-
Towels: $1/each at Dollar Tree
Belts: $1/each at Dollar Tree

Total: $4

On top of these two projects, I made Alex
She's going to just love these, and it's not another box to cut apart, and another toy to be forgotten in 2 days.



Monday, January 4, 2010

Home Sewn Socks in 2010


Last week, as I sat shivering in the cold Michigan winter, I lamented how quickly soft fuzzy socks lose their fuzz, and shape. They are made for 1 size fits all, but let's face it, they get stretched out quickly, because they are made to stretch up to a size 10 foot, which my feet are not.

I marveled at how soft and warm and cozy my scarf arm warmers were, and was struck by inspiration. Surely these dollar store scarves would work for socks, too, right?

I had some scarves left over from my Christmas projects (and, I'll admit, I'm contemplating picking up 2-3 more to have on hand for next year's crafts, in case they don't get them in again), and started to think. Of course, today was my first day kid-free (though, Nick took today off as one of his floating holiday days, so I wasn't husband free), and I decided a few minutes ago to try my hand.

My first idea was to cut the material at an angle, so there was a definite foot section, and definite leg section. I wasn't sure just where to perform the cut, though, so I opted to first sew a tube, with one end sewn shut. I'm glad I didn't cut it.

I worried that without elastic, there would be nothing to hold my new socks up, but the stretch around my legs did that just fine. I worried that it wouldn't fit, but a quick check with my actual arm warmers showed that it would indeed stretch enough to fit around my feet.

And, here I sit, warm and cozy with my 10 minute home made fuzzy socks that cost me just $1.


How did I make them? See below.

Homemade Fuzzy Socks

You'll need:
1 skinny, fuzzy scarf from Dollar Tree
Sewing Maching
Feet, to try them on


  1. Cut the scarf in half. The ends of these scarves have a solid block of color, where as the in betweens of the scarf are striped. I opted to make the solid block of color my toe section. Forget measuring the scarf, as it will become shorter when it stretches as you pull it on.
  2. Fold the scarf in half. Yes, this makes it appear impossibly skinny for a human, adult foot, but I assure you, this is what you want. Pin it into place, then decide where you want the seam. I choose to have my seam run along the side of my foot, not under it, and I barely notice it. 
  3. Once you've decided where the seam will go, sew one end of the sock shut, rounding it off, and trimming the excess (otherwise, you get boxy toes).
  4. Sew straight down the open side, pulling the fabric to stretch it slightly as you do. This gives it a bit of elasticity for stretch.
  5. Trim the seam as closely as you can, along with the threads. Turn it inside out, stretch it open like you would a pair of tights, and start pulling it on. 


 These fit me snuggly, like no other socks ever do. They feel custom made to my feet! They are warm, and cozy, though maybe not as fuzzy as socks you buy for $3 a pair in the winter. I love them!

I wear a size 8 shoe. These fit me great, and have some extra stretch. I don't think anyone would have a problem with these fuzzy tube socks with size, because they stretch all the way around.  I did not stitch up the raw edge at all, because I didn't want it to constrict how wide the sock would open for me.


I have 1 scarf left. Maybe 2. My next plan is to make 1 scarf and some fleece into two pairs of slipper socks. It might not work for 2 pairs. We'll see!!

Linked up at:


The Girl Creative


Making


Tuesday, December 1, 2009

25 Ornaments - Day 2

And the countdown continues! Happy December to everyone!


(Sorry- I know this posted already, sans photos- this is a redo with photos!)

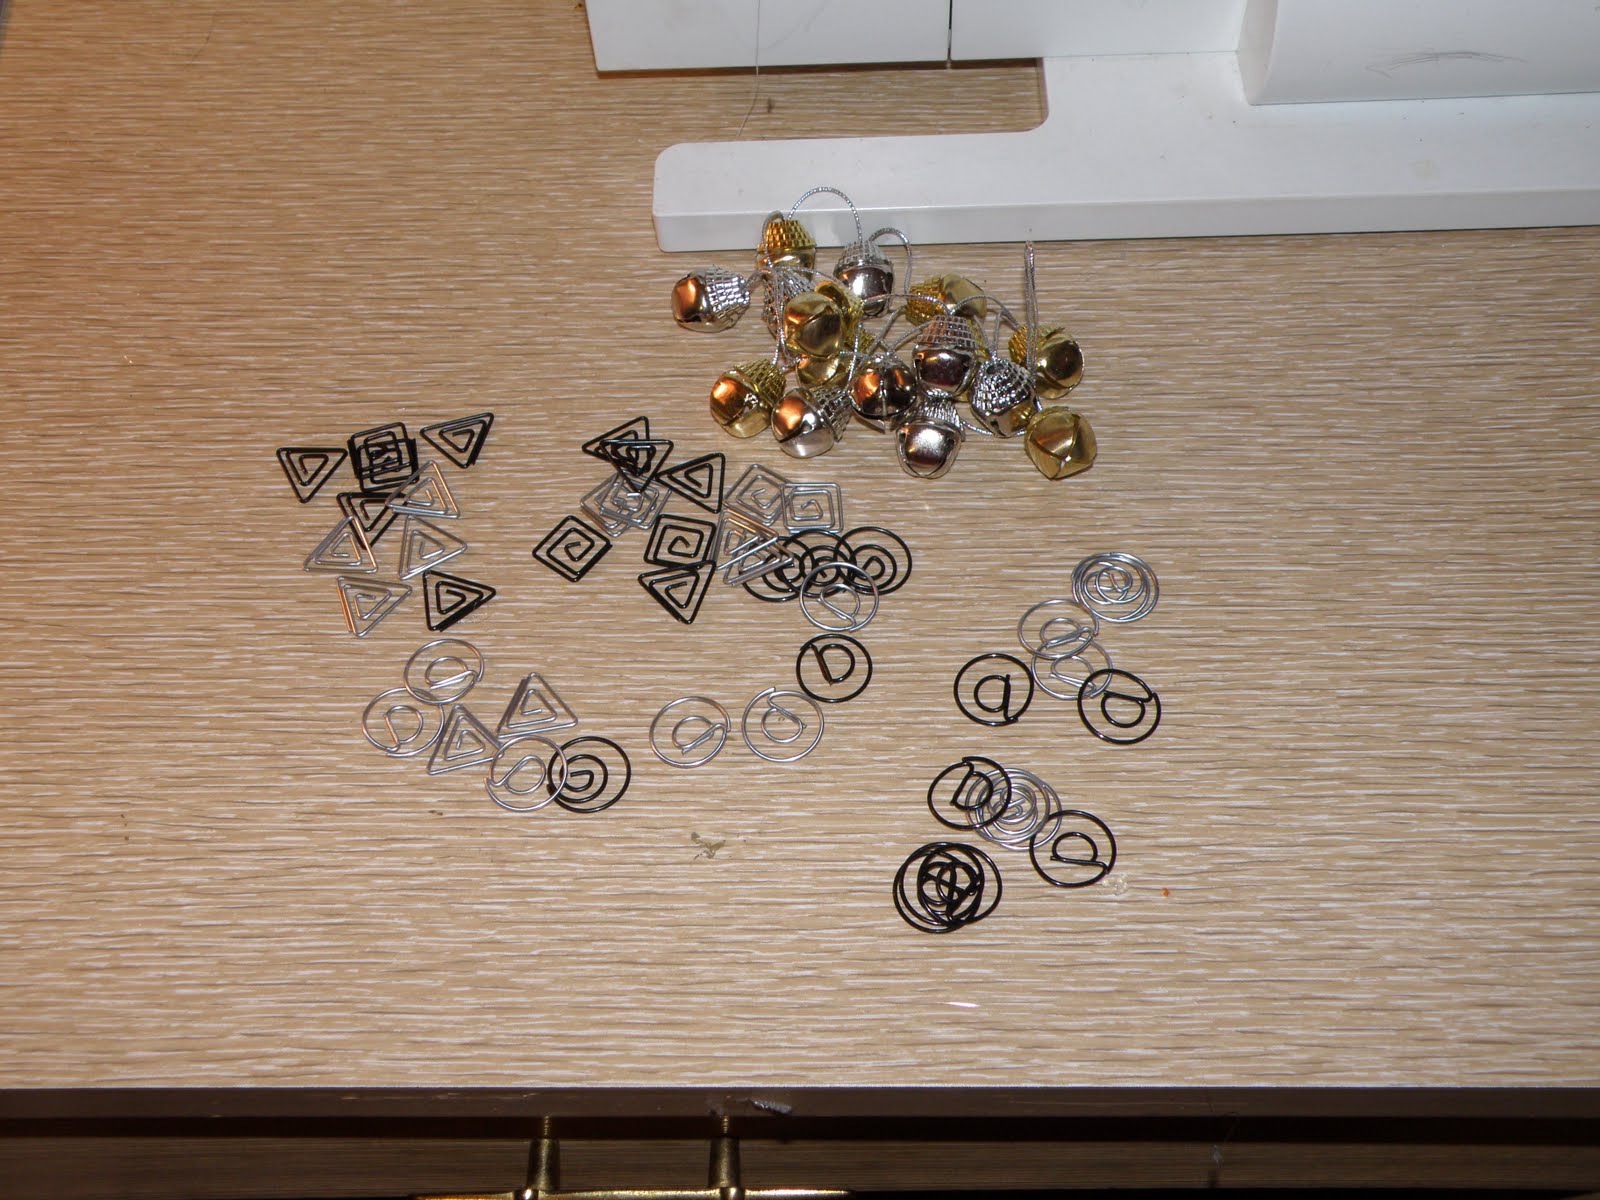
Last night, I was haunting the aisles of Dollar Tree looking for something specific that (this time) had nothing to do with crafts, when the most wonderful thing jumped out at me- shaped paperclips in silver & black!


They come in packs of 24 and feature 4 designs in 2 colors in each pack. Two of the designs have 4 each in the 2 colors, and two of the designs have 2 each in 2 of the colors. There are 2 round shapes, 1 square shape, and 1 triangle shape.


I immediatly knew these would be my next ornament! They would be perfect dangling down from a Christmas tree, and best of all, they would be EASY to make! I had hoped to find the S shaped curly que ornament hangers as well, but alas, my Dollar Tree was all out.

If your DT has them, snatch em up ;)

This ornament is so easy, I won't do a full step-by-step tutorial. Instead, I'll just tell you how to do it.

Simply clip the paper clips together as you want them. Yes, that's all. As I played around with these clips, I dug out my beads, and my bells, and added to them.

The beads will only go onto the round clips, where as the bells will slide around the corners on the triangle and square shapes. I liked both the beads and the bells, but I also liked these ornaments without adornment.


I did strands of plain silver, plain black, and a strand of mixed silver and black.

For $1, you get 24 of the clips, and can make 6 or 8 ornaments, depending on if you clip together 3 or 4 of the paper clips. I would have loved adding a bow, but none of my ribbon was narrow enough for these clips, I don't think.


So there you have it- a FRUGAL, simple craft for day 2. I bought 2 packs, so I'm planning to make up 12 of these cute little ornaments to adorn wrapped gifts this year.


These clips were found in the office supply area, near the markers, high lighters, and ink pens.

Monday, November 23, 2009

Our Advent Calendar

Last year, I found a couple of really cute stockings at Goodwill, and I started to realize just how much I adore stockings. I decided then and there that I would collect stockings. They are inexpensive, and not breakable. While I started collecting stockings, I was also looking for an easy way to make an advent calendar that was both big enough to stash treats for 3 kids, but small enough to pack away easily.

At some point, I realized that mini stockings would work out great. I waited until the holidays passed by, and stopped in to Dollar Tree. I found 2-packs of mini stockings for $.50 each, and bought up 12 matching packs. First I considered getting 4 packs each of 3 designs, but they were sold out of most of the designs, so I was unable to find an equal amount of any 3 designs. Instead, I wound up with 24 mini stockings in my favorite design last year.


When we unpacked the Christmas boxes yesterday, I found them all stashed away, just waiting for me. I dug them out, and spent about 15 minutes last night putting numbers on each of the stockings in glitter glue. It took all night for the glitter to dry, but now they are ready to go.

To hang them, I strung a wide 2" red grosgrain ribbon across my kitchen archway, which is pretty wide. I added a tack to the middle, so the ribbon won't get too weighed down, then used clothing pins to clip the stockings to the ribbon.


Now I'm just trying to decide- do I want to clip them up one day at a time, or remove them one day at a time? Hmm.... I also have to write up some activities to insert into the stockings, and get treats out for them. I picked up some candy on clearance after Halloween to use in the stockings.


Here are some of the different things I'll use to fill the stockings.

Holiday Pencils- I tried to glue a bell to the end of them, but the glue doesn't stick to erasers. Instead, I wrapped a tiny bow around the ends of the pencils.

Family Puzzle Night- I'll put a few puzzle pieces into the stocking, with a note to save them for the puzzle night. I can use this 2-3 times, before having a puzzle night scheduled for a weekend.

Mini Ornaments- The kids have a small tree we'll set up in their family room upstairs. On the day when we get it out, they will have 1 ornament each in the stocking to hang on the tree.

Hot Cocoa- the kids love hot cocoa, so I'll put together some baggies of cocoa & mini marshmallows for 1-2 of the stockings.

A Christmas Light- I'll have a lightbulb in one of the later stockings, for the night we're going to drive around looking at lights.

Movie Night- I will put a small baggie of popcorn in the stocking, for a night when we'll have a family movie night with a holiday movie. I will try to do this one twice as well.

A Cookie Cutter- for a day when we make holiday cookies, I'll include a cookie cutter in the stocking.

A photo of Santa- for the day when we go to visit Santa

And remember- I'd love to see any projects you make from my ideas!

Heather

Friday, November 20, 2009

1 $.79 Sweater = 2 Great Hats!

I'll start off by saying that I made 2 because I did not photograph the steps to the first hat. I love this hat! I got the idea from Disney's post at 30 Days, on making a Cardigan hat. Disney runs one of my favorite blogs- Ruffles and Stuff. She has so many cute ideas! I only hope I'm half as good as she is some day. ;)

Since I did change the hat up a bit, I'll post a tutorial as well, but again, the idea came from Disney! I found my sweater at Goodwill for just $.79, and I was able to make 2 hats out of 1 sweater, with enough fabric on the sleeves for 1 scarf. At that price, each finished piece cost me just about $.27 to make. Can't beat that at the store! If you have an old sweater on hand, you can make this project for free!

Sweater Hat

You'll Need:

1 Old Sweater, adult sized SM or larger for kids, and L or larger for adults.
Scissors
Sewing Machine

  1. First, you'll want to cut the sweater apart. To start off, you need a circle, so make sure the sweater is bigger in size. The bigger the circle, the baggier the hat. I used a dinner plate to measure my circle, but in cutting it, I made the circle larger by about an inch around. I used a rotary cutter to cut through it, and stuck my cutting mat in between the layers of the sweater, so only the top was cut.


  2. Cut the bottom ribbing off the sweater. In the sweater I used, it had an extra long ribbing, which came in handy.

  3. The circumference of your sweater circle will be longer than the ribbing, as an aside. In Disney's tutorial, she first sewed the circle with a straight stitch, then pulled the top thread to gather the material. My first try at that was a big fail.


  4. Pin the bottom side of the hat to the ribbing, creating gathers as you pin. This is how I added gather to the hat, without being able to use the thread to create an instant gather. You may have to pin and re-pin a time or two to insure that you have the right size gather to fit the ribbing.


  5. Leave the loose ends of the ribbing unpined. Once the hat is pinned, sew the two loose ends of ribbing together, then pin 1 last gather to the ribbing.

  6. Sew along the gather, going nice and slow, and removing pins as you go- I noticed that some got hidden under the pleats created, and were harder to find at that point.


  7. If you are like me, you'll be in love with the hat once the first 6 steps are finished, and immediatly try it on. Now- if you had extra long ribbing, like I did, you'll note at this point that the hat resembles an odd, knit chef hat, and will create a weird mushroom above your head. It is not a flattering look. At this point, you'll pout a bit, and wonder where you went wrong. Or, since I have already done that for you, you can move on to step 8. Keep in mind, if you have ribbing that is only about 2 inches long, you can stop here, and enjoy your hat! If not, move on to step 8!


  8. To conquer the prior noted problem, I folded the ribbing inward, and looked at the hat inside out. The seam should have some allowance for adding another stitch to it. I did not pin it the second time around, I just went slow, and matched the ribbing seam with the inner seam, and stitched it on top.


  9. Fold the hat right side out, and you'll have a cute little, puffy beret type hat for winter!

  10. Embellish as you like! On one hat, I added a little 4-loop bow, with a big button in the middle.


This was a fairly easy hat, though some knowledge of sewing and pinning is required. Or, trial and error, if you are a fast learner. Rather than attack my own sweater collection, I have been hitting up thrift shops for materials to use all week. The children's set I made earlier this week was nice, but I much prefer my brightly colored set.