The trick is at least as old as I am, because I remember making them when I was little. What parent with young children doesn't have a stash of broken crayons laying around? So, what to do with them? Melt them down!
Heck, Crayola even has a horribly over priced contraption for just that purpose. When I was little, we used muffin pans. We would break and fill the tin as much as we could, melt the crayons in the oven, and have a big chunk of multi-colored crayon to use afterwards.
A few weeks ago, Jessica at Mad in Crafts posted
a tute using snow flake shaped silicon muffin pans. I loved it! Unfortunatly, I have not had a chance to get into Target for the snowflake pan. Last night, though, I found Christmas Tree shaped silicon ice cube trays at Dollar Tree.
I snagged it, because I was really wanting to make some cute shaped crayons for my 2 year old niece before Christmas.
Shaped Crayons
You'll Need:
Naked Crayons- Remove the wrappers!
A muffin pan, or shaped silicon pan
Oven
The ice cube tray I bought has 10 cavities in it, and I broke up 12 brand new, full sized crayons to melt down, which made 8 Christmas Tree crayons. I would recommend using more than that, though, as the crayons came out skinny.

- Remove the wrappers from the crayons, if you have not yet done so. Kids can help with this, if they are around. Since I was home alone, I used an exacto knife to slice down the length of the wrapper, then used it to poke at the wrapper until enough of it lifted away from the crayon to peel it away. NOT recommended for kids!
- Break the crayons into the smallest pieces you can manage. The larger the chunk, the less it will mix in with the other colors, but also, the more room it will take up in the cavity, meaning a thinner crayon in the end.
- Fill the mold with crayons, squeezing in as many little bits as you can. Don't worry if it's a little over the top edge of the mold, because it'll melt down, but don't go too tall over the edge, or it'll spill onto the top of the mold.
- Bake the mold at 200 degrees for 10-20 minutes, depending on the thickness of the mold. Mine only took about 15 minutes to melt down. Remove from the oven and let set. Tip- set the mold on a cookie sheet, it will be far easier to remove from the oven.
- To cool these, you can let them sit, or you can put them in the fridge, or even outside if it's cold enough. They'll harden much faster. Watch the wax, it's going to be HOT in liquid form!
- Simply press on the under side of the mold, and the crayons will pop out!

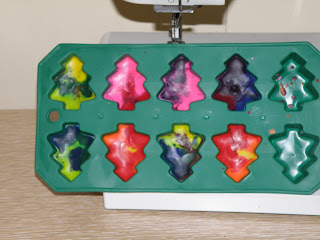

These are super easy to make, and are great for little hands that tend to easily break crayons. They are easier to hold on to. You can make them in solid colors, a mix of similar colors, or just toss in whatever you want. You can also add a pinch of glitter to them after they are melted down, but before they harden.
Tips-
Make sure the cavity is as full as you can make it. Use tiny broken pieces to squeeze into empty spaces.
If the crayons are still coming out skinny, take a carrot peeler, and make crayon shavings to sprinkle into each mold to help fill out the crayons more.
Rub the bottom side smooth on paper, as they will have sunken in teh middle just a bit, and make for an uneven edge.
Package them in the empty crayon box, or pretty cellophane bags, or stack them and tie with a ribbon.
Enjoy!


