Showing posts with label kids. Show all posts

Monday, October 17, 2011

Kids Fall 2011 Portraits - My how they've grown!

4 years ago, now, I put my foot down, and decided that school portraits both A) Suck, and B) Cost an arm and a leg. So, to get around it, I decided to pick up my own little Kodak point and shoot, and try my hand at taking the photos myself.

I wasn't sure where that would go, but it wound up becoming a part time job that I love. I've long since upgraded from a point and shoot to a Sony DSLR that I absolutely love. And as for saving money? Well, I suppose when you factor in the cost of my camera, I really didn't save money anymore, but it's something I love, and it does make me some money on the side.

Anyway, here is a look at how far I've come, and how much the lil monsters darlings have grown.


I have seen a lot of growth both in my SOOC (straight off the camera) photos, and my editing skills over the past year, and I love seeing how they turn out each time I do a shoot.

This summer, we were out a lot- we did a 5 day family vacation, a few small weekend things, and I went on my own kid-free, spouse-free vacation for 5 days as well.

With all of this, I did not do nearly as many photoshoots this year as I did last year, but it picked up this fall, and since September, I've done 3 senior portrait sessions, and several families. Fall is just a fun time for photos!

Wednesday, September 22, 2010

My baby is in high school

14 years ago, I was worrying about what to dress my darling little baby up as for Halloween. She wound up going as a pumpkin. It was a homemade costume made for a 4 year old, so it was HUGE and round- only her little head poked out- but she won 1st place in a costume contest with it.

Now I'm worrying about how to do her hair for homecoming. Homecoming. She's 14, and a freshman this year. I stopped and thought about it a few weeks ago, and was shocked- from here on out, I'll have a high schooler every year for 10 years. 10 YEARS!

Someone tell me how she leap frogged from this:


to this:


I'm wondering where the time went? Sure- everyone tells you it goes fast. But while it's happening, it doesn't -seem- fast. It seems slow. Very slow when you add in my two younger kids. Now? She's a freshman, and looking back, I can't help but wonder...  didn't she just graduate from Pre-school?

Wednesday, May 12, 2010

Keeping up with Heather's Family

It's been a long week. Well, actually, it's been a long few years, but that's a whole different matter. Anyway, if you guys are at all interested in what I've been doing, you can check out my family blog, Minions X 3.

Thursday, May 6, 2010

My Crazy World

1. Got an MP3 player this week. Sewed a crappy little case for it, sans tutorial. Plan to make a new one, though. This time, I know what I'm doing, so score! I have been using it a lot. I also discovered I love that stupid song Tik Tok by Kesha (I refuse to acknowledge the $ she slapped in her name).

2. Just occasionally, being a parent really sucks. Like when you get not 1, not 2, but 3 phone calls home from school in a single week because middle child is doing dumb things in school that resulted in 1 detention, 1 half day suspension, and 1 day and a half suspension. Said kid is up in his room right now, "Thinking about his actions."

3. 3 doctors appointments next week. 1 for Little Bit, 1 for Middle Child, 1 for Self. Middle Child needs his meds adjusted, seriously. This is the 3rd time the office has rescheduled his appointment. Let's hope this one 'sticks', because at this rate, I'm ready to take him to our old doctor (you know, the one that's over an hour away) just to get him seen. But, this new place is supposed to be A.MAZE.ING with kids who have ADHD.

4. Went photo scouting today. I have a senior picture appointment on Sunday at a park I've never been to, so I wanted to see it first. I've heard great things, but at first, I was like BA-LAH! Then, I found the cool parts. There are natural limestone cliffs and ledges along a river side path. Gorgeous, fun, and the colors? To die for! Which leads me to...

5. I did something really dumb. I wasn't doing any climbing unless there was a defined path, because while there were a lot of easily reachable 'ledges', there were also some steep areas. I found a nice one on my way back to the car, though. Nice big shelf, only about 4 feet up, with stepping stones for climbing. Well, not REALLY for climbing, but they worked. Then as I went to climb down, I misstepped. Then, to save myself from falling head first, I jumped. In ballet flats. With no padding. Now? Can't put any weight on my right heel at all. It doesn't hurt much at all normal, but weight? Agony.

6. But I got some wicked cool Macro's today, and did a lot of walking through the park, and got to listen to my MP3 player with comfy head phones (cause ear buds SUCK, and HURT!).

Wednesday, April 21, 2010

My Frugal Etsy Shop!

I have finally done it- I've opened an Etsy shop with some small items in it, all frugally priced.


Currently, there are 3 headbands, a pair of clip barrettes, and a pair of bib clips available in the shop.

Lucy Clips- A pair of corker ribbon clips

 Charlotte Headband, with a black satin bow & red gemstone attached

Emma Leigh Headband, with a pale pink Gerbera Daisy, and a pink button and gemstone center

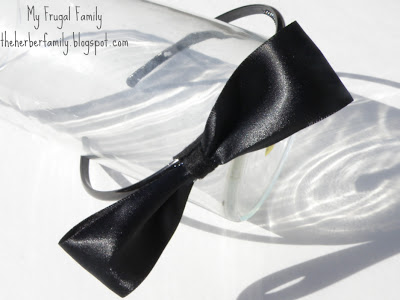
Alice Headband- a black slim headband with a wide black satin bow, perched off center

Baby Bib Clips- turn any piece of fabric, cloth, or even paper towel into an emergency bib with just 1 clip. These can also be used for nursing mothers modesty blankets, or attaching favorite toys, cups, blankets, or stuffed animals to strollers.

Sophia Clips- This is a pair of yellow and fuchsia snap barrettes. The centers are made from yellow buttons and pale pink gemstones.

Betsy Headband- This is a slim fuchsia pink, clear plastic headband with glitter inside. Attached is a fuchsia pink Gerbera daisy, with an orange button and purple gemstone center.

Olivia Headband- This is a slim, pink plastic multi-tonal headband with a pale pink Gerbera daisy on it. The center of the daisy is made from a thick clear pink button, and a pink gem stone.


If you have a moment, please check the shop out! My goal is to earn some money through my crafts, to put towards summer fun with the kids!

Monday, March 1, 2010

Circus! Circus! Circus!

Last week, I got an email from the Breslin Center, which is the basketball arena at Michigan State U. Back in October, I got tickets and took Raegan to see Cavo, Theory of a Deadman, and (my favorite!) Daughtry in concert. Since then, I get emails announcing concerts and events.

The email was announcing a circus coming to town. Not a big, well known one, like Shrine or Ringling, but still, a circus, and a fairly good sized one. The email included a coupon good for $5 off each ticket. After talking with Nick, and seeing if the kids would even like that (they ARE almost 14, 11, and 8), I went ahead and ordered them last night.

We're going on Sunday the 14th for the last show. I figured the Saturday shows were likely packed. There's a Friday night show, which Nick said might be a nice way to unwind, but I worried about Chris and Gilly having bad days at school. They both have adhd, and when they have a rough time at school, it's usually a rough night at home.

I opted for the Sunday afternoon show, and got pretty awesome seats. I can't be completely sure just -how- awesome they are, though. We got bleacher seats, which are the closest set of seats to the floor. There are only 10 rows going upward, so either way, we got good seats. We wound up in row 1. If I recall correctly, Rae and I had row 9 in the bleachers last time, which was second from the top. If that IS the case, we're the very first row!

How awesome is that for something like the circus? For starters, plenty of leg room, and great views to be had.

I took Rae to the circus once when she was maybe 2. Early enough that she doesn't remember it. Chris & Gilly have never been to one. Neither has Nick. In fact, he's really excited to go!

He's at work right now, and I told him I ordered the tickets. He typed to me, "I have to admit something."

How often does something -good- come from those words? I said, "Ok.... what?"

He types back:

I'm pretty excited to see this.  never been to a circus b4. LOL

Isn't that cute?


We're going to the circus! I've been to the circus several times, both as a child, and later in my teen years. Heck, one time, a group of friends and I got tickets to go, just to have something to do that weekend. I think I had more fun then than as a child.

I remember one time when I was little when we rode the elephant. I was sick, and didn't feel great, and if I remember, I even had a fever, but we still went, and I still loved it.

Thursday, January 14, 2010

Making Cleaning Safe & FUN!

I had an idea last night. I wish I had had this idea years ago, when my kids were younger. Kids and cleaning chemicals are not the best combination, right? Young kids (I think under 3) should not be able to get at cleaning chemicals at all. But, I'd say by the time they're 3-4 years old, they are old enough to understand not to drink chemicals (in most instances, obviously every parent should be the judge on that, depending on what the child is like).

It's around this age that kids really want to mimic Mommy, and cleaning is still fun for them. While cleaning chemicals can look pretty in their bright yellows, blues, greens, and even purples, they aren't exactly something kids should be playing with just yet, either.

So, here's my idea- make a safe cleaning kit for kids, so that when it's time to clean, they can use their own "products", while Mommy uses hers (Or Daddy!).

What You'll Need:
1 Clean Spray Bottle (to avoid confusion, I do NOT recommend reusing a cleaning chemical bottle)
Stickers
Permanent Marker
Size Small reusable rubber cleaning gloves
Vinegar
Water
Colorful Scrub Brush
Micro Fiber Cloth
Bucket or Tub

Decorate the bottle & tub or bucket with stickers, and write your child's name on each item in big bright letters. Fill the bottle 3/4ths with water, and 1/4th with vinegar. The vinegar won't be harmful, if accidently ingested, and will give the water cleaning properties, and make it more of a deodorizer.

Make yourself a kit, while you are at it, and explain to the child(ren) that Mommy's kit (or Daddy's) is just for the grown up's, and the child kit is just for the kids. Put them away side by side, and when it's time to clean, everyone can help out!

The dollar store sells all of the supplies listed above in fun, bright colors. The spray bottles are opaque white, but have bright colored spray nozzles.


Decor Mamma


Saturday, January 9, 2010

I Am Broken

I'm sure there are many people out there who would agree with that statement, but I don't just mean mentally now. ;)

On Thursday, I posted a blog about taking the kids sledding, and how much fun we had, but how, ultimately, I got hurt. Well, after trying to stand up enough to put a pillow under my bum, and nearly bursting into tears from the pain, I decided to call Nick He was on his way home, I just wanted him to come home NOW.

He got here, and I got out of the PJ's I was in (excruciating, but necessary, since I had no desire to be seen in anything less than clean panties for x-rays), and he took me to the ER. Boy, am I glad Raegan is old enough to watch the kids for emergencies like this.

Anyway, they confirmed it- I broke my tailbone. The tip is separated from the rest. Ouch! I'm confined to some bloody uncomfortable sitting positions so that I don't put weight back on my tailbone. They had me pick up an inflatable donut, but honestly, I found that to be highly painful both last night and today, so instead, I sit leaning forward. It hurts my upper back, but keeps the weight from my tailbone.

I'm to take it easy, and rest for several days. The kids didn't have school today, so at least I didn't have to walk to the bus stop with Gilly. The bus stop is 8 houses down, and I almost always have to wait a good 15 minutes before the bus shows up. Walking actually doesn't bother me at all. Going up steps hurts. Down doesn't. But, just the thought of walking there makes me cringe.

However, taking her to school and sitting in the car? That DOES make me wanna yarf all over. So, bus stop it is. Nick is going to try and switch shifts next week. There is a mid-shift, which is from 9-6 instead of 8-5 (early shift) or 10-7 (late shift). If he can, then he'll be able to get Gilly on the bus in the morning, so I can rest for a few days. I'll also call the bus garage and make arrangements for them to let my older daughter pick her up in the afternoons next week, as well.

When school started, Gilly was 7, and the bus garage requires all children 7 or younger to be picked up by a parent or adult care giver. However, she just turned 8, and while I still want her picked up at all times, I think the bus garage will be all right with it. Then again, I did throw a massive hissy fit at the begining of the school year, so... who knows.

Should I explain the hissy fit? Man, that's a whole nother post. Maybe tomorrow.

Anyway, while I might make some posts occasionally over the next few days, I probably won't be sitting on my hard craft chair to do any crafts. I did find a cute idea for Valentine's Day bracelets, though, so I might do that in bed.

Speaking of bed... it's 2am, and I should get back in it. Tomorrow, I plan to rig up some way to take a long bath, without my tailbone resting on the bottom of the tub. Nick suggested submerging a towel, so I may have to try that.

Sunday, December 6, 2009

Craft Time!!

For a few weeks now, I've been planing a craft day with the kids and a friend & her daughter (or daughters, if her older daughter comes, too!). I made easy ornaments ahead of time to test out what works best for the kids, and what takes too much work or adult help to make.

I've got supplies leaking out of every drawer and shelf in my craft area in preparation! I'm excited, they should be here soon, and we can craft, craft, craft!

I'll post pictures later to show you how it went. ;) In the mean time, did you check out my Day 7 ornaments? They were my first time using Mod Podge, and I must say, it was love at first stroke! ;) Seriously, if you've never played with Mod Podge, I recommend it. It makes for some great projects for the painting challenged (erm, me). All I use is wooden shapes, scrap book paper, stamps & stamp pads, and mod podge to make some really cool ornaments!

I made two last night for my neighbor Gary, his girlfriend Traci, and their combined 5 kids (her boys on one ornament, his girls on the other). This morning, I took 2 3-D wood shapes with layers, and made them into ornaments. One is for my Dad, the other for my Step-Mom. They were much harder, since I could not just trace the shape, and slap it on.


However, I just love how they look! I stamped their names on the backside of the ornaments, as well. And, more importantly? I get to use my rotary tool to drill holes in the wooden shapes. ;) Yes, that is important, because I love using my drill.

Friday, December 4, 2009

Christmas Treats: Rice Krispie Trees

I was on Walmart.com looking at several of the Christmas baking recipes they have. A photo caught my eye- 3 Christmas tree shaped treats with candy cane trunks. I was immediatly in love with the visual.

To me, they looked like Rice Krispie treats cut into Christmas Trees, and decorated. However, they are actual cake. I'll post the recipe below. For me, though, I do believe we'll be making these as Rice Krispie treats that the kids can frost & decorate. I just love the candy cane trunk on it!


  1. Preheat oven to 350*F. Grease and flour two 9-inch round cake pans; set aside. Prepare cake batter as directed on package; tint with food coloring. Pour evenly into prepared pans.

  2. Bake as directed on package. Cool in pans 10 minutes; remove to wire racks. Cool completely.

  3. Beat cream cheese and powdered sugar with electric mixer on medium speed until well blended. Stir in whipped topping with wire whisk. Spread onto tops and sides of cakes.

  4. Cut each cake into eight wedges to resemble Christmas trees. Insert peppermint stick into curved side of each cake for the tree trunk. Decorate with remaining ingredients. Store in refrigerator.
All in all, the cake recipe is pretty easy, but I just can't get it out of mind with rice krispies instead of cake!

Thursday, December 3, 2009

Frugal Crayon Re-Use

The trick is at least as old as I am, because I remember making them when I was little. What parent with young children doesn't have a stash of broken crayons laying around? So, what to do with them? Melt them down!

Heck, Crayola even has a horribly over priced contraption for just that purpose. When I was little, we used muffin pans. We would break and fill the tin as much as we could, melt the crayons in the oven, and have a big chunk of multi-colored crayon to use afterwards.

A few weeks ago, Jessica at Mad in Crafts posted a tute using snow flake shaped silicon muffin pans. I loved it! Unfortunatly, I have not had a chance to get into Target for the snowflake pan. Last night, though, I found Christmas Tree shaped silicon ice cube trays at Dollar Tree.

I snagged it, because I was really wanting to make some cute shaped crayons for my 2 year old niece before Christmas.

Shaped Crayons


You'll Need:
Naked Crayons- Remove the wrappers!
A muffin pan, or shaped silicon pan
Oven

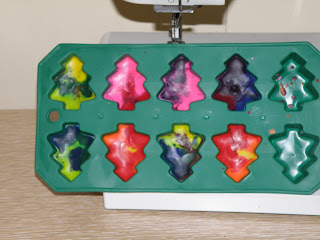
The ice cube tray I bought has 10 cavities in it, and I broke up 12 brand new, full sized crayons to melt down, which made 8 Christmas Tree crayons. I would recommend using more than that, though, as the crayons came out skinny.

  1. Remove the wrappers from the crayons, if you have not yet done so. Kids can help with this, if they are around. Since I was home alone, I used an exacto knife to slice down the length of the wrapper, then used it to poke at the wrapper until enough of it lifted away from the crayon to peel it away. NOT recommended for kids!

  2. Break the crayons into the smallest pieces you can manage. The larger the chunk, the less it will mix in with the other colors, but also, the more room it will take up in the cavity, meaning a thinner crayon in the end.

  3. Fill the mold with crayons, squeezing in as many little bits as you can. Don't worry if it's a little over the top edge of the mold, because it'll melt down, but don't go too tall over the edge, or it'll spill onto the top of the mold.

  4. Bake the mold at 200 degrees for 10-20 minutes, depending on the thickness of the mold. Mine only took about 15 minutes to melt down. Remove from the oven and let set. Tip- set the mold on a cookie sheet, it will be far easier to remove from the oven.

  5. To cool these, you can let them sit, or you can put them in the fridge, or even outside if it's cold enough. They'll harden much faster. Watch the wax, it's going to be HOT in liquid form!

  6. Simply press on the under side of the mold, and the crayons will pop out!


 These are super easy to make, and are great for little hands that tend to easily break crayons. They are easier to hold on to. You can make them in solid colors, a mix of similar colors, or just toss in whatever you want. You can also add a pinch of glitter to them after they are melted down, but before they harden.

Tips-

Make sure the cavity is as full as you can make it. Use tiny broken pieces to squeeze into empty spaces.

If the crayons are still coming out skinny, take a carrot peeler, and make crayon shavings to sprinkle into each mold to help fill out the crayons more.

Rub the bottom side smooth on paper, as they will have sunken in teh middle just a bit, and make for an uneven edge.

Package them in the empty crayon box, or pretty cellophane bags, or stack them and tie with a ribbon.


Enjoy!

Wednesday, November 4, 2009

Frugal Video Games: 6 WII Games for $30!

This was first posted on Gather, which referred to a blog, which referred to another blog.

Here's the deal-

WII Games are on sale this week at Target, Buy 2 games, get 1 FREE! Great deal, right? It gets better. For starters, there isn't a limit, so you can buy 6 or even more all at once, on 1 transaction.

To make the deal sweeter, there is a coupon on Target.com (which is useable ONLY in store, NOT online!) for buy 2 WII games, get $10 off.

http://sites.target.com/images/2009HolidayCoupons/holiday_coupons_print.html


So here's what you do- Pick out 6 games for $14.99, and print out 3 of the $10/2 coupons. The register will do the rest of the work.

6 Games@ $14.99 = $89.94
2 Games@ FREE= -$29.98
3 Coupons@ $10= -$30.00
Total = $29.96!

That's just under $5 per game, or a savings of $10 off per game! This can be done with any games, but obviously, the price will adjust depending on what games you find. There are even a few older titles for only $9.99, so you could probably shave the price down just a bit more.

This hasn't been tested by me, but has been tested by others. Hubby's already plotting how to get 6 cheap games. ;)

UPDATE:

I had to go to 2 different Target's before I found one that had a decent selection of the cheap games, still, but I found one!

I purchased 5 of the $14.99 games, and 1 of the $19.99 games. 2 of the $14.99 were free, and they accepted all 3 $10 off coupons! Now, to decide who gets what for Christmas...

Good luck!

Saturday, October 31, 2009

Inexpensive Child's Apron

With Thanksgiving & Christmas coming up, the chance to have the kids in the kitchen is expanding. Recently, I talked with a friend online about making an apron for my youngest daughter for Christmas. She is getting an easy bake oven for Christmas that another friend had sitting in her closet- brand new!

I am having one made for her, but after that, I found a really easy way to make a child's apron to use while baking. The main supplies- the towel & pot holder, can be found at Dollar Tree. For $3, you can buy 2 towels, and 1 2 pack of pot holders. Counting in the ribbon, this project should cost you about $1.75 to make.

Finished images of this project can be found on the blog by clicking the link below- it opens in a new window

Child's Kitchen Apron

What You'll Need:
1 Kitchen Towel
1 Rectangular Pot Holder
1 Spool of Ribbon
Sewing Machine or needle
Thread

  1. Clip the loop off the pot holder, if there is one.
  2. Take into account the child's height, then decide whether you want the towel to hang length wise, or sideways, depending on how tall or short the child is. Once you have decided, sew the pot holder onto the top edge, in the middle. The ends do not have to be bunched or gathered, they remain flat.
  3. Once you have the pot holder sewn on, cut a length of ribbon long enough to loop over the child's head, or create two lengths that can be tied around the neck. Sew the two ends to the upper corners of the pot holder.
  4. Sew two lengths of ribbon to the top corners of the towel, to tie around the child's waist. If you choose to make a sideways apron, you may want to fold the top corners down, and stitch the corner down before sewing ribbons on, to make it shorter around the waist. With smaller children, the apron might be too wide to tie around the waist at full length.
  5. To keep the ribbon from fraying, you can coat the ends in clear nail polish, or fold it over and sew the ends.
The image below shows how to place the potholder, and where the ribbons go. I didn't have anything on hand to demonstrate it, so I used my art program. Yes, I really should have been a serious artist, I'm just that good. ;)

Friday, October 30, 2009

Thanksgiving Kids Crafts

These are more of those craft ideas that can help keep little hands busy while the adults make their Thanksgiving Feast. It would also make for a fun school craft while talking about Thanksgiving.

Harvest Necklace

What You'll Need:
Thread or Fishing line
Needle
Cheerios
Dried Fruit- Raisins, Apricots, Apples, Cranberries, etc
Popped Corn

This is a simple project, just stringing things on a thread. Set each child up with a length of thread or fishing line, knotted on one end, and threaded through a needle on the other side.

Let the kids do an assortment or pattern of the foods provided on the thread. When it's close to full, take it off the needle, and tie together like a necklace for the kids to wear, and snack on!

Candy Cornucopia

What You'll Need:
Sugar Waffle Cones
Fruit Shaped Candies or cereal or Nuts & Dried Fruit
Decorating frosting with a writing tip

Have the kids or an adult write their names on the side of the waffle cone. Once it's dried, let the kids scoop some candies or dried fruit & nuts into the cone for their own cornucopia Thanksgiving treat!

Thumbprint Turkey Placecards

What You'll Need:
Ink pads in various fall colors- browns, golds, oranges, reds, and yellows
Black & Red Marker
Construction Paper or Card Stock

  • Press a thumb into the inkpad and then on paper to print a turkey's body. Use the same technique with fingertips to create a head and feathers.

  • Use markers to add a beak, wattle and feet.

  • Complete the cards by writing in guests' names

Most of all- have fun, and enjoy your upcoming Thanksgiving Holiday!

Thursday, October 22, 2009

Gifts Kids Can Make

I have 3 kids, and a whole lot of extended family. While we no longer try to buy for everyone, I do like to give something to as many people as I can, even if it's something small. This year, we are focusing on homemade gifts, such as the Christmas Dishtowel Angel.


With 3 kids, there is no reason not to involve them in the process as well! What Grandparent doesn't love a small homemade ornament, or a card? Or hand print art? While Christmas is still 2 months away, now is the time to get started on craft projects, so that you don't feel so rushed when December arrives. I like to set aside a Saturday with no other plans, and let the kids get creative.


Here are a few idea's I've been looking at to help get the kids into the spirit, and to help cut back on our Christmas gift costs.

Reindeer Pots

What You'll Need:
Scissors
Craft Glue, Hot Glue, or Glue Dots (school glue won't cut it on this one)
Terracotta clay pots- any size you want, but a 4-5" would work nice
Plastic google eyes
Red pom-poms- glittery or non
Three shades of brown craft foam, cardstock paper, or construction paper- your choice.
Tulle or netting to wrap candy in unless the candy is wrapped already
Pretty ribbon if you use the tulle or netting
Holiday Candy

You are going to need to make 2 antlers (dark brown), 2 large ears (medium brown), and 2 slightly smaller ears (light brown) to be the 'inside' of the ear. You'll also need 2 eyes, and 1 red nose.

If you have a larger pot, the easiest way to make the ears is using a child's hand to trace the shape. With the smaller pots, simply draw an ear shape on the medium you choose from the darkest brown color.

Glue the middle ear to the bigger ear, then glue that to the middle bottom of the antlers. Glue the antlers to the inside rim of the pot in the back.

Glue the eyes to the middle of the front of the pot, and the red pom pom nose under that, near the bottom of the pot.

Fill with wrapped candies, or make a tulle or net bag to wrap candies such as M & M's into. Voila- a cute reindeer candy dish to give away. This is great for teachers.


Beaded Ornaments

What you'll need:
Pony beads in assorted colors
Tinsel pipe cleaners
Jingle Bells

This is basically just bead stringing, and twisting the wire to create shapes.

Similar to the Holiday Napkin Rings, you can make a snowman. Bead about 18-20 beads in the middle, then twist to create the bigger snowball. String 12-14 beads onto the remaining portion, leaving enough space to twist the strands together on top.

Cut 3 pipe cleaners in half. Laying flat, twist two of them together in the middle to create a cross shape. Use the remaining two to create an X shape on top of the cross. String 3 beads towards the center of each strand to create a sparkling snow flake.

Use a gold pipe cleaner to form a bell- fold the pipe cleaner in half, and pinch a small bit of the bed to twist. Fluff it out to a circle to create a hanger. Now, shape the two end strands into a small bell shape, bending the ends towards each other to form the bottom. String 1 small jingle bell to the bottom center as you twist the ends together.

These ornaments make a great addition to a tag on top of a gift, and take hardly any time at all.

Christmas Puzzle Frame

What You'll Need:
Assorted puzzle pieces, any size
Red paint
Green paint
Paint brush
Glue
An old picture frame- this works better if the frame is flat, and not decorative with edges and bumps, and designs
Thin holiday ribbon
Glitter

Have the kids paint the puzzle pieces green or red, leaving an assortment of both. While still wet, the kids can sprinkle glitter onto the pieces. Once they are dry, the child can start gluing them to the frame, covering the whole outer side of it. Let this dry flat over night.

Once it's dry, tie a bow to place in the top corner, then run ribbon trails across the top, and down the side, gluing them into place here and there to create a bump going down it.

You can add a pretty picture from a past holiday if you would like, or the kids school photo, or leave it empty. This is a great craft for all those puzzles that are missing a piece or two.

The frame is my own directions, based on doing this when I was younger. Here are some alternate plans I found online, which differ, but could be a lot more frugal!


Christmas Puzzle Frame Alternate Directions