Showing posts with label christmas ornaments. Show all posts

Wednesday, December 16, 2009

25 Ornaments - Day 16

Good evening, everyone!

For today, I'm going to do another feature. Monogrammed ornaments by Lindsay at Crafty Chic Mommy, and they are really classy looking.


 {photo credit: Lindsay at Crafty Chic Mommy}

These can easily be made with some on-hand supplies- old ornament bulbs, glitter, glue, and a paintbrush!

Tuesday, December 15, 2009

25 Ornaments - Day 15

giveaways

I'm late, I'm late! Yesterday was a day when a hot bath and bed felt better than anything, so I did just that. After spending like 6 hours hunched over wrapping paper and Christmas gifts, that is. I did not remember until mid-bath last night that I had not gotten an ornament posted yesterday.

For today's ornament, or rather, yesterday's ornament, I made it nice and simple.

Felt Square Ornament

You'll Need:
Pre-cut Felt shapes (I found these 4 to a pack at Michaels for $1)
Matching solid felt shape
Ribbon to loop
Hot Glue & Gun
Glitter

  1. Place the two sections of felt together, and sandwich the loop of ribbon between them. For mine, I choose to do this at a corner, rather than in the middle.
  2. Glue the pieces together.
  3. Add glue to the front, and sprinkle with glitter. I used a cosemetic grade fine Green glitter I had on hand, but in the photos it looks blue.
Ta Da! A 3 step, easy peasy ornament. You can make 4 of these for around $1.50 after the cost of the pre-cut shapes and the regular felt. Michaels also had blue circles with a snowflake cut out, white doily shapes, and red squares with reindeer shapes. 


Sunday, December 13, 2009

25 Ornaments - Day 14

I realize this post is late in coming. I honestly thought I had written one up, and had it set to automatically post. Guess not, huh?

In stead of sorting through gads of photos to find one of my own, I am (once more) featuring an ornament I found on another blog. I remember making these (or something similar anyway) as a kid, and loved how colorful they were.

Take a peek over at Life As I See It to check out Jessica's awesome Tin Foil Stained Glass ornaments.


Saturday, December 12, 2009

25 Ornaments - Day 13

I recently discovered just how much fun Mod Podge is, much to my husbands, erm, "delight". With my delight, I've been searching up new projects, and went over to Mod Podge Rocks, which is an awesome blog. She has some pretty fabric & paper mache Christmas ornaments she mod podged with gold glitter Mod Podge.

 
{photo credit: Amy at Mod Podge Rocks!}
Fabric Ornaments

You'll Need:
Paper Mache ball ornaments
Fabric Scraps
Scissors
Mod Podge
Embellishments- ribbons, buttons, gems, etc.
Flat Paint Brush (I use foam brushes- 6 for $.99 at Hobby Lobby)

To see how to make these wonderful fabric ornaments, check out Amy's post on Mod Podge Rocks!

Friday, December 11, 2009

25 Ornaments - Day 12

For today's feature (I know, I've been doing a lot of features, but I have not created anything new- I've been trying to play catch up with getting stuff done before Christmas!), I'm featuring Victoria, a friend I know on Gather, and not just 1 ornament, but a whole series of kid friendly, handmade ornaments & kids crafts.

She has been making a craft or ornament each day after school with her kids, most of the ideas coming from old craft books, and they are just adorable. Some of the projects listed are regular crafts- things to hang on the wall or window, while others are ornaments.


Day 1: Deer Ornaments


{Photo credits are Victoria @ Gather.com}


Day 2: Tear It Up Santa


{Photo credits are Victoria @ Gather.com}


Day 3: Cinnamon Applesauce Ornaments


{Photo credits are Victoria @ Gather.com}


Day 4: Q-Tip Snowflakes


{Photo credits are Victoria @ Gather.com}


Day 5:  Woven Santa Beard


{Photo credits are Victoria @ Gather.com}


Day 6: Snowman Buddies


{Photo credits are Victoria @ Gather.com}


Day 7: Feathered Friends, Bird Ornament


{Photo credits are Victoria @ Gather.com}

For instructions on how to make each of these adorable, kid friendly crafts & ornaments, click the titles for them. They lead to Victoria's page!

Thursday, December 10, 2009

25 Ornaments - Day 11

Today's ornament is another feature, and just oh so cute! I may have to try this one tonight, and see how it turns out! I love it!

Bridget from Everyday Chaos did a guest post over at Write it Down has created a paper ball much like the well-posted book page wreath. They turned out just adorable!

Paper Scrap Ornament

You'll need:
Hot glue gun

Yucky old plastic ornament with bite marks on it.

Paint brush with a thicker handle.

2 sheets of thin scrapbook paper or about 7 book pages cut into 1” squares. You could also use wrapping paper… whatever you have that’s thin.

Glitter and paint in the same color

Piece of cardboard, an old shirt box works great.

Strip of paper 3/4” wide x 8 1/2” long with your favorite phrase or name printed in the center.


0ornament12

To see how to make this ornament, check out the tutorial on Write It Down!

Wednesday, December 9, 2009

25 Ornaments - Day 10 & A Contest!!

Welcome to the blog, from snow-bogged Michigan! I'm hoping the power stays on tonight, and that there is school tomorrow. It's been a long day with all 3 kids home.

For today's ornaments, I'm featuring the good old Salt Dough Ornaments. Who hasn't made these, or a variation? Last weekend, my friend Sarah from Sarah's Deals made these with her family, and they turned out just so cute! S

Salt Dough Ornaments

You'll Need:

For the dough:
4 Cups Flour
1 Cup Salt
1 1/2 Cups Water

For decorating:
Glitter glue
Paint
Ribbon


{Photo Credit: Sarah @ Sarah's Deals}

Now, in the title, I mentioned something about a giveaway, right? Ok, here you have it.

Sarah has asked if I would help her with an ornament give away! In the photo above are 5 sets of ornaments. Sarah is giving away 4 pairs on her blog, and I am giving away the 5th pair here on My Frugal Family! How cool is that?

The set I choose is the Gingerbread Men (aren't they cute?). If you are interested in winning one of the other 4 sets, make sure to check out how to enter on her blog!

To enter to win the Gingerbread Men here on My Frugal Family, you must leave a comment, and an email address on how to get ahold of you is also needed!!

Bonus entries will to to people who post about the contest somewhere- Twitter, Facebook, Gather, your Blog, a Yahoo Group- anywhere you want! Post a link to this page, and tell other people about the contest!

The winner will be randomly drawn from the people who enter the contest.

So, to recap, a successful entry must include:
  1. A Comment Here
  2. An email address- this is VERY important! I need to be able to contact the winner, or another person will be picked!
And lastly, here is a photo of the cute little Gingerbread Men Sarah made! Oh, and... the contest will end on 12/16/09 at 6pm. The winner will be picked randomly!!


Tuesday, December 8, 2009

25 Ornaments - Day 9

Last night, I pulled some felt, glitter glue, hot glue, and pipe cleaners out into the living room. That way, I could sit with the kids (who quickly joined in making ornaments) and watch my favorite Christmas movie ever- A Christmas Story. Sometime in early Spring last year, we found a collectible tin that came with the leg lamp Christmas lights, and the blu-ray version of the movie. Until last night, we had not yet watched it.

While I sat watching the movie, I made up 6 darling little ice skate ornaments. I got up and ran into the "Craft Cave" (equal parts Man Cave and Craft Room, equalling Craft Cave) to get things I forgot at least 3 times. Probably 4.

Felt Ice Skates

You'll Need:
Felt in white & black (I used glitter felt for both colors)
Hot Glue
Shiny pipe cleaners (silver admittedly would work best, but I lacked plain silver, so I went with gold, red, and a red/silver combo)
Ribbon
Tiny Pom Poms
Glitter Glue

  1. Fold a thin section of felt in half, and cut out the shape of an ice skate boot, using the folded half as the long, tall backside of the boot. 
  2. Clip a section of ribbon, and set it aside for the loop.
  3. Each figure skate uses up 1 whole pipe cleaner. The men's skates use less than 1. Section about an inch and a half, and double it over. Clip it off, then twist the doubled over pipe cleaner together. Curl one end of it upward for the toe pick.
  4. Clip two small sections of pipe cleaner, less than half an inch each is needed. Figure out the spacing on the boot & skate, and line the two sections up with the blade and boot to see where you need them at. Twist one end around the skate, leaving a straight spike going up.
  5. With the skate "butterfly" open, smooth hot glue on one side. Working quickly, arrange the ribbon, gluing it to the top of the boot. Next, place the pipe cleaner blade spikes into the boot, then fold the boot in half and smooth it down.
  6. For a men's boot, use glitter glue to mimic laces up the boot, then set it aside to dry. The men's boot is done.
  7. For a women's boot, use the left over pipe cleaner to form a bow. Glue it to the top of the boot, then use two mini pom poms, and glue the poms to the ends of the ribbon. The women's boot is also now down!
I made 3 women's boots first, using each of the different tinsel pipe cleaners I had on hand, before deciding to make them men's boots. I kept the blades matching, then used a matching glitter glue for the laces going up the boot.  For the red/silver combo, I used silver for the laces.


I've seen these online a lot, and thought they were cute, but have not seen a matching set yet. I've also seen them with paper clips for blades, but all I had on hand were shaped paper clips or small colorful paper clips. I think they look good with the tinsel!


Remember- if you do one of my crafts, I'd love to see the photos of your work!

Monday, December 7, 2009

25 Ornaments - Day 8

Christmas is getting closer and closer! Here in Michigan, we've finally gotten our first real snow fall. If I had my way, it would arrive on December 24th, snow all night, snow on and off on December 25th, and be gone on December 26th. That's just how I like it.

For Day 8, I've decided to feature another wonderful ornament from another wonderful blog, Blue Cricket Designs. These look so fun, I may just break my own "No real painting" rule to make some! (I can't paint anything other than solid colors, I have no mad skillz, it isn't a dormant skill waiting to be discovered, I just can't do it!).

Paper Mache Bulb Ornaments

You'll Need:
Old Christmas Bulb Ornaments, any color, dinged up or scuffed up is fine!
News Paper cut into strips
Mod Podge, or your typical, gross, pasty paper mache mix
Paint
Patience

To see the instructions, head on over to Blue Cricket Design! In the mean time, aren't these just so cute?


Sunday, December 6, 2009

Craft Time!!

For a few weeks now, I've been planing a craft day with the kids and a friend & her daughter (or daughters, if her older daughter comes, too!). I made easy ornaments ahead of time to test out what works best for the kids, and what takes too much work or adult help to make.

I've got supplies leaking out of every drawer and shelf in my craft area in preparation! I'm excited, they should be here soon, and we can craft, craft, craft!

I'll post pictures later to show you how it went. ;) In the mean time, did you check out my Day 7 ornaments? They were my first time using Mod Podge, and I must say, it was love at first stroke! ;) Seriously, if you've never played with Mod Podge, I recommend it. It makes for some great projects for the painting challenged (erm, me). All I use is wooden shapes, scrap book paper, stamps & stamp pads, and mod podge to make some really cool ornaments!

I made two last night for my neighbor Gary, his girlfriend Traci, and their combined 5 kids (her boys on one ornament, his girls on the other). This morning, I took 2 3-D wood shapes with layers, and made them into ornaments. One is for my Dad, the other for my Step-Mom. They were much harder, since I could not just trace the shape, and slap it on.


However, I just love how they look! I stamped their names on the backside of the ornaments, as well. And, more importantly? I get to use my rotary tool to drill holes in the wooden shapes. ;) Yes, that is important, because I love using my drill.

25 Ornaments - Day 7

My first attempt at Mod Podge! I love, love, love Mod Podge. I have a feeling I'll be using it a lot in the future.

Friday, I drove Nick into work, which put me in "the big city" to do some craft shopping. I had my choice of 2 Michaels, 2 Hobby Lobby's, and 2 Jo-Ann's. Here in my town, my choices are 1 Wal-mart, or 1 Dollar Tree. So, you can see how this was fun for me.

One of the things on my list was Mod Podge, and I had a 40% off coupon to use for it, which makes it much more affordable. I picked up Gold Shimmer Mod Podge, since it can be used as the glue, and as the finish. I thought the Gold Shimmer would be nice for Christmas.

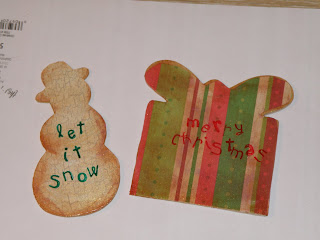
Aged Snowman Ornament


You'll Need:
Wooden Snowman shape (Hobby Lobby- 4/$1)
Scrap Book Paper
Gold Shimmer Mod Podge
Brown Ink Pad
Foam Brushes (These come 6 to a pack for $1 at Hobby Lobby, so they're super cheap!)
Green Ink Pad
Letter Stamps
Drill
Ribbon


Of course, being so excited by Mod Podge, I did not take photos during. Oops!


  1. Clean off the wooden shape of all price stickers. Trace the shape on the backside of a piece of scrapbook paper. Cut inside the lines, so that it fits on top of the ornament. It does not have to fit perfectly.
  2. Using your alphabet stamps, stamp the top side of the scrapbook paper with what you want it to say. For my snowman, I choose "Let it Snow". Now, as an aside, when I did this, I did NOT stamp the paper first. I waited until I was done with the ornament, and stamped the top of the ornament. Because of the glossy finish, the ink kept wiping off. So, instead, stamp the paper, and let the paper dry before moving on.
  3. Using an ink pad and a 2nd foam brush, 'stamp' the edges of the paper with a bit of brown ink, to 'age' the paper. Again, let it dry before moving on.
  4. Spread mod podge on the top of the ornament, and place the paper on top of the mod podge. Smooth it out from the middle to the edges to prevent bubbles.
  5. Let it dry for a moment, then spread more Mod Podge across the top to help seal the paper. Let it dry 5-10 minutes until it's dry on the top.
  6. If you want, you can spread more ink on the edges.
  7. Spread another layer of Mod Podge across the top. Let dry.
  8. Once it's dry, brush the backside with the shimmer Mod Podge. Give it another layer in a few minutes, so the back matches the front.
  9. Using a drill, punch a small hole in the top, and string a ribbon through it to hang the ornament with.


 It's a more involved process than some of my ornaments I've posted, but I just love how it turned out! With the snowman, I used a cream colored paper that looks like peeling paint, so it gives it a nice patina of old age, along with the edge distressing I did.

Total Costs:

Scrapbook Paper- $.15, used about an eigth of it, so.. um.. pennies
Wooden Shape- $.25 each, minus 40% off, so $.15 each
Ribbon- Pennies
Mod Podge- Pennies

This ornament can be made for under $.30. Even if it's not on sale, it's under $.50 total.


DIY Day @ ASPTL

Saturday, December 5, 2009

25 Days of Christmas Ornaments

Day 1 - Triangle Snowman
Day 2 - Paper Clip Ornaments
Day 3 - Felt Postcard Ornament
Day 4 - Foam Star
Day 5 - Jingle Bell Santa
Day 6 - FEATURE - Painted Bulbs
Day 7 - Mod Podge Old Time Snowman
Day 8 - FEATURE - Paper Mache Ornaments
Day 9 - His & Hers Ice Skates
Day 10
Day 11
Day 12
Day 13
Day 14
Day 15
Day 16
Day 17
Day 18
Day 19
Day 20
Day 21
Day 22
Day 23
Day 24
Day 25


Hello fellow crafters and bloggers! Christmas is sneaking up fast, and with it, the traditional advent count down to Christmas.

Now that Thanksgiving is out of the way (I love it, I really do, it just does not inspire me like Christmas does!), I can really get into Christmas. One of the things I plan to do is a countdown of my own, here in the Blogosphere. Is that word too over used? Oh well!

Starting on Monday, November 30th, I'll be posting an ornament craft a day. I am starting a day early, so I can get 25 days in, and relax on Christmas day with my family. Some will be my own crafts, some will be ornaments I've found on other blogs. All will be tutorials! They'll range from easy to make for kids, to hard to make for adults.

If you would like to recommend an ornament you've done, or have seen, please feel free to add a link to the comments section of any of the 25 Days of Christmas Ornament posts I make! I'd love to see how creative all my followers are!

If your ornament tutorial has been featured, please snag the link below & code to link back to the site! Feel free to change the code to point to the exact post including your ornament!


25 Ornaments - Day 6

For Day 6 of 25 Days of Christmas Ornaments, I'm featuring a great idea that T over at That's So Cuegly! posted. It's one I've heard of before, but never tried myself. T posts a great tutorial, though!

Homemade Bulb Ornaments

You'll Need:
Clear Bulb Ornaments
Acrylic Paint in 2+ colors
Ribbon to Embellish
Empty Egg Carton

Here's a photo of her finished ornament- check out her blog for the complete instructions!


{photo credits: T at That's So Cuegly!}


Friday, December 4, 2009

25 Ornaments - Day 5

Happy Friday everyone!

For Day 4, I admit, I slacked off a little bit. I did what I could with the items I had on hand that would make for a nice quick ornament. Still, it's a good one for kids, I think, since it's easy enough for even a toddler to handle!

For Day 5 of 25 Days of Christmas Ornaments, I took inspiration I found in a store. I went into KMart the other day, and saw one of those jingle bell necklaces, and loved it! It did require me running out to my favorite store in the world, but I was able to make a recreation of the necklace in ornament form, and just love it.

Santa Bell Ornament

You'll Need:
1 medium to large Jingle Bell- Dollar Tree has them in a garland, 12 bells for a buck!
Red Felt Square
White Felt Square
Small white pom pom
Hot Glue Gun & Glue
Thin ribbon

  1. Cut a rectangle of red felt long enough to wrap all the way around the bell. Cut a thin, equally long white strip.
  2. Place the length of ribbon on the red felt, so the ends are both along the bottom edge, but not near the seam. Hot glue the white strip to the red rectangle, along one edge, and over top of the ribbon.
  3. Squirt a bit of glue onto a small portion of the red-only side of the felt, on the edge. Place the bell on the glue where you want the hat to 'sit'. From there, glue along the edge while rolling the bell into the glue to affix the hat to the bell.
  4. Skip gluing the back open seam to the hat, it isn't needed. Gather the top of the hat together, pinching it small, and use glue between the folds to hold it together. Keep it pinched for a few moments while it dries.
  5. The hat should stand straight up now about 1 1/2" above the bell. Fold the hat downward to one side, where the open seam is. Tuck the material in as you fold it Use a bit of glue to glue the tip of the hat down to the 'rim' of the hat.
  6. Glue the white pom pom to the end or side of the tip of the hat.

     Now, you have a nice little Jingle Bell Santa Ornament! They are cute, and I plan to make more of these up for the big container of handmade ornaments I'll be taking with me to each of the parties we go to this year. I'm planning to let everyone pick an ornament out as a gift!