I stopped by Michael's today, and got a scratch off coupon at the counter. Mine was for 20% off my entire purchase. I didn't know about the coupons until my husband pointed them out- the people in front of us asked for one.
Make sure to ask for one if you shop this week! I was able to pick up a wooden Beyonce' statue for $.80.

Showing posts with label crafts. Show all posts
Showing posts with label crafts. Show all posts
Sunday, July 17, 2011
Tuesday, March 9, 2010
Do You Ever Notice...?
When you want need desperately have to have a great the best a fantastic idea, none are to be had? But when you otherwise just wander around with a million projects waiting for your attention, ideas sprout like weeds?
I'm in a funk. I have several projects I need to work on- things I'm making FOR other people, not myself. Things people have requested, or shown enough interest in that I feel they MUST have one too. But, sadly, new ideas are lacking.
I've had the mother of all headaches today, settled on my entire head. I suffer from headaches all the time. I've had my head, back, and neck all examined- lots, and there is never a cause. Usually, they are at the base of my skull- thick, pounding headaches. Today, there's that, then there's the same type of one behind my eyes, and in my forehead.
It has made my creative juices stop flowing all together. Iwant need desperately have to have a great the best a fantastic idea. See, I was asked to do a post on one of my FAVORITE blogs, and do you think I have ANY idea what to post?
Nope. Nothing. Nada. Zip. Zilch. Later, if I can wrangle the mother of all headaches under control, I may go to GW and DT to wander the aisles and let the inspiration soak up in me. If not, I'm going to be shutting myself in bed when Nick gets home, and hiding from the light, and noise. That's not to say it's a migraine- it isn't. But, still, light and noise can aggravate any headache. Kids, also. They can REALLY aggravate a headache.
-sigh- Here's hoping that the Excederin FINALLY kicks in (it usually does, but it's taking a lot longer today), and that my Crafty Muse comes flittering on by witha great the best a fantastic idea, which should also be totally unique and original, because those are the best ideas.
Also, because I suck, and I'm a loser, I haven't even done my craft for this week. I did -A- craft, but haven't finished or posted it, which would make this the first week of the year that I have not posted a craft for my goal of "A Craft A Week in 2010". I'll get around to it, promise.
I'm in a funk. I have several projects I need to work on- things I'm making FOR other people, not myself. Things people have requested, or shown enough interest in that I feel they MUST have one too. But, sadly, new ideas are lacking.
I've had the mother of all headaches today, settled on my entire head. I suffer from headaches all the time. I've had my head, back, and neck all examined- lots, and there is never a cause. Usually, they are at the base of my skull- thick, pounding headaches. Today, there's that, then there's the same type of one behind my eyes, and in my forehead.
It has made my creative juices stop flowing all together. I
Nope. Nothing. Nada. Zip. Zilch. Later, if I can wrangle the mother of all headaches under control, I may go to GW and DT to wander the aisles and let the inspiration soak up in me. If not, I'm going to be shutting myself in bed when Nick gets home, and hiding from the light, and noise. That's not to say it's a migraine- it isn't. But, still, light and noise can aggravate any headache. Kids, also. They can REALLY aggravate a headache.
-sigh- Here's hoping that the Excederin FINALLY kicks in (it usually does, but it's taking a lot longer today), and that my Crafty Muse comes flittering on by with
Also, because I suck, and I'm a loser, I haven't even done my craft for this week. I did -A- craft, but haven't finished or posted it, which would make this the first week of the year that I have not posted a craft for my goal of "A Craft A Week in 2010". I'll get around to it, promise.
Tuesday, February 23, 2010
Talented Tuesday & A Twilight Craft Box
Happy Tuesday everyone! Hope everyone's week has been going great so far!
Welcome back to Talented Tuesday, where you, my awesome readers, strut your stuff, and show us all the cool stuff you've made recently. From food, to furniture, to clothing, and so much more, you guys continue to amaze me with your fun projects.
Below is one of my weekend crafts- a wooden box made over in black, white, and red (with pink, since I had a very hard time finding just dark red printed scrapbook paper, after stopping at 3 stores). My oldest daughter is going to be 14 soon, which is enough of a shock to my system. Right now, she's very into Twilight, so I've been making Twilight inspired crafts.
I found a cubed wooden box at the local grocery store, of all places, on clearance for $2-something. Perfect! I snagged it without an immediate project in mind, but it only took a few days to come up with an idea. When I had my Girls Day Out with one of my good friends last Friday, I picked up some fun supplies- scrapbook paper (like, a ton!), Glitter mod podge (ooOOOOoOOoo...), ribbon, wooden 'knobs' (a 3 pack), lots of felt, 2 Distress Ink ink pads (black soot, which I am NOT in love with, and Fired Brick, which I do love), and much more.
Below is the project. I was overly zealous, and did not stop to take any before or during photos (that's becoming a bad habit...), so all you have is the finished project. I also didn't stop to paint the box first, but... that's not really something it -needed-, just thought it would be a nice touch.
What I Used:
5 Sheets of Scrapbook Paper (not a whole sheet needed of each, but I wanted a different pattern on each side)
1 Wooden Knob
Paint
Mod Podge
Distress Ink

I wish I had the Glitter Mod Podge on hand last week, when I made a springy heart in twilight colors. They match, but not totally, since I used Gold Shimmer, and used the Vintage Photo Distress Ink, which is brown. But, there you have it. I now have 2 Twilight inspired crafts for Raegan's birthday in April.
Hopefully, I'll come up with more before then!


1) Post a blog about something you've made- a refurnish, recipes, a craft project, a sewing project, room decoration, anything you've done!
2) Add a link to your blog post- not to the blog itself, but to the individual posts! You can post more than one project, just add more links! The links should look something like:
http://theherberfamily.blogspot.com/2010/01/love-banner.html
and NOT like this:
http://theherberfamily.blogspot.com/
3) Add the code below to each post you link to the MckLinky, so that others can post their projects here as well! The list will accept new links through Saturday, so if you make something new, come back and post it! Don't forget to look at the links on the list, and let people know where you found their post at!


Welcome back to Talented Tuesday, where you, my awesome readers, strut your stuff, and show us all the cool stuff you've made recently. From food, to furniture, to clothing, and so much more, you guys continue to amaze me with your fun projects.
Below is one of my weekend crafts- a wooden box made over in black, white, and red (with pink, since I had a very hard time finding just dark red printed scrapbook paper, after stopping at 3 stores). My oldest daughter is going to be 14 soon, which is enough of a shock to my system. Right now, she's very into Twilight, so I've been making Twilight inspired crafts.
I found a cubed wooden box at the local grocery store, of all places, on clearance for $2-something. Perfect! I snagged it without an immediate project in mind, but it only took a few days to come up with an idea. When I had my Girls Day Out with one of my good friends last Friday, I picked up some fun supplies- scrapbook paper (like, a ton!), Glitter mod podge (ooOOOOoOOoo...), ribbon, wooden 'knobs' (a 3 pack), lots of felt, 2 Distress Ink ink pads (black soot, which I am NOT in love with, and Fired Brick, which I do love), and much more.
Below is the project. I was overly zealous, and did not stop to take any before or during photos (that's becoming a bad habit...), so all you have is the finished project. I also didn't stop to paint the box first, but... that's not really something it -needed-, just thought it would be a nice touch.
What I Used:
5 Sheets of Scrapbook Paper (not a whole sheet needed of each, but I wanted a different pattern on each side)
1 Wooden Knob
Paint
Mod Podge
Distress Ink

- Measure and cut your paper. I used 5 different patterns. Because the lid has edges, I tore the paper in half for a more distressed look. In some instances, I had to tear more off to allow for where the wood meets.
- I used Black Soot Distress Ink on the red paper. I don't feel the black soot was up to the same quality as the Red Brick I also bought, or the Vintage Photo I have had for a few weeks. It got ALL OVER my hands, and it did not dry anywhere near as quickly- when I mod podged it to the wood, it smeared on the first one. You can kind of see it in the photo above, on the red swirly side of the box.
- I used Red Brick Distress Ink on the black & white sides, and it worked wonderfully. For the most part, I distressed all the sides of the paper (all paper used, actually), and a few smudges here and there in the middle of the papers.
- For the top section, I tore each of the four edges.
- I used Matte Mod Podge to attach the paper to the box. Once it was dry, some of the paper had an over hang on the corners, so I sanded down each corner and edge on the box, and some of the sections where the lid meets the box, so the paper wouldn't get in the way.
- For the top coat, I went with Glitter Mod Podge, so it sparkles, like the Vampire Wannabe's in Twilight. (can you tell, it's not my favorite book ever?) Glitter Mod Podge sparkles nicely, and I can't wait to use it in some Easter crafts.
- While this dried, I painted one of the wooden knobs. I first thought the red I had on hand would be too bright, so I added a few drops of black, but the color came out all together too rustic and brownish, so I wiped as much of it off as I could, then repainted it red. The dark color showed through in some spots, for a distressed look, so my mistake? Totally on purpose to distress it. Or so I'll tell anyone who asks. I also added some spots of black ink around it with a foam brush, for added depth to the color.
- When the knob dried, I used E6000 to glue it to the center of the lid, then I mod podged over it with Glitter Mod Podge.
I wish I had the Glitter Mod Podge on hand last week, when I made a springy heart in twilight colors. They match, but not totally, since I used Gold Shimmer, and used the Vintage Photo Distress Ink, which is brown. But, there you have it. I now have 2 Twilight inspired crafts for Raegan's birthday in April.
Hopefully, I'll come up with more before then!


This post is linked up at the link parties listed here.
The Rules
1) Post a blog about something you've made- a refurnish, recipes, a craft project, a sewing project, room decoration, anything you've done!
2) Add a link to your blog post- not to the blog itself, but to the individual posts! You can post more than one project, just add more links! The links should look something like:
http://theherberfamily.blogspot.com/2010/01/love-banner.html
and NOT like this:
http://theherberfamily.blogspot.com/
3) Add the code below to each post you link to the MckLinky, so that others can post their projects here as well! The list will accept new links through Saturday, so if you make something new, come back and post it! Don't forget to look at the links on the list, and let people know where you found their post at!
This MckLinky will remain open and accepting links through Wed night, so feel free to come back and add more links if you post new things!!

Wednesday, February 10, 2010
A Cricut?
Nick and I were talking tonight, and he asked what sorts of crafting supplies I have my eyes on. Honestly, the only thing I kind of have in mind right now is a Cricut. Though, to be fair, I am not a scrapbooker, and while I'm sure I'd get a lot of use out of it, it seems to be a money sucker.
$70 for a cartridge, money for supplies to put in it, not to mention the high price of getting the machine in the first place. I know there is also a machine called a Cuttlebug, and a Sizzix. I just don't know what the difference in those machines are to the Cricut, and if there is a price difference.
So, advise me, all you crafty people. Being that I don't scrap book, and the Cricut would only be used occasionally for crafts, is it worth the money?
Here are my thoughts-
As of right now, I don't miss it, because I don't have one, have never used one, don't use die cuts often, and don't scrapbook at all.
If I get one, though, I have a feeling I'll find all sorts of uses for die cuts in mod podging, and more. I have a feeling that I'll wind up really loving it, and wanting new cartridges quite often.
Obviously, it isn't something I need- this is purely want, as all craft supplies are. Being frugal, the price scares me.
Also- does anyone know if I could use a 40 or 50% off coupon on the machine, if I can find a coupon for Hobby Lobby or Michaels, at a time when it's not on sale? I've never tried to use one of the coupons on anything that cost more than $20 before coupon, and don't know if there are restrictions.
Obviously, between sale prices and coupons, the cartridges could be bought cheaper. Then, of course, there is eBay which can be helpful.
Advise me! Give me your own pro's and con's of the Cricut, the Sizzix, and the Cuttlebug. I will have some extra money soon, I just don't know if that's where I want it to go.
Oh! One of the big draws right now are vinyl letters. I would love to be able to do vinyl. Back in "the day", my step-mom owned her own sign shop. She painted signs, murals, vehicles, and more. She had this HUGE machine, which had pre-programmed fonts (only 12 of them). She could run vinyl through it, and cut letters out, or she could free hand shapes. It came in handy for signs. Now, keep in mind, this must have been the early 90's, but I recall vinyl being pricey. However, on an upside, I know of places locally where I can get it, too, so maybe it'll be cheaper than ordering it.
I've read on a few blogs that the vinyl has to be ordered, and it's expensive, and has to be bought in a huge roll.
Ok, for the third (and final time)... advise me.
Monday, February 1, 2010
Talented Tuesday
Welcome to my third week of hosting Talented Tuesday at My Frugal Family! I have to admit, I am loving all the wonderful creations I'm getting to see this way! There are so many talented people out there, and this is a great way to be able to find even more talented people.
If you ever see someone post something you like, please feel free to send them this way, because the more people, the merrier, and the more inspiration we all can bask in.
Last week, we have 120 links! It took a while, but I went through every last one, and loved them- seriously, you guys put me to shame with how fantastic your creations are!
While I loved just about every last one of them, here are a few of my favorites. If you want to see all of them, check out last week's links. ;)

Jess at Mad in Crafts made a calendar hanger from a picture frame, which is totally customizable month by month! Turn drab give away calendars into whatever you want! AND, you can reuse it year after year!
 MiaMoo Designs made these cute felt Conversation Hearts- super easy, and super adorable... I could totally see a garland of these- hint hint, all you crafty ladies!

Dwellings by DeVore took a vase and turned it into this Glass Lamp. Now, isn't that super crafty?
 I am in LOVE with this Rose Petal Purse that The House of Beauty and Culture made!


If you were featured this week, feel free to grab the "Featured At" button below! The Talented Tuesday Button is found just above the MckLinky!

1) Post a blog about something you've made- a refurnish, recipes, a craft project, a sewing project, room decoration, anything you've done!
2) Add a link to your blog post- not to the blog itself, but to the individual posts! You can post more than one project, just add more links! The links should look something like:
http://theherberfamily.blogspot.com/2010/01/love-banner.html
and NOT like this:
http://theherberfamily.blogspot.com/
3) Add the code below to each post you link to the MckLinky, so that others can post their projects here as well! The list will accept new links through Saturday, so if you make something new, come back and post it! Don't forget to look at the links on the list, and let people know where you found their post at!
If you ever see someone post something you like, please feel free to send them this way, because the more people, the merrier, and the more inspiration we all can bask in.
Last week, we have 120 links! It took a while, but I went through every last one, and loved them- seriously, you guys put me to shame with how fantastic your creations are!
While I loved just about every last one of them, here are a few of my favorites. If you want to see all of them, check out last week's links. ;)

Jess at Mad in Crafts made a calendar hanger from a picture frame, which is totally customizable month by month! Turn drab give away calendars into whatever you want! AND, you can reuse it year after year!


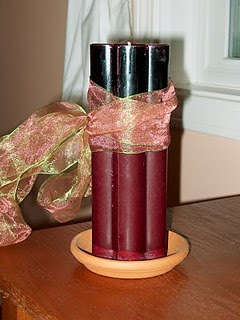
The Opulent Poppy took green frugality to the max by melting down candle stubs to make this great new Flower Candle!

Dwellings by DeVore took a vase and turned it into this Glass Lamp. Now, isn't that super crafty?
 I am in LOVE with this Rose Petal Purse that The House of Beauty and Culture made!
Before:

After:

The Little Green Bean decided to paint a dresser. Next thing she knew, she had completely redone her bedroom- with some paint, and some vinyl letters and numbers!

Angie at Treasures for Tots found a cute, pricey Felt Headband at Target. She decided she could do just as good- only, I think she did it a whole lot cuter!
If you were featured this week, feel free to grab the "Featured At" button below! The Talented Tuesday Button is found just above the MckLinky!

Have you been featured on my blog? Copy and past the following code to your page!
The Rules
1) Post a blog about something you've made- a refurnish, recipes, a craft project, a sewing project, room decoration, anything you've done!
2) Add a link to your blog post- not to the blog itself, but to the individual posts! You can post more than one project, just add more links! The links should look something like:
http://theherberfamily.blogspot.com/2010/01/love-banner.html
and NOT like this:
http://theherberfamily.blogspot.com/
3) Add the code below to each post you link to the MckLinky, so that others can post their projects here as well! The list will accept new links through Saturday, so if you make something new, come back and post it! Don't forget to look at the links on the list, and let people know where you found their post at!
This MckLinky will remain open and accepting links through Wed night, so feel free to come back and add more links if you post new things!!
Friday, January 29, 2010
Valentine's Day Placemats
This is a project I did when I was still spending most of the day laid up in bed. After Christmas, when Dollar Tree marked their Christmas items down to $.25, I picked up 4 bright red placemats. I picked up 4 because I was on a budget, and wanted to spend in even dollar amounts. I did not, in all my infinite wisdom, pick up on the subtle fact that we have 5 people in the family.
Because I was laid up at the time, I did not get back to DT for almost 2 weeks, and when I went, they still had Christmas stuff out, but were out of the red placemats. I did pick up 5 of the same placemat in white, though, for Easter.
Anyway, because I was in bed, there are no tutorial pictures, but it's easy enough.


You'll Need:
Felt
Scissors
Thread
Buttons, pom poms, or other embellishments
Placemats
Needle


Total cost would depend on your On-Hand items. I had everything on hand once I decided to make these. I didn't have anyhting in mind for the placemats specifically when I picked them up, though. Breaking down the costs (cause, let's face it, you buy the supplies at some point, whether they are on hand or not), though, I spent $1 on 4 placemats. Thread- $1.99 for 1 roll, but I used very little. Buttons were bought in a big container for $4.99, probably close to 500 of them. So, a penny per button- $.04 for the buttons.

I had thought about adding some ribbon trim hand sewn on in loops and ruffles in the corners where the hearts were, but opted not to. Being 4 of them, I put the hearts in a different corner for each one. I did 2 pink and 2 white hearts, and used red thread on them.


Because I was laid up at the time, I did not get back to DT for almost 2 weeks, and when I went, they still had Christmas stuff out, but were out of the red placemats. I did pick up 5 of the same placemat in white, though, for Easter.
Anyway, because I was in bed, there are no tutorial pictures, but it's easy enough.


You'll Need:
Felt
Scissors
Thread
Buttons, pom poms, or other embellishments
Placemats
Needle

- Cut out shapes from the felt. Because I was doing Valentine's Day, I went with hearts. For Easter, I think I'll do eggs.
- Stitch a button to the center of the heart, if you are doing what I did. Otherwise, embellish the felt shape as you like.
- Hand stitch the shape to the placemats. I did a primitive looking stitch, but you can do any type of stitch you want, obviously. You could also do this with a machine, if you are so inclined, but it was a fast job even by hand.

Total cost would depend on your On-Hand items. I had everything on hand once I decided to make these. I didn't have anyhting in mind for the placemats specifically when I picked them up, though. Breaking down the costs (cause, let's face it, you buy the supplies at some point, whether they are on hand or not), though, I spent $1 on 4 placemats. Thread- $1.99 for 1 roll, but I used very little. Buttons were bought in a big container for $4.99, probably close to 500 of them. So, a penny per button- $.04 for the buttons.

I had thought about adding some ribbon trim hand sewn on in loops and ruffles in the corners where the hearts were, but opted not to. Being 4 of them, I put the hearts in a different corner for each one. I did 2 pink and 2 white hearts, and used red thread on them.

Now, for something kind of funny... I have a red velvet (ish) stocking hanging above my desk. It's been there since probably late October, early November. I tend to forget it's there. Today, I did some much needed tidying around the desk, and saw a few picks I bought after Christmas at 90% off- all of them are in pinks, lavendars, and reds for Valentine's Day. Well, haven't come up with a use yet, so I decided to put the stocking to work as storage. I think it turned out cute:


Have a FANTASTIC weekend, everyone!!
This post is linked up at the link parties listed here.
Check back on Tuesday to link up with Talented Tuesdays at My Frugal Family!
Tuesday, January 26, 2010
Valentines Day Crafts
I'll admit it freely- before this year, I never really looked at how many cool things can be done for Valentine's Day. There are just so many wicked cool crafts that look oh so sweet! On any given day, I'm finding more and more fun ideas, and more and more takes on already seen ideas.
I am in love with Valentine's Day right now!
I am in love with Valentine's Day right now!
Thursday, January 21, 2010
Today

Check it out
I finally slept last night. I have not been sleeping on a good schedule. Being so lazy around the house, and spending so much time in bed, my sleep schedule was messed up. I'm already an insomniac, so it just really did not help.
The past few nights, I've tried so hard to sleep, without success, which meant spending the day- my free time, and crafting time, sleeping. Well, last night, I finally got some sleep. It wasn't a ton, but it was enough that I can get through the day!
Today I'm going to try a craft I've been wanting to try for days. I'm so excited, I can't wait! I'll let you know how it turns out!
Thursday, December 31, 2009
Crafts in Recap, 2009
I'm relatively new to this whole blogging thing. While overall, I'm not new to crafting, I haven't crafted regularly in years before starting this blog. I was so impressed with all the wonderful blogs I've found, and with the ideas bouncing in my head, that I started back up.
Here are a few of my favorite projects for 2009. Each photo links to the post about the project, most of them with tutorials on how to make them!


Each project I've made has been fun, and I've learned how to do so many new things. I can't wait to see what 2009 brings me!

Here are a few of my favorite projects for 2009. Each photo links to the post about the project, most of them with tutorials on how to make them!


Each project I've made has been fun, and I've learned how to do so many new things. I can't wait to see what 2009 brings me!
Sunday, December 6, 2009
Craft Time!!
For a few weeks now, I've been planing a craft day with the kids and a friend & her daughter (or daughters, if her older daughter comes, too!). I made easy ornaments ahead of time to test out what works best for the kids, and what takes too much work or adult help to make.
I've got supplies leaking out of every drawer and shelf in my craft area in preparation! I'm excited, they should be here soon, and we can craft, craft, craft!
I'll post pictures later to show you how it went. ;) In the mean time, did you check out my Day 7 ornaments? They were my first time using Mod Podge, and I must say, it was love at first stroke! ;) Seriously, if you've never played with Mod Podge, I recommend it. It makes for some great projects for the painting challenged (erm, me). All I use is wooden shapes, scrap book paper, stamps & stamp pads, and mod podge to make some really cool ornaments!
 I made two last night for my neighbor Gary, his girlfriend Traci, and their combined 5 kids (her boys on one ornament, his girls on the other). This morning, I took 2 3-D wood shapes with layers, and made them into ornaments. One is for my Dad, the other for my Step-Mom. They were much harder, since I could not just trace the shape, and slap it on.

However, I just love how they look! I stamped their names on the backside of the ornaments, as well. And, more importantly? I get to use my rotary tool to drill holes in the wooden shapes. ;) Yes, that is important, because I love using my drill.
I've got supplies leaking out of every drawer and shelf in my craft area in preparation! I'm excited, they should be here soon, and we can craft, craft, craft!
I'll post pictures later to show you how it went. ;) In the mean time, did you check out my Day 7 ornaments? They were my first time using Mod Podge, and I must say, it was love at first stroke! ;) Seriously, if you've never played with Mod Podge, I recommend it. It makes for some great projects for the painting challenged (erm, me). All I use is wooden shapes, scrap book paper, stamps & stamp pads, and mod podge to make some really cool ornaments!


However, I just love how they look! I stamped their names on the backside of the ornaments, as well. And, more importantly? I get to use my rotary tool to drill holes in the wooden shapes. ;) Yes, that is important, because I love using my drill.
Friday, December 4, 2009
I Love MOD PODGE!
Today, I went to Hobby Lobby, Michaels, and JoAnn's in search of some craft supplies. I had about $25 to spend, a coupon for 40% off 1 item, and a few things in mind. One of those things was Mod Podge. I have never worked with Mod Podge before. Never!
So while out and about, I picked one up. I wasn't sure which type to get, but since I'm primarily using it for Christmas ornaments right now, I decided to go with gold shimmer Mod Podge.
All I can say, is my hands and the tote top I'm using as a Mod Podge station are all gold. I've done 3 ornaments, and I'm working on a candy cane holder now! I love, love, love Mod Podge!
Friday, November 13, 2009
Accomplished!
Today, I was a busy, busy little bee. I completed several projects, most from start to finish, with one of them being one I had started, then ran out of ribbon, and let sit.
I hope to post at least a few tutorials on Friday! In the mean time, I wanted to let everyone know that you can now find me on Facebook by clicking the Facebook Fan widget on the left side bar. It's right over there!
<--------------------------------
I'll post to it when I update my page with new posts, or update when I'm working on something new, or whatever strikes my fancy!
I'd love to see some new fans! Also- for those who have found my blog because of Facebook, welcome! I hope you enjoy my blog!
Heather
Sunday, November 1, 2009
I Am In Love...
Tonight, yet another sleepless night in the life of an insomniac, I remembered a website I had found over a year ago. I couldn't remember the name, of course, but I remember what I found there. It was a website for crafters that holds monthly challenges.
One of the monthly challenges, my favorite, was to make something totally unique out of $10 of supplies bought only at a dollar store. I was amazed at some of the really cool ideas there were, and how totally cool the items turned out.
One woman bought some fleece scarves, and some squishy teddy bears, and turned them into an awesome, fur lined, totally wearable hoodie. Another woman made a replica of Scarlett O'Hara's green & white picnic gown out of a hula hoop, foam pool noodle, garden stakes, plastic table clothes, and coffee filters.
There were just some amazing entries into the contest, which can all be seen here. While I was locating it, I found they had done another dollar store challenge for $5 or under. Not all of the images are still there, as the post is several years old, but it does have some interesting ideas on crafts that can be made cheap using dollar store items.
Starburst Mirror
A Pocket Advent Calendar- This one is SO easy, and a FUN thing to send to your college kid, or give to a friend!
$.50 Stuffed Chipmunk- As a side note, Walmart sells the Magic Gloves used for this project at 2 pairs for $1.50, so it would make 4 chipmunks for roughly $.37 each.
Mosaic Headboard
Bandanna Quilt- SO simple & easy- if you can sew a straight line, you can make this!
I hope you take a while to peruse both sites, because for the crafty among us can find a lot of awesome ideas to use for making Christmas gifts this year. I plan to tackle the Bandanna Quilt soon. The things people come up with just by walking the aisles of Dollar Tree are simply
amazing. The actual websites are:
http://dollarstorecrafts.com
Friday, October 30, 2009
Kids & Crafts- Making a Craft Kit
Crafts can be an easy and fun way to spend time together as a family, to make inexpensive decorations, and to keep kids busy. With winter coming up, the chance of an unexpected day stuck inside is pretty good. Craft time can fill those snow days up nicely, and allow you to make gifts for the holidays.
It's always a great idea to keep a small box filled with some craft items that can be used on the spur of the moment. I have a small tub that I keep stocked with basic items, and some not so basic items, if the price is right. Here are my recommendations for a kid friendly craft kit.
Foam- shapes, sheets, or items made of foam. You can find many good foam items at Dollar Tree. Craft stores are also a great source for foam items. Michaels & Hobby Lobby regularly put foam kits on sale cheap, so pick one or two up when you find them at a good price. Walmart carries these, as well, and after a major holiday, the holiday kits go on clearance.
Felt- Sheets of felt can be found for around $.25 each, sometimes cheaper.
Pipe Cleaners- an assortment of colors can be used to make all sorts of things, from ornaments & napkin rings, to animals. Dollar Tree carries these as well.
Construction Paper
Scissors
Glue- I recommend a hot glue gun & glue sticks (to be used with adult supervision!), as well as Tacky Glue, and plain old white glue & glue sticks.
Markers, Crayons, & Colored Pencils for drawing- I pick these up when they are super cheap during Back to School sales!
All of these items alone can make plenty of fun craft projects, and you have something on hand for rainy, snowy, yucky days, when the kids are driving you nuts! To store all of these items, I get a small tub, big enough to fit the construction paper, and deep. You can use a pencil box to store the smaller items.
Picking up one or two things here and there can make it a cheap way to fill a box for a day of fun! And always remember- Freecycle, ReUseIt, Craigslist, and 2nd Hand Stores can make for a great place to find some cheap supplies!
Here are some additional items that you can pick up cheap to add into your Craft Kit.
Glitter
Jingle Bells
Hole Punch
Ruler
Stapler
Tape
Beads
Spangles- these are the foil shapes similar to sequins, but usually larger
Sequins
Buttons
Paint
Paint brushes
Feathers
There are a lot of items you can use around the house- egg cartons, foam meat trays (my store swapped to plastic, but either works good, if you wash it really well), cardboard boxes (you can use the boxes from cereal, mac n cheese, or anything else that comes in a box, as well!), the metal lid to frozen juice concentrate containers- there are plenty of things found just in the kitchen that can become a great craft item, instead of another landfill item! Feel free to add your own ideas in the comment section!
Good luck with your own craft kit!
Thanksgiving Kids Crafts
These are more of those craft ideas that can help keep little hands busy while the adults make their Thanksgiving Feast. It would also make for a fun school craft while talking about Thanksgiving.
Harvest Necklace
What You'll Need:
Thread or Fishing line
Needle
Cheerios
Dried Fruit- Raisins, Apricots, Apples, Cranberries, etc
Popped Corn
This is a simple project, just stringing things on a thread. Set each child up with a length of thread or fishing line, knotted on one end, and threaded through a needle on the other side.
Let the kids do an assortment or pattern of the foods provided on the thread. When it's close to full, take it off the needle, and tie together like a necklace for the kids to wear, and snack on!
Candy Cornucopia
What You'll Need:
Sugar Waffle Cones
Fruit Shaped Candies or cereal or Nuts & Dried Fruit
Decorating frosting with a writing tip
Have the kids or an adult write their names on the side of the waffle cone. Once it's dried, let the kids scoop some candies or dried fruit & nuts into the cone for their own cornucopia Thanksgiving treat!
Thumbprint Turkey Placecards
What You'll Need:
Ink pads in various fall colors- browns, golds, oranges, reds, and yellows
Black & Red Marker
Construction Paper or Card Stock
-
Press a thumb into the inkpad and then on paper to print a turkey's body. Use the same technique with fingertips to create a head and feathers.
-
Use markers to add a beak, wattle and feet.
-
Complete the cards by writing in guests' names
Thanksgiving Turkey Treat Holder
Once Halloween passes, it's all too easy to rush right past Thanksgiving, and zoom towards Christmas. Planning, decorating, shopping... it can take over! Thanksgiving is a holiday rich in tradition, and family. Here is a craft idea I found online today, that I think would make for a fun weekend project. It would be inexpensive, and would make for a fun addition to any Thanksgiving table this November!
Turkey Treat Holder
What You'll Need:
Small Terra Cotta Pots- probably votive candle sized.
Sheets of foam or felt in red, yellow, orange, & brown
Googly eyes
Glue
Candy
If you are having a large gathering, these would make for a good craft to keep the younger group busy while the adults make the meals.
Turkey Treat Holder
What You'll Need:
Small Terra Cotta Pots- probably votive candle sized.
Sheets of foam or felt in red, yellow, orange, & brown
Googly eyes
Glue
Candy
- Start by cutting 5 "feather" shapes from the red, yellow, & orange colored foam or felt. You'll want an assortment, with 5 total 'feathers'.
- Cut a heart shape from the red foam or felt, and a small triangle from the orange felt or foam.
- Next, cut a long oval from the brown foam or felt. This will be your turkey's head.
- Glue the googly eyes in place on the head, near one end. Glue the orange triangle just below it, with one of the points aiming towards the side.
- Glue the heart onto the bottom of the pot, so that the two rounded humps stick out like feet.
- Glue the feathers into place on the back, over lapping them from the center outward in a fan shape.
- Once the eyes & beak are dry, glue the head onto the front of the pot.
- When the turkey is completely dry, fill with candy, and set them out.
If you are having a large gathering, these would make for a good craft to keep the younger group busy while the adults make the meals.
Thursday, October 22, 2009
Gifts Kids Can Make
I have 3 kids, and a whole lot of extended family. While we no longer try to buy for everyone, I do like to give something to as many people as I can, even if it's something small. This year, we are focusing on homemade gifts, such as the Christmas Dishtowel Angel.

With 3 kids, there is no reason not to involve them in the process as well! What Grandparent doesn't love a small homemade ornament, or a card? Or hand print art? While Christmas is still 2 months away, now is the time to get started on craft projects, so that you don't feel so rushed when December arrives. I like to set aside a Saturday with no other plans, and let the kids get creative.

Here are a few idea's I've been looking at to help get the kids into the spirit, and to help cut back on our Christmas gift costs.
Reindeer Pots
What You'll Need:
Scissors
Craft Glue, Hot Glue, or Glue Dots (school glue won't cut it on this one)
Terracotta clay pots- any size you want, but a 4-5" would work nice
Plastic google eyes
Red pom-poms- glittery or non
Three shades of brown craft foam, cardstock paper, or construction paper- your choice.
Tulle or netting to wrap candy in unless the candy is wrapped already
Pretty ribbon if you use the tulle or netting
Holiday Candy
You are going to need to make 2 antlers (dark brown), 2 large ears (medium brown), and 2 slightly smaller ears (light brown) to be the 'inside' of the ear. You'll also need 2 eyes, and 1 red nose.
If you have a larger pot, the easiest way to make the ears is using a child's hand to trace the shape. With the smaller pots, simply draw an ear shape on the medium you choose from the darkest brown color.
Glue the middle ear to the bigger ear, then glue that to the middle bottom of the antlers. Glue the antlers to the inside rim of the pot in the back.
Glue the eyes to the middle of the front of the pot, and the red pom pom nose under that, near the bottom of the pot.
Fill with wrapped candies, or make a tulle or net bag to wrap candies such as M & M's into. Voila- a cute reindeer candy dish to give away. This is great for teachers.

Beaded Ornaments
What you'll need:
Pony beads in assorted colors
Tinsel pipe cleaners
Jingle Bells
This is basically just bead stringing, and twisting the wire to create shapes.
Similar to the Holiday Napkin Rings, you can make a snowman. Bead about 18-20 beads in the middle, then twist to create the bigger snowball. String 12-14 beads onto the remaining portion, leaving enough space to twist the strands together on top.
Cut 3 pipe cleaners in half. Laying flat, twist two of them together in the middle to create a cross shape. Use the remaining two to create an X shape on top of the cross. String 3 beads towards the center of each strand to create a sparkling snow flake.
Use a gold pipe cleaner to form a bell- fold the pipe cleaner in half, and pinch a small bit of the bed to twist. Fluff it out to a circle to create a hanger. Now, shape the two end strands into a small bell shape, bending the ends towards each other to form the bottom. String 1 small jingle bell to the bottom center as you twist the ends together.
These ornaments make a great addition to a tag on top of a gift, and take hardly any time at all.
Christmas Puzzle Frame
What You'll Need:
Assorted puzzle pieces, any size
Red paint
Green paint
Paint brush
Glue
An old picture frame- this works better if the frame is flat, and not decorative with edges and bumps, and designs
Thin holiday ribbon
Glitter
Have the kids paint the puzzle pieces green or red, leaving an assortment of both. While still wet, the kids can sprinkle glitter onto the pieces. Once they are dry, the child can start gluing them to the frame, covering the whole outer side of it. Let this dry flat over night.
Once it's dry, tie a bow to place in the top corner, then run ribbon trails across the top, and down the side, gluing them into place here and there to create a bump going down it.
You can add a pretty picture from a past holiday if you would like, or the kids school photo, or leave it empty. This is a great craft for all those puzzles that are missing a piece or two.
The frame is my own directions, based on doing this when I was younger. Here are some alternate plans I found online, which differ, but could be a lot more frugal!
Christmas Puzzle Frame Alternate Directions
Christmas Dishtowel Angel

This year, I'm concentrating on making items for gifts, instead of buying them. Here is my first attempt- A Dishtowel Angel.
You'll Need:
Ribbon (I've made 2 so far- one using wide, pretty, wired ribbon, and one using curling ribbon. The curling works better, the pretty ribbon looks better)
1 pot holder
1 dish towel
1 dish cloth or wash cloth
 I shopped for supplies at Dollar Tree, and had decent luck. Almost all of their pot holders come in a 2 pack, as do their dish cloths. So far, though, I have not found any dish towels that came with more than 1, so that's the expensive addition at $1 each, instead of $.50. The total cost for this angel is $2 to make, if I don't count the cost of the ribbon, which is pennies since I can use it for quite a few angels.
 Step 1: Fold the dish towel accordion style, length wise. I try to make sure the end edges are
folded towards the back, not the front. If you use a patterned dish towel, that is the "front" side. (See above)
 Step 2: Fold the dish towel in half, and tie a ribbon around it near the tie, to create a
rounded "head" for the angel. (See above & below)


Step 3: Next, fold the dish cloth accordion style as well, also length wise,
if it's more rectangular than square. Set this aside without tying it. (See above)
 Step 4: Pinch the pot holder semi-accordion style in the middle. Try it from
different angles to see how you like it best. (See above)
 Step 5: While still pinching the pot holder, place the folded dish cloth on top of the front of the
wings, then tie them together. It should resemble a bow. (See above & below)

 Step 6: Set the angel's body on top of the wings, and using a criss cross pattern,
tie the wings to the body. (See above)
 Step 7: Last, gather the dish cloth "arms" together in front of the body, and tie them both
together near the ends of the cloth, so that they resemble two arms with the
hands clasped together in front of the angel. (See above)
I have not tried it yet, and likely won't, but you can use a chenille stem (pipe cleaner) to form a halo to go over top of the angel's head. Simply create a longer 'stick' on the end of the halo, and secure it between the wings & arms, and the body, so it rests over her head.
I think I may pick up some small flowers of some sort to add to the 'hand' part. When putting these together, keep in mind that they are a functional gift as well, so don't glue or cut the items to add things, unless you do not care if they are functional items still.
Here are some poems I have found on various websites that you can print out and attach to your little angel.
I am your Kitchen Angel
I'll watch over all you do,
Baking all those goodies,
And snitching one or two!
And if you ever tire of me,
Or some help is what your wish is,
Just untie my little ribbons,
And I'll help you with the dishes!
I'll watch over all you do,
Baking all those goodies,
And snitching one or two!
And if you ever tire of me,
Or some help is what your wish is,
Just untie my little ribbons,
And I'll help you with the dishes!
~~~~~~~~~~~~~~~~~~~~~~~~~~
An angel in the Kitchen
Watching the stew
Blesses your cooking
And all that you do.
Watching the stew
Blesses your cooking
And all that you do.
~~~~~~~~~~~~~~~~~~~~~~~~
These angels are just adorable, and only take about 5-10 minutes to make. For $2, you are able to give a functional gift set, that looks unique, and not like just another store bought gift. Sure, it really is, but the presentation is so much nicer!

Subscribe to:
Posts (Atom)